

Growing sugarcane in buckets might sound like a tropical dream confined to vast plantations, but I’m here to tell you it’s a surprisingly achievable reality, even in your own backyard! Forget those images of sprawling fields; we’re bringing the sweet taste of the tropics to your patio, balcony, or even a sunny windowsill.
Sugarcane, with its rich history dating back thousands of years to Southeast Asia, has been a vital crop and a symbol of sweetness and prosperity across cultures. From ancient Ayurvedic medicine to the modern sugar industry, its significance is undeniable. But what if you could tap into that history and cultivate your own little piece of it, right at home?
Let’s face it, store-bought sugar can be expensive and often lacks the fresh, vibrant flavor of homegrown produce. Plus, there’s something incredibly satisfying about nurturing a plant from a simple stalk to a thriving source of natural sweetness. This DIY guide will provide you with all the essential growing sugarcane in buckets tricks and hacks you need to succeed, regardless of your gardening experience. Imagine the fresh sugarcane juice, the homemade molasses, and the sheer bragging rights you’ll have! So, grab your gardening gloves, and let’s embark on this sweet adventure together!
Growing Sugarcane in Buckets: A Sweet DIY Project
Hey there, fellow gardening enthusiasts! Ever dreamt of harvesting your own sugarcane, right from your backyard (or balcony!)? Well, guess what? You absolutely can, even if you don’t have acres of land. I’m going to walk you through the process of growing sugarcane in buckets 鈥?a fun, rewarding, and surprisingly easy DIY project. Get ready to enjoy the sweet taste of success!
What You’ll Need
Before we dive in, let’s gather our supplies. This is crucial for a smooth and enjoyable experience.
* Sugarcane stalks (seed pieces): You can usually find these at local nurseries, agricultural supply stores, or even online. Look for healthy stalks with visible buds (the “eyes” that will sprout). Make sure they are disease-free.
* Large buckets (at least 15-20 gallons): The bigger, the better! Sugarcane needs room for its roots to grow. I recommend using food-grade buckets if possible.
* Well-draining potting mix: A mix of garden soil, compost, and perlite or vermiculite works wonders. Good drainage is essential to prevent root rot.
* Sharp knife or pruning shears: For cutting the sugarcane stalks into seed pieces.
* Watering can or hose: For, well, watering!
* Fertilizer (optional): A balanced fertilizer or one specifically formulated for sugarcane can boost growth.
* Gloves: To protect your hands.
* Sunlight: Sugarcane loves sunshine, so choose a sunny spot.
* Patience: Growing sugarcane takes time, so be prepared to wait.
Preparing the Sugarcane Seed Pieces
This is a crucial step to ensure successful germination. We need to encourage those buds to sprout!
1. Inspect the stalks: Carefully examine your sugarcane stalks. Look for healthy, plump buds. Avoid stalks that are dry, shriveled, or show signs of disease.
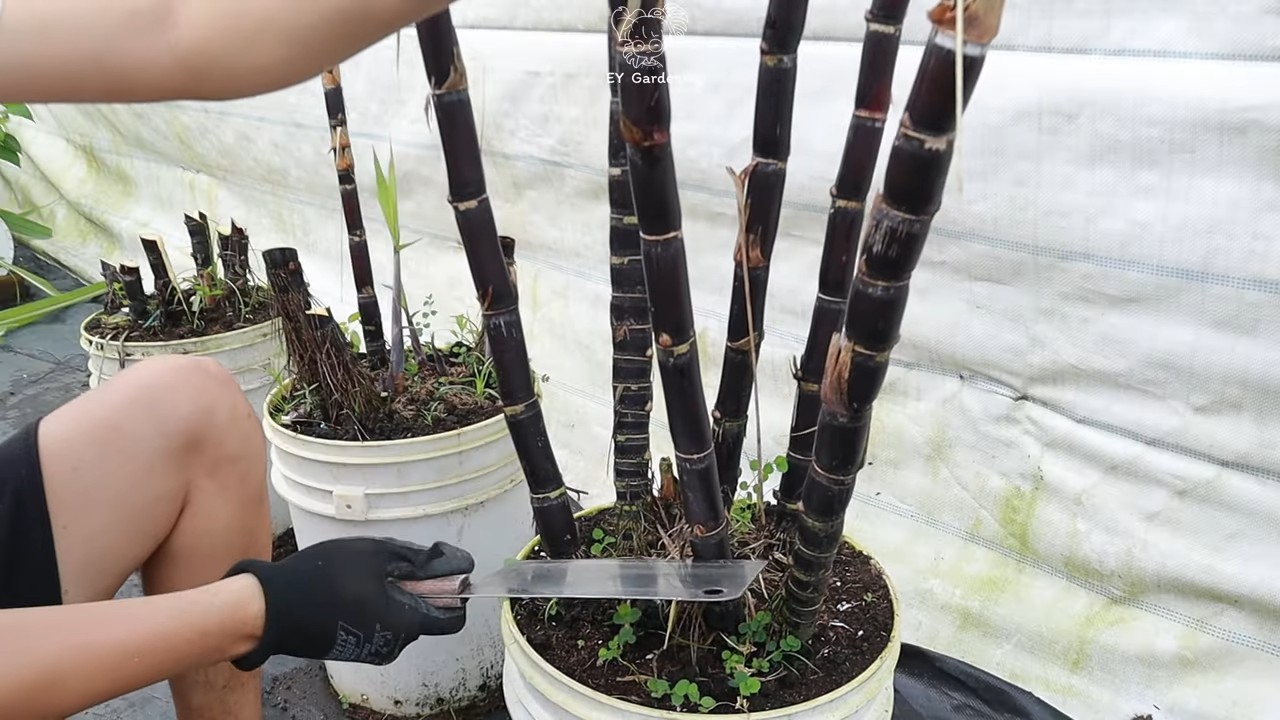
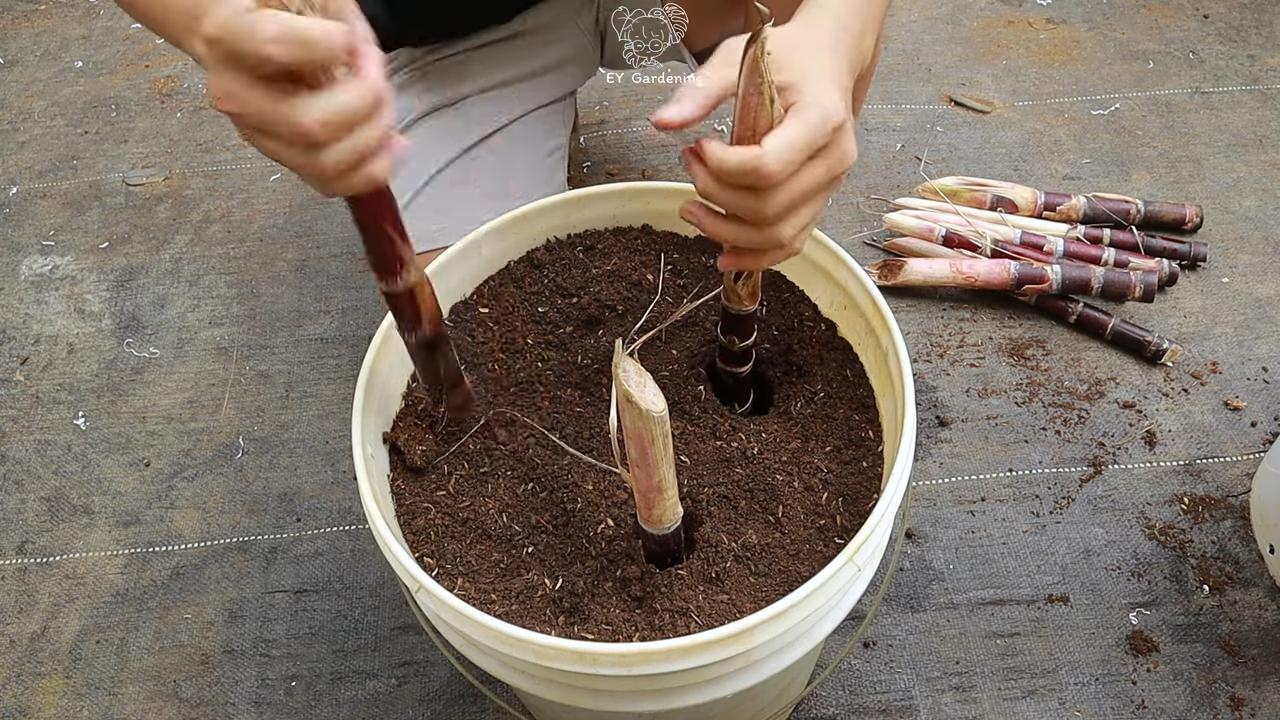
2. Cut the stalks into sections: Using your sharp knife or pruning shears, cut the sugarcane stalks into sections, each containing at least two or three buds. I usually aim for sections that are about 6-8 inches long.
3. Prepare the cut ends: To prevent infection and encourage rooting, you can dip the cut ends of the sugarcane sections in rooting hormone (optional, but recommended) or a fungicide solution.
4. Curing (optional but recommended): This step helps to prevent rot. Place the cut sugarcane sections in a cool, dry, and shaded area for a few days (2-3 days) to allow the cut ends to callous over. This will help protect them from fungal infections when planted.
Planting the Sugarcane
Now for the fun part 鈥?getting those sugarcane pieces into the buckets!
1. Prepare the buckets: Make sure your buckets have drainage holes at the bottom. If they don’t, drill some! Good drainage is absolutely vital.
2. Fill the buckets with potting mix: Fill the buckets with your well-draining potting mix, leaving about 2-3 inches of space at the top.
3. Plant the sugarcane sections: There are two main ways to plant the sugarcane sections:
* Horizontal planting: Lay the sugarcane sections horizontally on top of the potting mix, with the buds facing upwards or sideways. Cover them with about 1-2 inches of potting mix. This method encourages multiple shoots to emerge.
* Vertical planting: Plant the sugarcane sections vertically, with one end buried in the potting mix and the other end exposed. Make sure at least one bud is above the soil line. This method tends to produce a single, strong stalk.
I personally prefer horizontal planting as it gives me more stalks per bucket.
4. Water thoroughly: After planting, water the buckets thoroughly until water drains out of the bottom. This will help settle the soil and provide moisture for germination.
Caring for Your Sugarcane
This is where the real commitment comes in. Sugarcane needs consistent care to thrive.
1. Sunlight: Place the buckets in a location that receives at least 6-8 hours of direct sunlight per day. Sugarcane is a sun-loving plant!
2. Watering: Keep the soil consistently moist, but not waterlogged. Water deeply whenever the top inch of soil feels dry to the touch. During hot weather, you may need to water more frequently.
3. Fertilizing: Sugarcane is a heavy feeder, so regular fertilization is beneficial. Use a balanced fertilizer (e.g., 10-10-10) or one specifically formulated for sugarcane. Follow the instructions on the fertilizer package. I usually fertilize every 2-3 weeks during the growing season.
4. Weeding: Keep the buckets free of weeds, as they can compete with the sugarcane for nutrients and water.
5. Mulching (optional): Applying a layer of mulch around the base of the sugarcane stalks can help retain moisture, suppress weeds, and regulate soil temperature.
6. Support (optional): As the sugarcane stalks grow taller, they may need support to prevent them from falling over. You can use stakes or trellises to provide support.
7. Pest and disease control: Keep an eye out for pests and diseases. Common sugarcane pests include aphids, sugarcane borers, and scale insects. Diseases can include red rot and smut. Treat any infestations or infections promptly with appropriate insecticides or fungicides. Organic options are available.
Harvesting Your Sugarcane
The moment you’ve been waiting for! Harvesting your own sugarcane is incredibly satisfying.
1. Timing: Sugarcane typically takes 9-12 months to mature, depending on the climate and growing conditions. You’ll know it’s ready to harvest when the stalks are thick, hard, and have a high sugar content. A good indicator is when the leaves start to dry out and turn brown.
2. Testing for ripeness: You can test for ripeness by cutting a small piece of the stalk and chewing on it. If it’s sweet and juicy, it’s ready to harvest.
3. Harvesting: To harvest, use a sharp knife or machete to cut the sugarcane stalks at the base, close to the soil line.
4. Processing (optional): After harvesting, you can process the sugarcane to extract the juice. This can be done using a sugarcane juicer or by crushing the stalks and squeezing out the juice. The juice can be used to make sugarcane juice, sugar, or other products.
Troubleshooting
Even with the best planning, things can sometimes go wrong. Here are a few common issues and how to address them:
* Poor germination: If your sugarcane sections don’t sprout, it could be due to several factors, such as poor quality seed pieces, improper planting depth, or lack of moisture. Make sure your seed pieces are healthy, plant them at the correct depth, and keep the soil consistently moist.
* Slow growth: Slow growth can be caused by insufficient sunlight, lack of nutrients, or poor soil drainage. Ensure your sugarcane is getting enough sunlight, fertilize regularly, and make sure the soil is well-draining.
* Yellowing leaves: Yellowing leaves can indicate a nutrient deficiency, such as nitrogen or iron. Fertilize with a balanced fertilizer or one specifically formulated for sugarcane.
* Pest infestations: Treat any pest infestations promptly with appropriate insecticides. Organic options are available.
* Disease: Remove any infected leaves or stalks and treat with an appropriate fungicide. Ensure good air circulation to prevent fungal diseases.
Tips for Success
Here are a few extra tips to help you succeed in growing sugarcane in buckets:
* Choose the right variety: Some sugarcane varieties are better suited for container growing than others. Ask your local nursery for recommendations.
* Start with healthy seed pieces: The quality of your seed pieces is crucial for success. Choose healthy, disease-free stalks with visible buds.
* Provide adequate drainage: Good drainage is essential to prevent root rot. Make sure your buckets have drainage holes and use a well-draining potting mix.
* Water regularly: Keep the soil consistently moist, but not waterlogged.
* Fertilize regularly: Sugarcane is a heavy feeder, so regular fertilization is beneficial.
* Protect from frost: Sugarcane is sensitive to frost. If you live in an area with cold winters, you’ll need to protect your plants from frost by moving them indoors or covering them with a frost blanket.
* Be patient: Growing sugarcane takes time, so be patient and don’t get discouraged if you don’t see results immediately.
Growing sugarcane in buckets is a rewarding and enjoyable DIY project. With a little bit of effort and care, you can harvest your own sweet sugarcane, right from your backyard or balcony. Happy gardening!
Conclusion
So, there you have it! Growing sugarcane in buckets is not only possible, but it’s also a surprisingly rewarding experience, especially for those of us who don’t have acres of farmland at our disposal. This DIY trick transforms the seemingly impossible into a tangible reality, bringing a touch of the tropics right to your backyard, balcony, or even your sunny windowsill.
Why is this a must-try? Because it empowers you to connect with your food source in a way that store-bought sugarcane simply can’t. Imagine the satisfaction of harvesting your own sweet stalks, knowing exactly where they came from and how they were grown. It’s a fantastic educational opportunity for kids, a conversation starter for guests, and a unique way to add a touch of exotic flair to your garden.
Beyond the sheer novelty, growing sugarcane in buckets offers practical benefits. You control the soil quality, ensuring your plants receive the nutrients they need. You can easily move the buckets to optimize sunlight exposure or protect them from harsh weather. And, let’s be honest, there’s something incredibly satisfying about nurturing a plant from a small cutting to a towering stalk.
But don’t stop there! Experiment with different sugarcane varieties. Some are known for their higher sugar content, while others boast unique colors and flavors. Try adding companion plants to your buckets, such as basil or marigolds, to deter pests and attract beneficial insects. Consider using different types of fertilizer to see how they impact growth and yield. The possibilities are endless!
For a spicier twist, consider infusing your irrigation water with a diluted chili pepper solution. This can help deter pests and may even impart a subtle, intriguing flavor to the sugarcane. Or, if you’re feeling adventurous, try fermenting your harvested sugarcane juice to create your own homemade rum! (Remember to research local regulations and responsible brewing practices before attempting this.)
We wholeheartedly encourage you to give this DIY trick a try. It’s easier than you might think, and the rewards are well worth the effort. Don’t be afraid to experiment, learn from your mistakes, and most importantly, have fun!
Once you’ve embarked on your sugarcane-growing journey, we’d love to hear about your experiences. Share your photos, tips, and challenges in the comments below. Let’s create a community of sugarcane enthusiasts and learn from each other. Together, we can unlock the secrets to successfully growing this tropical treasure in even the most unlikely of places. Remember, mastering the art of growing sugarcane in buckets is a journey, not a destination. Embrace the process, enjoy the fruits (or rather, the stalks) of your labor, and share your knowledge with the world!
Frequently Asked Questions (FAQ)
1. What type of sugarcane should I grow in a bucket?
The best type of sugarcane to grow in a bucket depends on your climate and personal preferences. However, some varieties are generally more suitable for container gardening than others. Look for varieties that are known for their shorter stature and adaptability to different growing conditions. Some popular choices include:
* **’CP 72-2086’**: This variety is known for its high sugar content and relatively compact growth habit. It’s a good choice for beginners.
* **’Lal Pori’**: This is a red sugarcane variety that is popular in India. It is known for its sweetness and is relatively easy to grow.
* **’Black Magic’**: This variety has a dark purple stalk and is prized for its ornamental value as well as its sweet juice.
* **’Green Sugar Cane’**: A common variety that is readily available and adapts well to container growing.
When selecting your sugarcane variety, consider factors such as your local climate, the size of your buckets, and your desired sugar content. It’s also a good idea to check with your local agricultural extension office to see which varieties are best suited for your region.
2. What size bucket is best for growing sugarcane?
A minimum of 10-gallon bucket is recommended, but larger is always better. Sugarcane has an extensive root system, and a larger bucket will provide ample space for the roots to grow and develop. A 20-gallon or larger bucket is ideal for optimal growth and yield. Make sure the bucket has drainage holes to prevent waterlogging.
3. What kind of soil should I use?
Sugarcane thrives in well-draining, fertile soil. A good mix would be:
* 1 part garden soil
* 1 part compost or well-rotted manure
* 1 part perlite or coarse sand
This mixture provides good drainage, aeration, and nutrients for the sugarcane plants. You can also add a slow-release fertilizer to the soil mix to provide a steady supply of nutrients throughout the growing season.
4. How much sunlight does sugarcane need?
Sugarcane needs at least 6-8 hours of direct sunlight per day to thrive. Choose a location that receives plenty of sunlight throughout the day. If you live in a particularly hot climate, you may need to provide some afternoon shade to prevent the leaves from scorching.
5. How often should I water my sugarcane plants?
Sugarcane needs consistent moisture, especially during the growing season. Water deeply whenever the top inch of soil feels dry to the touch. Avoid overwatering, as this can lead to root rot. In hot weather, you may need to water your plants daily.
6. How do I fertilize my sugarcane plants?
Sugarcane is a heavy feeder, so regular fertilization is essential for optimal growth. Use a balanced fertilizer (e.g., 10-10-10) every 4-6 weeks during the growing season. You can also supplement with organic fertilizers such as compost tea or fish emulsion.
7. How long does it take for sugarcane to mature?
Sugarcane typically takes 9-12 months to mature, depending on the variety and growing conditions. You’ll know it’s ready to harvest when the stalks are thick and the leaves begin to dry out.
8. How do I harvest sugarcane?
To harvest sugarcane, use a sharp knife or machete to cut the stalks at the base. Remove the leaves and any dried portions of the stalk. You can then chew on the stalks to extract the sweet juice, or you can use a sugarcane juicer to extract the juice for other purposes.
9. Can I grow sugarcane indoors?
While it’s possible to grow sugarcane indoors, it can be challenging due to the plant’s high light requirements. If you do choose to grow sugarcane indoors, make sure to provide it with plenty of bright, direct sunlight. You may also need to supplement with artificial grow lights.
10. What are some common pests and diseases that affect sugarcane?
Some common pests that affect sugarcane include aphids, sugarcane borers, and spider mites. Common diseases include red rot and smut. You can prevent these problems by providing your plants with proper care and by inspecting them regularly for signs of pests or diseases. If you do find any problems, treat them promptly with appropriate insecticides or fungicides. Neem oil is a good organic option for pest control.
11. Can I propagate sugarcane from cuttings?
Yes, sugarcane can be easily propagated from cuttings. Take a cutting from a mature stalk that has at least two nodes (the bumps on the stalk where leaves grow). Plant the cutting horizontally in a pot of moist soil, with the nodes facing upwards. Keep the soil moist and warm, and the cutting should sprout within a few weeks.
12. What if my sugarcane isn’t producing much sugar?
Several factors can contribute to low sugar content in sugarcane. Insufficient sunlight, inadequate fertilization, and improper watering can all affect sugar production. Make sure your plants are receiving at least 6-8 hours of direct sunlight per day, fertilize them regularly with a balanced fertilizer, and water them deeply whenever the top inch of soil feels dry. Also, ensure the sugarcane is allowed to fully mature before harvesting.


Leave a Comment