

Balcony Guava Tree Growing might seem like a tropical dream reserved for sprawling orchards, but I’m here to tell you it’s absolutely achievable, even if your “garden” is a cozy balcony! Forget the notion that you need acres of land to enjoy the sweet, tangy taste of homegrown guavas. This DIY guide is your passport to cultivating your very own guava paradise, right outside your door.
Guava, a fruit steeped in history and cultural significance, has been enjoyed for centuries across tropical and subtropical regions. From its use in traditional medicine to its place in vibrant culinary traditions, the guava holds a special place in many cultures. Imagine bringing that rich heritage to your own home!
But why should you embark on this Balcony Guava Tree Growing adventure? Well, beyond the sheer joy of nurturing a plant and harvesting your own fruit, growing your own guava tree offers a fantastic way to connect with nature, even in a limited space. Plus, you’ll have access to fresh, organic guavas, free from the pesticides and long-distance transportation associated with store-bought fruit. This DIY project is perfect for anyone looking to add a touch of the tropics to their urban life, and I’m excited to show you how!
Growing Guava on Your Balcony: A DIY Guide
Hey there, fellow plant enthusiasts! Ever dreamt of plucking a juicy guava right from your own balcony? Well, dream no more! Growing guava in containers is totally doable, and I’m here to guide you through the entire process. It might seem intimidating at first, but trust me, with a little patience and the right know-how, you’ll be enjoying homegrown guavas in no time.
Choosing the Right Guava Variety
Not all guava varieties are created equal, especially when it comes to container gardening. You’ll want to opt for a dwarf or semi-dwarf variety that won’t outgrow your balcony space. Here are a few of my personal favorites:
* ‘Ruby Supreme’: This variety produces medium-sized, pink-fleshed guavas with a sweet and slightly acidic flavor. It’s known for its relatively compact size and good fruit production in containers.
* ‘Mexican Cream’: If you prefer a milder, sweeter guava, ‘Mexican Cream’ is an excellent choice. The fruits are yellow-skinned with creamy white flesh. It’s also relatively cold-hardy compared to other varieties.
* ‘Tropical White’: This is another great option for container growing. It produces medium to large sized fruits with white flesh and a sweet, aromatic flavor.
* ‘Patillo’: A smaller variety, perfect for smaller balconies. It produces yellow skinned fruit with pink flesh.
Important Note: Always check the mature size of the variety you choose to ensure it’s suitable for container growing. Look for varieties that are grafted onto dwarfing rootstock, as these will stay smaller and more manageable.
Gathering Your Supplies
Before we dive into the planting process, let’s make sure you have everything you need. Here’s a checklist of essentials:
* A large container: Choose a container that’s at least 24 inches in diameter and depth. The bigger, the better, as it will give your guava tree plenty of room to grow. Make sure it has drainage holes!
* High-quality potting mix: Avoid using garden soil, as it can become compacted in containers. Opt for a well-draining potting mix specifically formulated for container gardening. I like to use a mix of peat moss, perlite, and vermiculite.
* Guava tree sapling: Purchase a healthy sapling from a reputable nursery. Look for a tree with strong branches and healthy green leaves.
* Slow-release fertilizer: Guava trees are heavy feeders, so a slow-release fertilizer will provide them with the nutrients they need over an extended period.
* Watering can or hose: You’ll need a way to water your guava tree regularly.
* Pruning shears: Pruning is essential for maintaining the shape and size of your guava tree.
* Mulch: Mulch helps retain moisture in the soil and suppress weeds.
* Optional: A trellis or support structure if you choose a variety that tends to be a bit sprawling.
Planting Your Guava Tree
Now for the fun part! Let’s get your guava tree planted in its new home.
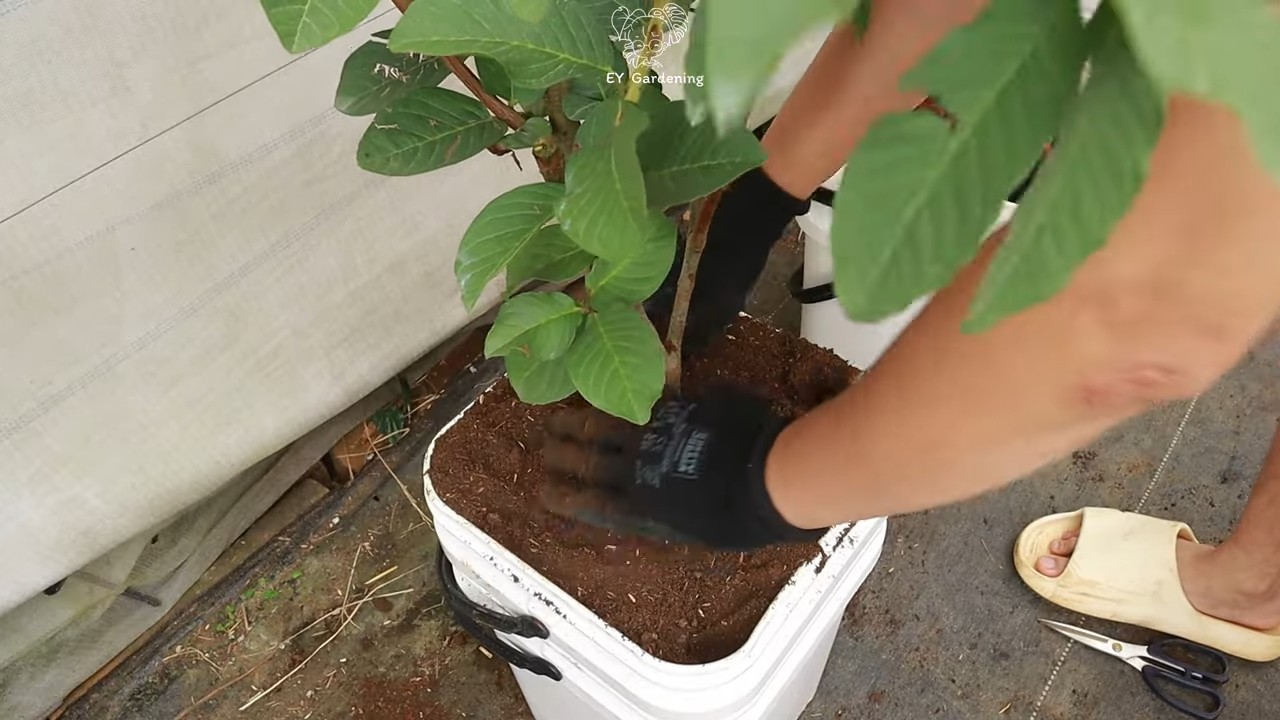
1. Prepare the container: Make sure your container is clean and has adequate drainage holes. If the drainage holes are large, you might want to cover them with a piece of landscape fabric to prevent soil from washing out.
2. Fill the container with potting mix: Fill the container about one-third full with your chosen potting mix.
3. Remove the guava tree from its nursery pot: Gently loosen the root ball by tapping the sides of the pot. Carefully remove the tree from the pot, being careful not to damage the roots.
4. Inspect the roots: If the roots are tightly bound, gently tease them apart with your fingers. This will encourage them to grow outwards into the new potting mix.
5. Position the tree in the container: Place the guava tree in the center of the container, making sure the top of the root ball is level with the top of the potting mix.
6. Fill the remaining space with potting mix: Add more potting mix around the root ball, gently firming it down as you go. Leave about an inch or two of space between the top of the potting mix and the rim of the container.
7. Water thoroughly: Water the newly planted guava tree thoroughly until water drains out of the drainage holes. This will help settle the soil and ensure the roots are well-hydrated.
8. Add mulch: Apply a layer of mulch around the base of the tree, keeping it a few inches away from the trunk. This will help retain moisture and suppress weeds.
Caring for Your Guava Tree
Once your guava tree is planted, it’s time to provide it with the care it needs to thrive.
Sunlight
Guava trees need plenty of sunlight to produce fruit. Aim for at least 6-8 hours of direct sunlight per day. If your balcony doesn’t get enough sunlight, you might consider using a grow light to supplement.
Watering
Water your guava tree regularly, especially during hot, dry weather. The soil should be kept consistently moist, but not soggy. Check the soil moisture by sticking your finger into the soil. If the top inch feels dry, it’s time to water. Reduce watering during the winter months when the tree is dormant.
Fertilizing
Guava trees are heavy feeders and benefit from regular fertilization. Apply a slow-release fertilizer specifically formulated for fruit trees in the spring and again in the summer. Follow the instructions on the fertilizer package for application rates. You can also supplement with liquid fertilizer every few weeks during the growing season.
Pruning
Pruning is essential for maintaining the shape and size of your guava tree and encouraging fruit production. Prune your tree in late winter or early spring before new growth begins. Remove any dead, damaged, or crossing branches. You can also prune to shape the tree and encourage branching.
Pest and Disease Control
Guava trees are generally resistant to pests and diseases, but they can occasionally be affected by aphids, scale, or fruit flies. Inspect your tree regularly for signs of pests or diseases. If you notice any problems, treat them promptly with an appropriate insecticide or fungicide. Organic options are always preferable.
Overwintering
Guava trees are tropical plants and are not cold-hardy. If you live in an area with cold winters, you’ll need to protect your tree from frost. You can either move the container indoors to a bright, sunny location or wrap the container with burlap or blankets to insulate the roots. Reduce watering during the winter months.
Pollination
Guava trees are self-pollinating, meaning they don’t need another tree to produce fruit. However, cross-pollination can improve fruit set and quality. If you have multiple guava trees, you can encourage cross-pollination by hand-pollinating the flowers. Use a small paintbrush to transfer pollen from one flower to another.
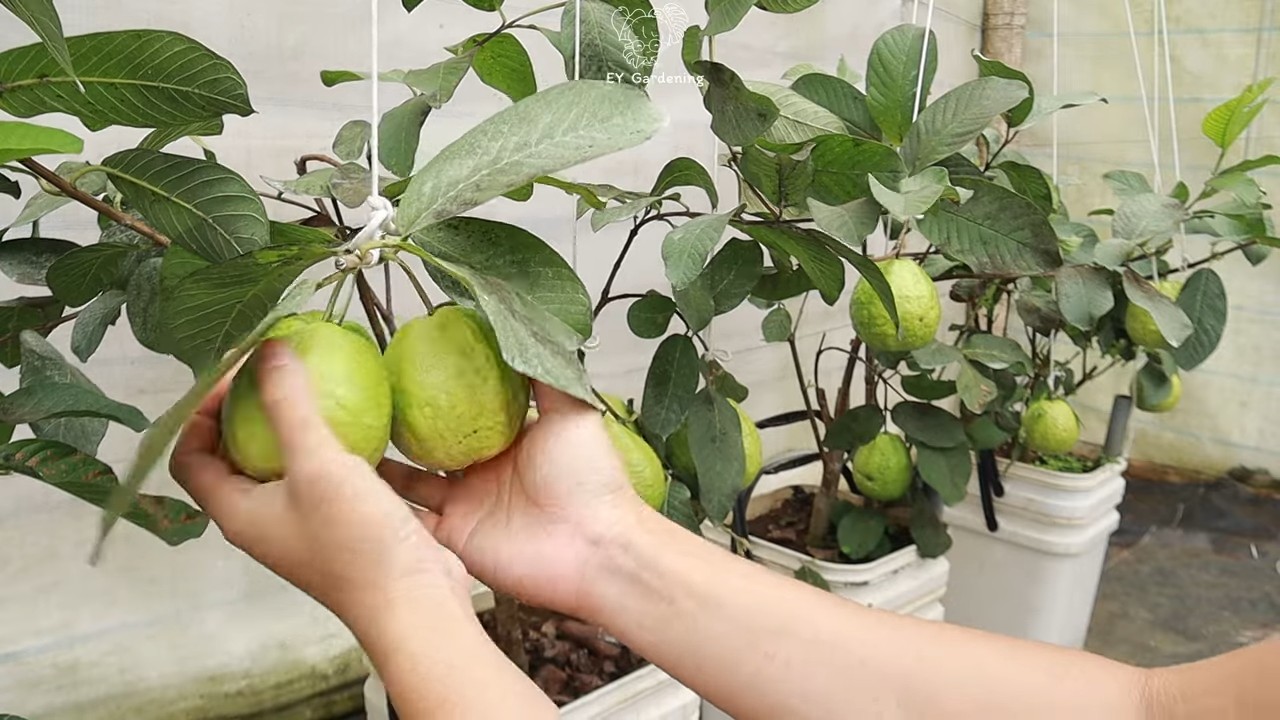
Harvesting
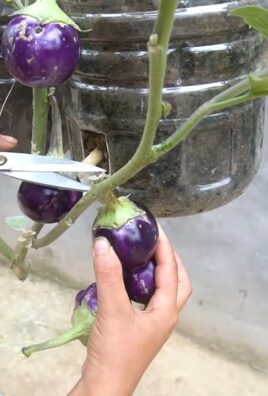
The time it takes for your guava tree to produce fruit will depend on the variety and growing conditions. Generally, you can expect to harvest your first fruits within 2-4 years of planting. Guavas are ripe when they turn yellow or pink and have a fragrant aroma. The fruit should also be slightly soft to the touch. Gently twist the fruit from the branch to harvest.
Troubleshooting
Even with the best care, you might encounter some challenges along the way. Here are a few common problems and how to address them:
* Yellowing leaves: This could be a sign of overwatering, underwatering, or nutrient deficiency. Check the soil moisture and adjust your watering accordingly. Fertilize your tree with a balanced fertilizer.
* Leaf drop: Leaf drop can be caused by stress, such as sudden changes in temperature or humidity. Make sure your tree is getting adequate sunlight and water.
* Lack of fruit: This could be due to insufficient sunlight, poor pollination, or nutrient deficiency. Make sure your tree is getting at least 6-8 hours of direct sunlight per day. Hand-pollinate the flowers to improve fruit set. Fertilize your tree with a fertilizer specifically formulated for fruit trees.
Hey there, fellow plant enthusiasts! Ever dreamt of plucking a juicy guava right from your own balcony? Well, dream no more! Growing guava in containers is totally doable, and I’m here to guide you through the entire process. It might seem intimidating at first, but trust me, with a little patience and the right know-how, you’ll be enjoying homegrown guavas in no time.
Choosing the Right Guava Variety
Not all guava varieties are created equal, especially when it comes to container gardening. You’ll want to opt for a dwarf or semi-dwarf variety that won’t outgrow your balcony space. Here are a few of my personal favorites:
* ‘Ruby Supreme’: This variety produces medium-sized, pink-fleshed guavas with a sweet and slightly acidic flavor. It’s known for its relatively compact size and good fruit production in containers.
* ‘Mexican Cream’: If you prefer a milder, sweeter guava, ‘Mexican Cream’ is an excellent choice. The fruits are yellow-skinned with creamy white flesh. It’s also relatively cold-hardy compared to other varieties.
* ‘Tropical White’: This is another great option for container growing. It produces medium to large sized fruits with white flesh and a sweet, aromatic flavor.
* ‘Patillo’: A smaller variety, perfect for smaller balconies. It produces yellow skinned fruit with pink flesh.
Important Note: Always check the mature size of the variety you choose to ensure it’s suitable for container growing. Look for varieties that are grafted onto dwarfing rootstock, as these will stay smaller and more manageable.
Gathering Your Supplies
Before we dive into the planting process, let’s make sure you have everything you need. Here’s a checklist of essentials:
* A large container: Choose a container that’s at least 24 inches in diameter and depth. The bigger, the better, as it will give your guava tree plenty of room to grow. Make sure it has drainage holes!
* High-quality potting mix: Avoid using garden soil, as it can become compacted in containers. Opt for a well-draining potting mix specifically formulated for container gardening. I like to use a mix of peat moss, perlite, and vermiculite.
* Guava tree sapling: Purchase a healthy sapling from a reputable nursery. Look for a tree with strong branches and healthy green leaves.
* Slow-release fertilizer: Guava trees are heavy feeders, so a slow-release fertilizer will provide them with the nutrients they need over an extended period.
* Watering can or hose: You’ll need a way to water your guava tree regularly.
* Pruning shears: Pruning is essential for maintaining the shape and size of your guava tree.
* Mulch: Mulch helps retain moisture in the soil and suppress weeds.
* Optional: A trellis or support structure if you choose a variety that tends to be a bit sprawling.
Planting Your Guava Tree
Now for the fun part! Let’s get your guava tree planted in its new home.
1. Prepare the container: Make sure your container is clean and has adequate drainage holes. If the drainage holes are large, you might want to cover them with a piece of landscape fabric to prevent soil from washing out.
2. Fill the container with potting mix: Fill the container about one-third full with your chosen potting mix.
3. Remove the guava tree from its nursery pot: Gently loosen the root ball by tapping the sides of the pot. Carefully remove the tree from the pot, being careful not to damage the roots.
4. Inspect the roots: If the roots are tightly bound, gently tease them apart with your fingers. This will encourage them to grow outwards into the new potting mix.
5. Position the tree in the container: Place the guava tree in the center of the container, making sure the top of the root ball is level with the top of the potting mix.
6. Fill the remaining space with potting mix: Add more potting mix around the root ball, gently firming it down as you go. Leave about an inch or two of space between the top of the potting mix and the rim of the container.
7. Water thoroughly: Water the newly planted guava tree thoroughly until water drains out of the drainage holes. This will help settle the soil and ensure the roots are well-hydrated.
8. Add mulch: Apply a layer of mulch around the base of the tree, keeping it a few inches away from the trunk. This will help retain moisture and suppress weeds.
Caring for Your Guava Tree
Once your guava tree is planted, it’s time to provide it with the care it needs to thrive.
Sunlight
Guava trees need plenty of sunlight to produce fruit. Aim for at least 6-8 hours of direct sunlight per day. If your balcony doesn’t get enough sunlight, you might consider using a grow light to supplement.
Watering
Water your guava tree regularly, especially during hot, dry weather. The soil should be kept consistently moist, but not soggy. Check the soil moisture by sticking your finger into the soil. If the top inch feels dry, it’s time to water. Reduce watering during the winter months when the tree is dormant.
Fertilizing
Guava trees are heavy feeders and benefit from regular fertilization. Apply a slow-release fertilizer specifically formulated for fruit trees in the spring and again in the summer. Follow the instructions on the fertilizer package for application rates. You can also supplement with liquid fertilizer every few weeks during the growing season.
Pruning
Pruning is essential for maintaining the shape and size of your guava tree and encouraging fruit production. Prune your tree in late winter or early spring before new growth begins. Remove any dead, damaged, or crossing branches. You can also prune to shape the tree and encourage branching.
Pest and Disease Control
Guava trees are generally resistant to pests and diseases, but they can occasionally be affected by aphids, scale, or fruit flies. Inspect your tree regularly for signs of pests or diseases. If you notice any problems, treat them promptly with an appropriate insecticide or fungicide. Organic options are always preferable.
Overwintering
Guava trees are tropical plants and are not cold-hardy. If you live in an area with cold winters, you’ll need to protect your tree from frost. You can either move the container indoors to a bright, sunny location or wrap the container with burlap or blankets to insulate the roots. Reduce watering during the winter months.
Pollination
Guava trees are self-pollinating, meaning they don’t need another tree to produce fruit. However, cross-pollination can improve fruit set and quality. If you have multiple guava trees, you can encourage cross-pollination by hand-pollinating the flowers. Use a small paintbrush to transfer pollen from one flower to another.
Harvesting
The time it takes for your guava tree to produce fruit will depend on the variety and growing conditions. Generally, you can expect to harvest your first fruits within 2-4 years of planting. Guavas are ripe when they turn yellow or pink and have a fragrant aroma. The fruit should also be slightly soft to the touch. Gently twist the fruit from the branch to harvest.
Troubleshooting
Even with the best care, you might encounter some challenges along the way. Here are a few common problems and how to address them:
* Yellowing leaves: This could be a sign of overwatering, underwatering, or nutrient deficiency. Check the soil moisture and adjust your watering accordingly. Fertilize your tree with a balanced fertilizer.
* Leaf drop: Leaf drop can be caused by stress, such as sudden changes in temperature or humidity. Make sure your tree is getting adequate sunlight and water.
* Lack of fruit: This could be due to insufficient sunlight, poor pollination, or nutrient deficiency. Make sure your tree is getting at least 6-8 hours of direct sunlight per day. Hand-pollinate the flowers to improve fruit set. Fertilize your tree with a fertilizer specifically formulated for fruit trees.
* Pest infestations: Treat any pest infestations promptly with an appropriate insecticide. Organic options are always preferable.
Enjoying Your Homegrown Guavas
Congratulations! You’ve successfully grown guava on your balcony. Now it’s time to enjoy the fruits of your labor. Guavas can be eaten fresh, juiced, or used in jams, jellies, and desserts. They’re a delicious and nutritious treat that you can now enjoy right from your own balcony.
Growing guava in containers is a rewarding experience that allows you to enjoy fresh, homegrown fruit even if you don’t have a large garden. With a little patience and the right care, you can have a thriving guava tree on your balcony for years to come. Happy gardening!
Conclusion
So, there you have it! Growing your own guava tree on your balcony isn’t just a whimsical dream; it’s a tangible reality within reach, even if you’re short on space. This DIY approach to cultivating your own tropical fruit oasis is more than just a gardening project; it’s an investment in fresh, flavorful guavas, a connection to nature, and a rewarding experience that will transform your balcony into a vibrant, productive space.
Why is this DIY guava growing trick a must-try? Because it empowers you to enjoy the unparalleled taste of homegrown fruit, bursting with flavor that store-bought varieties simply can’t match. Imagine plucking a perfectly ripe guava, still warm from the sun, and savoring its sweet, slightly tangy flesh. That’s the magic you unlock with this project. Beyond the taste, you’re also gaining control over the growing process, ensuring your guavas are free from harmful pesticides and chemicals. You know exactly what goes into nurturing your tree, giving you peace of mind and a healthier harvest.
But the benefits extend beyond the fruit itself. Nurturing a guava tree is a therapeutic activity, a chance to de-stress and reconnect with the natural world. The vibrant green foliage and the delicate fragrance of the blossoms will transform your balcony into a tranquil retreat, a welcome escape from the hustle and bustle of daily life. Plus, a thriving guava tree is a conversation starter, a unique and eye-catching addition to your outdoor space that will impress your friends and neighbors.
Looking for variations? Consider experimenting with different guava varieties. While the dwarf varieties are ideal for balconies, you might explore other options depending on the size of your container and the available sunlight. Pink guavas, white guavas, and even lemon guavas offer unique flavor profiles and visual appeal. You can also tailor the soil mix to suit your specific climate and growing conditions. Adding organic matter like compost or aged manure will enrich the soil and provide your tree with essential nutrients.
Another exciting variation is to explore different training techniques. You can prune your guava tree to maintain a compact shape, encourage branching, and maximize fruit production. Espaliering, a technique of training trees to grow flat against a wall or fence, is another option for maximizing space and creating a stunning visual display.
We wholeheartedly encourage you to embark on this DIY guava growing adventure. It’s a rewarding experience that will bring joy, flavor, and a touch of the tropics to your balcony. Don’t be afraid to experiment, adapt the techniques to your specific circumstances, and most importantly, have fun!
Once you’ve harvested your first batch of homegrown guavas, we’d love to hear about your experience. Share your photos, tips, and stories with us in the comments below. Let’s create a community of balcony guava growers and inspire others to transform their small spaces into thriving fruit gardens. Your success story could be the inspiration someone else needs to start their own guava growing journey! Remember, the key to success is patience, persistence, and a genuine love for nurturing your guava tree. Happy growing!
Frequently Asked Questions (FAQ)
What is the best type of guava tree to grow on a balcony?
Dwarf guava varieties are the most suitable for balcony growing due to their compact size and manageable growth habit. Look for cultivars specifically labeled as “dwarf” or “patio” guavas. These varieties typically reach a mature height of 4-6 feet, making them ideal for container gardening. Some popular dwarf guava varieties include ‘Nana’ guava and ‘Red Strawberry’ guava. These varieties are known for their delicious fruit and relatively small size, making them perfect for limited spaces. Remember to check the mature size of any guava variety before purchasing to ensure it will fit comfortably on your balcony.
How much sunlight does a balcony guava tree need?
Guava trees thrive in full sun, requiring at least 6-8 hours of direct sunlight per day. Choose a location on your balcony that receives ample sunlight throughout the day. If your balcony is partially shaded, try to position the tree where it receives the most morning sun, as this is generally the strongest and most beneficial. If you live in an area with limited sunlight, you may need to supplement with grow lights to ensure your guava tree receives adequate light for healthy growth and fruit production. Rotate the pot regularly to ensure all sides of the tree receive even exposure to sunlight.
What type of soil is best for growing guavas in containers?
A well-draining potting mix is essential for growing guavas in containers. Avoid using garden soil, as it can become compacted and waterlogged in pots. A good potting mix should consist of a blend of peat moss, perlite, and vermiculite. You can also add compost or aged manure to enrich the soil and provide essential nutrients. The ideal pH level for guava trees is between 5.5 and 7.0. You can test the pH of your soil using a soil testing kit and adjust it accordingly if necessary. Ensure the container has adequate drainage holes to prevent water from accumulating at the bottom.
How often should I water my balcony guava tree?
Water your guava tree regularly, especially during the growing season (spring and summer). The frequency of watering will depend on the weather conditions, the size of the container, and the type of potting mix you are using. Generally, you should water when the top inch of soil feels dry to the touch. Avoid overwatering, as this can lead to root rot. During the dormant season (fall and winter), reduce watering frequency. Check the soil moisture regularly and adjust your watering schedule accordingly.
How often should I fertilize my guava tree?
Fertilize your guava tree regularly during the growing season to promote healthy growth and fruit production. Use a balanced fertilizer specifically formulated for fruit trees. Follow the instructions on the fertilizer packaging for application rates and frequency. You can also use organic fertilizers such as compost tea or fish emulsion. Avoid fertilizing during the dormant season. Regular fertilization will ensure your guava tree receives the necessary nutrients for optimal growth and fruit development.
How do I prune my balcony guava tree?
Pruning is essential for maintaining the shape and size of your balcony guava tree, as well as promoting fruit production. Prune your tree in late winter or early spring, before new growth begins. Remove any dead, damaged, or diseased branches. Thin out crowded branches to improve air circulation and sunlight penetration. You can also prune to shape the tree and encourage branching. Guava trees fruit on new growth, so avoid pruning too heavily, as this can reduce fruit production. Regular pruning will help keep your guava tree healthy and productive.
How do I protect my guava tree from pests and diseases?
Monitor your guava tree regularly for signs of pests and diseases. Common pests that can affect guava trees include aphids, scale, and mealybugs. You can control these pests with insecticidal soap or neem oil. Diseases that can affect guava trees include anthracnose and root rot. Prevent these diseases by providing good air circulation, avoiding overwatering, and using a well-draining potting mix. If you notice any signs of pests or diseases, treat them promptly to prevent them from spreading.
How long does it take for a guava tree to produce fruit?
Guava trees typically start producing fruit within 2-4 years of planting. However, the exact time frame can vary depending on the variety, growing conditions, and care provided. Dwarf guava varieties may start fruiting sooner than standard varieties. Providing your guava tree with adequate sunlight, water, and fertilizer will help it to mature and produce fruit more quickly. Be patient and continue to provide proper care, and you will eventually be rewarded with delicious homegrown guavas.
Can I grow a guava tree indoors?
While guava trees thrive outdoors in warm climates, it is possible to grow them indoors with proper care. Choose a dwarf guava variety and provide it with plenty of sunlight, either through a sunny window or with the help of grow lights. Maintain a consistent temperature and humidity level. Water regularly and fertilize during the growing season. Be aware that indoor guava trees may not produce as much fruit as outdoor trees, but they can still be a beautiful and rewarding addition to your indoor garden.
What do I do if my guava tree is not fruiting?
There are several reasons why your guava tree may not be fruiting. First, ensure that it is receiving enough sunlight (at least 6-8 hours per day). Second, check the soil pH and nutrient levels. Guava trees prefer slightly acidic soil and require regular fertilization. Third, make sure you are pruning your tree correctly to encourage new growth, as guavas fruit on new growth. Finally, be patient, as it may take several years for a guava tree to mature and start producing fruit. If you have addressed all of these factors and your tree is still not fruiting, consult with a local gardening expert for further assistance.
Leave a Comment