

Bottle mushroom growing might sound like something out of a sci-fi movie, but trust me, it’s a surprisingly simple and rewarding way to cultivate delicious, fresh mushrooms right in your own home! Forget those expensive grocery store prices and the mystery of where your fungi friends have been – with this DIY guide, you’ll be harvesting your own gourmet mushrooms in no time.
Mushroom cultivation has a rich history, dating back centuries in various cultures. From ancient China to the Roman Empire, mushrooms have been prized for their culinary and medicinal properties. While traditional methods often involved complex setups, we’re bringing mushroom growing into the 21st century with a clever and accessible technique: using readily available plastic bottles!
Why should you try bottle mushroom growing? Well, for starters, it’s incredibly space-efficient, perfect for apartment dwellers or anyone with limited gardening space. Plus, it’s a fantastic way to recycle those plastic bottles that might otherwise end up in a landfill. But the real magic lies in the satisfaction of nurturing your own food from start to finish. Imagine the pride you’ll feel serving up a dish featuring mushrooms you grew yourself! This DIY project is not only fun and educational but also empowers you to take control of your food source and enjoy the freshest, most flavorful mushrooms imaginable. Let’s dive in and unlock the secrets to successful bottle mushroom growing!
“`html
Grow Mushrooms in a Bottle: A Fun and Easy DIY Project
Hey there, fellow fungi enthusiasts! Ever thought about growing your own mushrooms? It’s surprisingly easy, and you don’t need a fancy setup. I’m going to walk you through how to cultivate delicious mushrooms right in a recycled bottle. This project is perfect for beginners, and it’s a fantastic way to reuse plastic while enjoying fresh, homegrown goodness.
What You’ll Need
Before we dive in, let’s gather our supplies. This is a pretty low-cost project, so you probably have many of these items already!
* A Clear Plastic Bottle: A 2-liter soda bottle or a large water bottle works great. Make sure it’s clean and has a lid.
* Mushroom Spawn: This is the most important ingredient! You can purchase mushroom spawn online or from a local gardening supply store. Oyster mushrooms are a great choice for beginners because they’re relatively easy to grow.
* Substrate: This is the food source for your mushrooms. I recommend using straw, coffee grounds, or hardwood sawdust. You can even mix them!
* Boiling Water: For pasteurizing the substrate.
* Spray Bottle: Filled with clean water, for misting.
* Drill or Nail: To create ventilation holes in the bottle.
* Rubbing Alcohol: For sanitizing.
* Gloves: To keep things clean.
* Optional: Micropore Tape: To cover the ventilation holes and prevent contamination.
Preparing the Substrate
The substrate is where your mushroom mycelium will grow, so it’s crucial to prepare it properly. We need to pasteurize it to kill off any competing organisms.
1. Gather Your Substrate: Choose your substrate. For this example, let’s say we’re using straw. Chop the straw into small pieces, about 1-2 inches long. This will make it easier to pack into the bottle.
2. Pasteurize the Straw: Place the chopped straw in a large bucket or container. Pour boiling water over the straw until it’s completely submerged. Let it soak for at least an hour, or even better, overnight. This process will kill off any unwanted bacteria or fungi that could compete with your mushroom spawn.
3. Drain the Excess Water: After soaking, drain the straw thoroughly. You want it to be moist but not dripping wet. Squeeze out any excess water with your hands. The straw should feel like a wrung-out sponge.
Preparing the Bottle
Now, let’s get our bottle ready for its new role as a mushroom farm!
1. Clean and Sanitize: Wash the plastic bottle thoroughly with soap and water. Rinse it well to remove any soap residue. Then, sanitize the inside of the bottle with rubbing alcohol. This will help prevent contamination.
2. Create Ventilation Holes: Using a drill or a nail, create several small ventilation holes around the bottle. I usually make about 6-8 holes, spaced evenly around the sides. These holes will allow for air exchange, which is essential for mushroom growth.
3. Optional: Cover the Holes: If you’re concerned about contamination, you can cover the ventilation holes with micropore tape. This will allow air to pass through but prevent larger particles from entering.
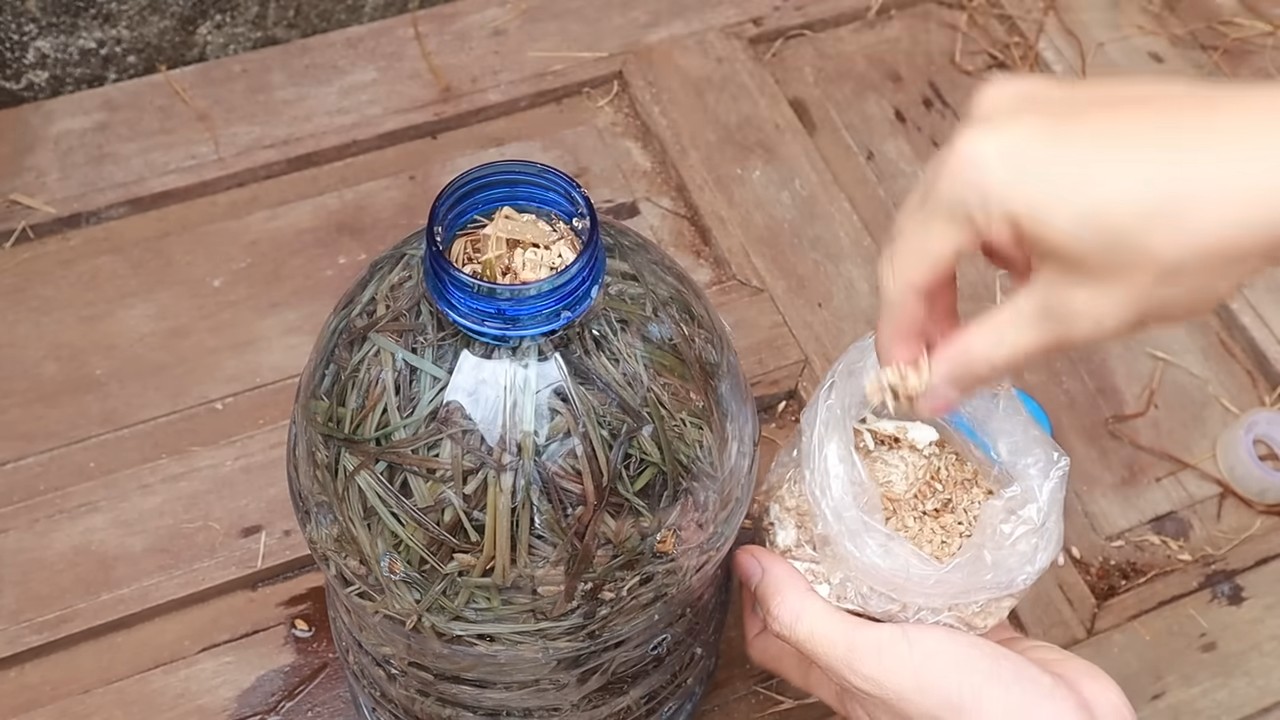
Inoculating the Bottle
This is where the magic happens! We’re going to introduce the mushroom spawn to the prepared substrate.
1. Sanitize Your Hands: Before handling the spawn, wash your hands thoroughly with soap and water. You can also wear gloves to further reduce the risk of contamination.
2. Layer the Substrate and Spawn: Start by adding a layer of the pasteurized straw to the bottom of the bottle, about 2-3 inches thick. Then, sprinkle a generous layer of mushroom spawn over the straw.
3. Repeat the Layers: Continue layering the straw and spawn, alternating between the two. Make sure to distribute the spawn evenly throughout the bottle. The final layer should be a layer of straw.
4. Pack Lightly: Don’t pack the substrate too tightly. You want to leave some air pockets for the mycelium to breathe.
5. Close the Lid: Screw the lid onto the bottle. This will help maintain humidity inside.
Incubation Period
Now comes the waiting game. The mycelium needs time to colonize the substrate.
1. Find a Dark, Warm Place: Place the bottle in a dark, warm location with a consistent temperature of around 65-75°F (18-24°C). A closet, basement, or cupboard works well.
2. Monitor the Mycelium Growth: Check the bottle every few days. You should start to see white, fuzzy mycelium spreading throughout the substrate. This is a good sign!
3. Be Patient: The incubation period can take anywhere from 2-4 weeks, depending on the type of mushroom spawn and the environmental conditions.
Fruiting Stage
Once the substrate is fully colonized (it will look completely white), it’s time to initiate fruiting.
1. Increase Humidity: Mushrooms need high humidity to fruit. Mist the inside of the bottle with water several times a day. You can also place the bottle inside a clear plastic bag to create a humidity chamber. Just make sure to leave the bag slightly open for air circulation.
2. Introduce Light: Move the bottle to a location with indirect light. Direct sunlight can dry out the substrate.
3. Maintain Ventilation: Ensure that the ventilation holes are clear and allowing for air exchange.
4. Wait for Pins: After a few days, you should start to see tiny mushroom “pins” forming on the surface of the substrate. These are baby mushrooms!
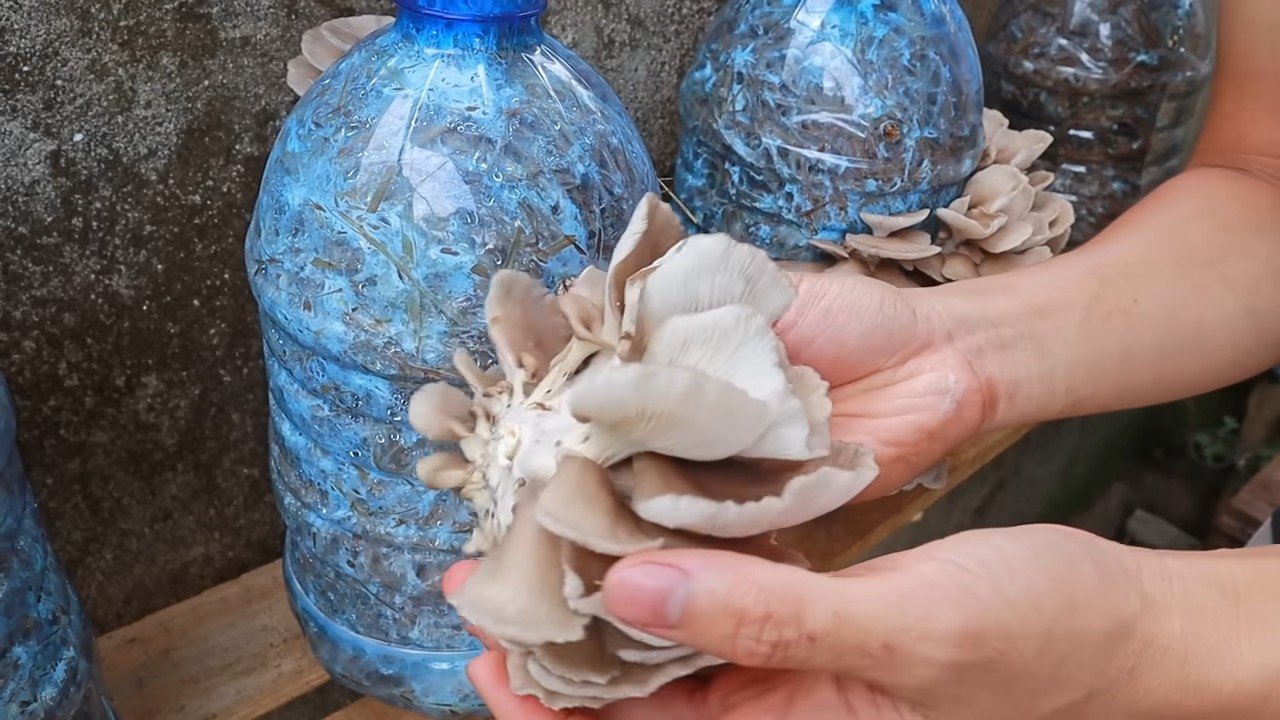
Harvesting Your Mushrooms
The moment we’ve all been waiting for!
1. Harvest When Mature: Harvest the mushrooms when they are fully grown but before they start to drop spores. The caps should be fully open, but not yet flattened.
2. Twist and Pull: To harvest, gently twist and pull the mushrooms from the substrate. You can also use a sharp knife to cut them off at the base.
3. Enjoy Your Harvest: Congratulations! You’ve successfully grown mushrooms in a bottle. Enjoy your fresh, homegrown mushrooms in your favorite recipes.
Second Flush and Beyond
You can often get multiple flushes of mushrooms from the same bottle.
1. Soak the Substrate: After harvesting the first flush, soak the substrate in water for a few hours. This will rehydrate it and encourage another flush of mushrooms.
2. Repeat the Fruiting Stage: Return the bottle to the fruiting environment and repeat the steps for the fruiting stage.
3. Monitor and Harvest: Continue to monitor the bottle and harvest any subsequent flushes of mushrooms.
4. Eventually, the substrate will be depleted of nutrients, and you won’t get any more mushrooms. At that point, you can compost the spent substrate and start a new bottle!
Troubleshooting
Sometimes things don’t go exactly as planned. Here are a few common problems and how to fix them:
* Contamination: If you see mold or other unwanted growth in the bottle, it’s likely contaminated. Unfortunately, there’s not much you can do at this point. Discard the bottle and start over with fresh substrate and spawn, making sure to sanitize everything thoroughly.
* Slow Growth: If the mycelium is growing slowly, it could be due to low temperature or humidity. Make sure the bottle is in a warm, humid environment.
* No Fruiting: If the substrate is fully colonized but you’re not seeing any pins, it could be due to lack of humidity or light. Increase the humidity and move the bottle to a location with indirect light.
* Small Mushrooms: If the mushrooms are small and stunted, it could be due to lack of nutrients or water. Try soaking the substrate in water and adding a small amount of nutrient-rich material, such as coffee grounds.
Tips for Success
Here are a few extra tips to help you succeed with your bottle mushroom growing project:
* Start with a Small Batch: If you’re a beginner, start with just one or two bottles. This will allow you to learn the process and troubleshoot any problems before scaling up.
* Use Fresh Spawn: Make sure your mushroom spawn is fresh and viable. Check the expiration date before using it.
* Maintain Cleanliness: Cleanliness is key to preventing contamination. Sanitize everything thoroughly before starting.
* Be Patient: Mushroom growing takes time and patience. Don’t get discouraged if you don’t see results immediately.
* Experiment: Try different substrates and mushroom varieties to see what works best for you.
I hope this guide has inspired you to try growing your own mushrooms in a bottle. It’s a fun, rewarding, and sustainable project that anyone can do.
Conclusion
So, there you have it! Transforming a simple bottle into a thriving mushroom farm is not only incredibly rewarding but also surprisingly easy. We’ve walked you through the process, highlighting the key steps and offering insights to ensure your success. But why should you embark on this DIY adventure?
First and foremost, growing your own mushrooms in a bottle is a fantastic way to access fresh, delicious, and nutritious food right in your own home. Forget those wilted, overpriced mushrooms at the grocery store. With this method, you’ll have a constant supply of flavorful fungi, ready to elevate your culinary creations. Imagine adding freshly harvested oyster mushrooms to your pasta, shiitakes to your stir-fry, or lion’s mane to your morning smoothie. The possibilities are endless!
Beyond the culinary benefits, this project is also incredibly sustainable. You’re repurposing a discarded bottle, reducing waste, and creating a closed-loop system. It’s a small step towards a more environmentally conscious lifestyle, and every little bit helps. Plus, it’s a great conversation starter! Imagine the look on your friends’ faces when you tell them you grow your own mushrooms in a bottle.
But the real magic lies in the process itself. Watching those tiny spores transform into plump, juicy mushrooms is an experience unlike any other. It’s a fascinating glimpse into the world of fungi and a reminder of the incredible power of nature. It’s also a fantastic educational opportunity, especially if you have children. They’ll love learning about the life cycle of mushrooms and participating in the growing process.
This DIY bottle mushroom growing method is a must-try for anyone who loves fresh food, sustainable living, and a little bit of magic.
Now, let’s talk about variations. While we’ve focused on a specific method, there are plenty of ways to customize your bottle mushroom farm. Experiment with different types of mushrooms, such as oyster, shiitake, or lion’s mane. Each variety has its own unique flavor and texture, so find the ones you enjoy the most. You can also try different substrates, such as coffee grounds, straw, or wood chips. Just be sure to research the specific needs of your chosen mushroom variety.
Another fun variation is to create a multi-tiered bottle farm. By stacking multiple bottles on top of each other, you can maximize your growing space and create a visually stunning display. You can also add decorative elements to your bottles, such as paint, stickers, or twine. Let your creativity shine and create a mushroom farm that reflects your personal style.
Finally, don’t be afraid to experiment with different growing conditions. Try placing your bottle farm in different locations around your home to see what works best. Some mushrooms prefer bright, indirect light, while others thrive in darker environments. Pay attention to the temperature and humidity levels, and adjust as needed.
We’re confident that you’ll find this DIY bottle mushroom growing project to be both rewarding and enjoyable. So, what are you waiting for? Grab a bottle, gather your supplies, and get growing! We can’t wait to see what you create.
We encourage you to try this DIY bottle mushroom growing project and share your experiences with us. Post photos of your mushroom farms on social media using the hashtag #BottleMushroomMagic. We’d love to see your creations and learn from your successes (and even your failures!). Together, we can create a community of mushroom enthusiasts and share our knowledge with the world.
Frequently Asked Questions (FAQ)
What type of bottle is best for growing mushrooms?
The best type of bottle to use is a clear, plastic bottle with a wide mouth. This allows for easy access to the substrate and provides ample space for the mushrooms to grow. A 2-liter soda bottle or a large water bottle works well. Glass bottles can also be used, but they are more fragile and may be more difficult to work with. Make sure the bottle is clean and free of any residue before you start.
What kind of substrate should I use?
The substrate is the material that the mushrooms will grow on. A good substrate should be nutritious, absorbent, and well-aerated. Some popular options include:
* **Coffee grounds:** Coffee grounds are a readily available and nutrient-rich substrate. They are especially good for growing oyster mushrooms. Be sure to use spent coffee grounds that have already been brewed.
* **Straw:** Straw is another excellent substrate, particularly for oyster mushrooms. It is readily available and relatively inexpensive. You will need to pasteurize the straw before using it to kill any competing organisms.
* **Wood chips:** Wood chips are a good choice for growing shiitake mushrooms. Use hardwood chips, such as oak or maple. You will need to sterilize the wood chips before using them.
* **Sawdust:** Sawdust can also be used as a substrate, especially for shiitake and lion’s mane mushrooms. Use hardwood sawdust and sterilize it before use.
* **Coco coir:** Coco coir is a sustainable and readily available substrate made from coconut husks. It is a good option for a variety of mushroom species.
How do I pasteurize or sterilize the substrate?
Pasteurization and sterilization are important steps to kill any competing organisms in the substrate. Pasteurization is a milder process that kills most, but not all, organisms. Sterilization kills all organisms.
* **Pasteurization:** To pasteurize straw or coffee grounds, soak them in hot water (around 160-180°F) for 1-2 hours. This will kill most of the competing organisms without completely sterilizing the substrate.
* **Sterilization:** To sterilize wood chips or sawdust, you will need to use a pressure cooker or autoclave. Place the substrate in a heat-resistant container and cook it at 15 PSI for 90 minutes. This will kill all organisms and ensure a clean growing environment.
Where should I place my bottle mushroom farm?
The ideal location for your bottle mushroom farm will depend on the type of mushroom you are growing. Generally, mushrooms prefer a cool, dark, and humid environment. A basement, closet, or shaded area of your home is a good choice. Avoid placing your bottle farm in direct sunlight, as this can dry out the substrate and inhibit growth.
How often should I water my mushrooms?
Mushrooms need a humid environment to thrive. You should mist your mushrooms with water 1-2 times per day, or as needed to keep the substrate moist. Be careful not to overwater, as this can lead to mold growth. The substrate should be damp, but not soggy.
How long does it take for mushrooms to grow?
The time it takes for mushrooms to grow will vary depending on the type of mushroom, the substrate, and the growing conditions. Generally, you can expect to see mushrooms within 2-4 weeks of inoculation. Oyster mushrooms are typically the fastest to grow, while shiitake mushrooms may take longer.
What if I see mold growing in my bottle?
Mold is a common problem in mushroom cultivation. If you see mold growing in your bottle, it is important to take action immediately. Remove the affected area with a clean spoon or knife. You can also try spraying the area with a diluted hydrogen peroxide solution. If the mold is widespread, it may be necessary to discard the entire batch.
Can I reuse the substrate after harvesting mushrooms?
Yes, you can often get multiple flushes (harvests) from the same substrate. After harvesting your mushrooms, mist the substrate and allow it to rest for a few days. You may need to add some fresh nutrients to the substrate to encourage further growth. Eventually, the substrate will become depleted and you will need to replace it.
What are the benefits of growing my own mushrooms?
There are many benefits to growing your own mushrooms, including:
* **Fresh, delicious food:** You’ll have access to fresh, flavorful mushrooms right in your own home.
* **Sustainable living:** You’re repurposing discarded materials and reducing waste.
* **Educational opportunity:** It’s a great way to learn about the fascinating world of fungi.
* **Cost savings:** You’ll save money on groceries by growing your own food.
* **Therapeutic activity:** Gardening and mushroom cultivation can be relaxing and rewarding.
Is growing mushrooms in a bottle safe?
Yes, growing mushrooms in a bottle is generally safe, as long as you follow proper hygiene practices. Be sure to clean your hands and equipment thoroughly before handling the substrate or mushrooms. Avoid eating any mushrooms that you are unsure about, and always cook your mushrooms thoroughly before eating them. If you have any concerns, consult with a mycologist or other expert.

Leave a Comment