

Easy Homegrown Lettuce: Your Guide to Fresh, Flavorful Greens
Easy homegrown lettuce? It sounds too good to be true, doesn’t it? But I’m here to tell you it’s entirely achievable, even if you’ve got a brown thumb and a tiny balcony! This article is your passport to a world of crisp, delicious lettuce, grown right in your own backyard or kitchen window. Forget those limp, tasteless supermarket leaves; I’m going to share my favorite easy homegrown lettuce tricks and DIY projects that will transform your gardening game.
Growing your own food has a rich history, connecting us to ancient agricultural practices and a simpler way of life. From the earliest civilizations cultivating crops to the modern-day resurgence of home gardening, there’s a deep satisfaction in nurturing something from seed to plate. And let’s be honest, nothing beats the taste of a freshly picked lettuce leaf, bursting with flavor and free from pesticides.
Why Grow Your Own Lettuce?
In today’s fast-paced world, we often sacrifice quality for convenience. But wouldn’t it be wonderful to have access to fresh, healthy lettuce whenever you want? Easy homegrown lettuce offers more than just delicious salads; it’s a chance to reconnect with nature, reduce your carbon footprint, and save money on groceries. Plus, it’s incredibly rewarding to watch your tiny seeds sprout and grow into a bountiful harvest. This article will equip you with the knowledge and confidence to start your own easy homegrown lettuce journey, no matter your experience level.
So, grab your gardening gloves and let’s get started on this exciting adventure! I’ll guide you through simple techniques, clever DIY solutions, and helpful tips to ensure your easy homegrown lettuce project is a resounding success. Get ready to experience the joy of homegrown goodness!
Harvesting Your Broccoli Garden: A Step-by-Step Guide
So, you’ve nurtured your broccoli plants from tiny seedlings to flourishing heads. Congratulations! Now comes the rewarding part: harvesting your delicious bounty. This guide will walk you through the process, ensuring you get the most out of your hard work.
Assessing Your Broccoli
- Check for maturity: Broccoli heads are ready for harvest when they are firm, dark green, and tightly closed. The florets should be compact and not showing any signs of yellowing or flowering. A mature head will usually be about 6-8 inches in diameter, but this can vary depending on the variety.
- Avoid overripe broccoli: If you leave the heads on the plant too long, they will become tough, woody, and less flavorful. The florets will start to open and yellow, and the head will become loose. Harvesting at the right time is key to enjoying tender, delicious broccoli.
- Inspect for pests and diseases: Before harvesting, take a quick look at your broccoli plants for any signs of pests or diseases. If you see any problems, address them before harvesting to prevent contamination.
Harvesting the Main Head
- Gather your tools: You’ll need a sharp knife or garden shears. A clean pair is important to prevent the spread of disease.
- Cut the head: Using your knife or shears, cut the main head of broccoli at the stem, about 1-2 inches below the head. Make a clean cut to avoid damaging the plant. Don’t pull the head off, as this can damage the plant and reduce future yields.
- Examine the cut: After cutting, take a moment to inspect the cut stem. Ensure it’s clean and free of any signs of disease or pests. If you notice anything concerning, you might want to remove the affected part of the stem.
- Handle with care: Once harvested, handle the broccoli head gently to avoid bruising. Place it in a container or basket to prevent damage.
Harvesting Side Shoots (and Subsequent Harvests)
Many broccoli varieties produce smaller side shoots after the main head is harvested. These side shoots, also known as secondary heads, are just as delicious as the main head and can provide a second, even third, harvest from the same plant!
- Wait for side shoots to develop: After harvesting the main head, allow the plant to continue growing. Within a few weeks, you should see smaller side shoots developing from the base of the plant.
- Harvest side shoots: Once the side shoots reach a reasonable size (usually 3-4 inches in diameter), harvest them in the same way you harvested the main head. Cut them at the stem, about 1-2 inches below the head, using a sharp knife or shears.
- Continue harvesting: Depending on the variety and growing conditions, you may be able to harvest several side shoots from each plant over several weeks. Keep an eye on the plant and harvest the side shoots as they mature.
- Fertilize and water: To encourage the growth of side shoots, make sure to water and fertilize your plants regularly. A balanced fertilizer will help the plant produce more side shoots.
Post-Harvest Care and Storage
- Clean your broccoli: Once you’ve harvested all the broccoli heads, give them a quick rinse to remove any dirt or debris. Avoid soaking them in water, as this can make them soggy.
- Proper storage: Store your harvested broccoli in the refrigerator. Place it in a plastic bag or container to maintain freshness. Broccoli can be stored in the refrigerator for up to a week.
- Freezing for later use: If you have more broccoli than you can use fresh, you can freeze it for later use. Blanch the broccoli in boiling water for 2-3 minutes, then immediately plunge it into ice water to stop the cooking process. Once cooled, drain the broccoli and package it in freezer bags or containers. Frozen broccoli can be stored for up to a year.
Troubleshooting Common Issues
Yellowing or Browning Florets
This often indicates that the broccoli was harvested too late. The florets should be a deep green and tightly closed when harvested. Next time, try harvesting earlier.
Small or Stunted Heads
This could be due to insufficient sunlight, poor soil quality, or lack of nutrients. Ensure your plants receive at least 6-8 hours of sunlight per day and amend your soil with compost or fertilizer to improve its quality.
Pests or Diseases
Regularly inspect your plants for signs of pests or diseases. If you find any problems, take appropriate action to control them. This may involve using insecticidal soap or other organic pest control methods.
Remember to always practice safe gardening habits, including washing your hands before and after handling plants. Happy harvesting!
Conclusion
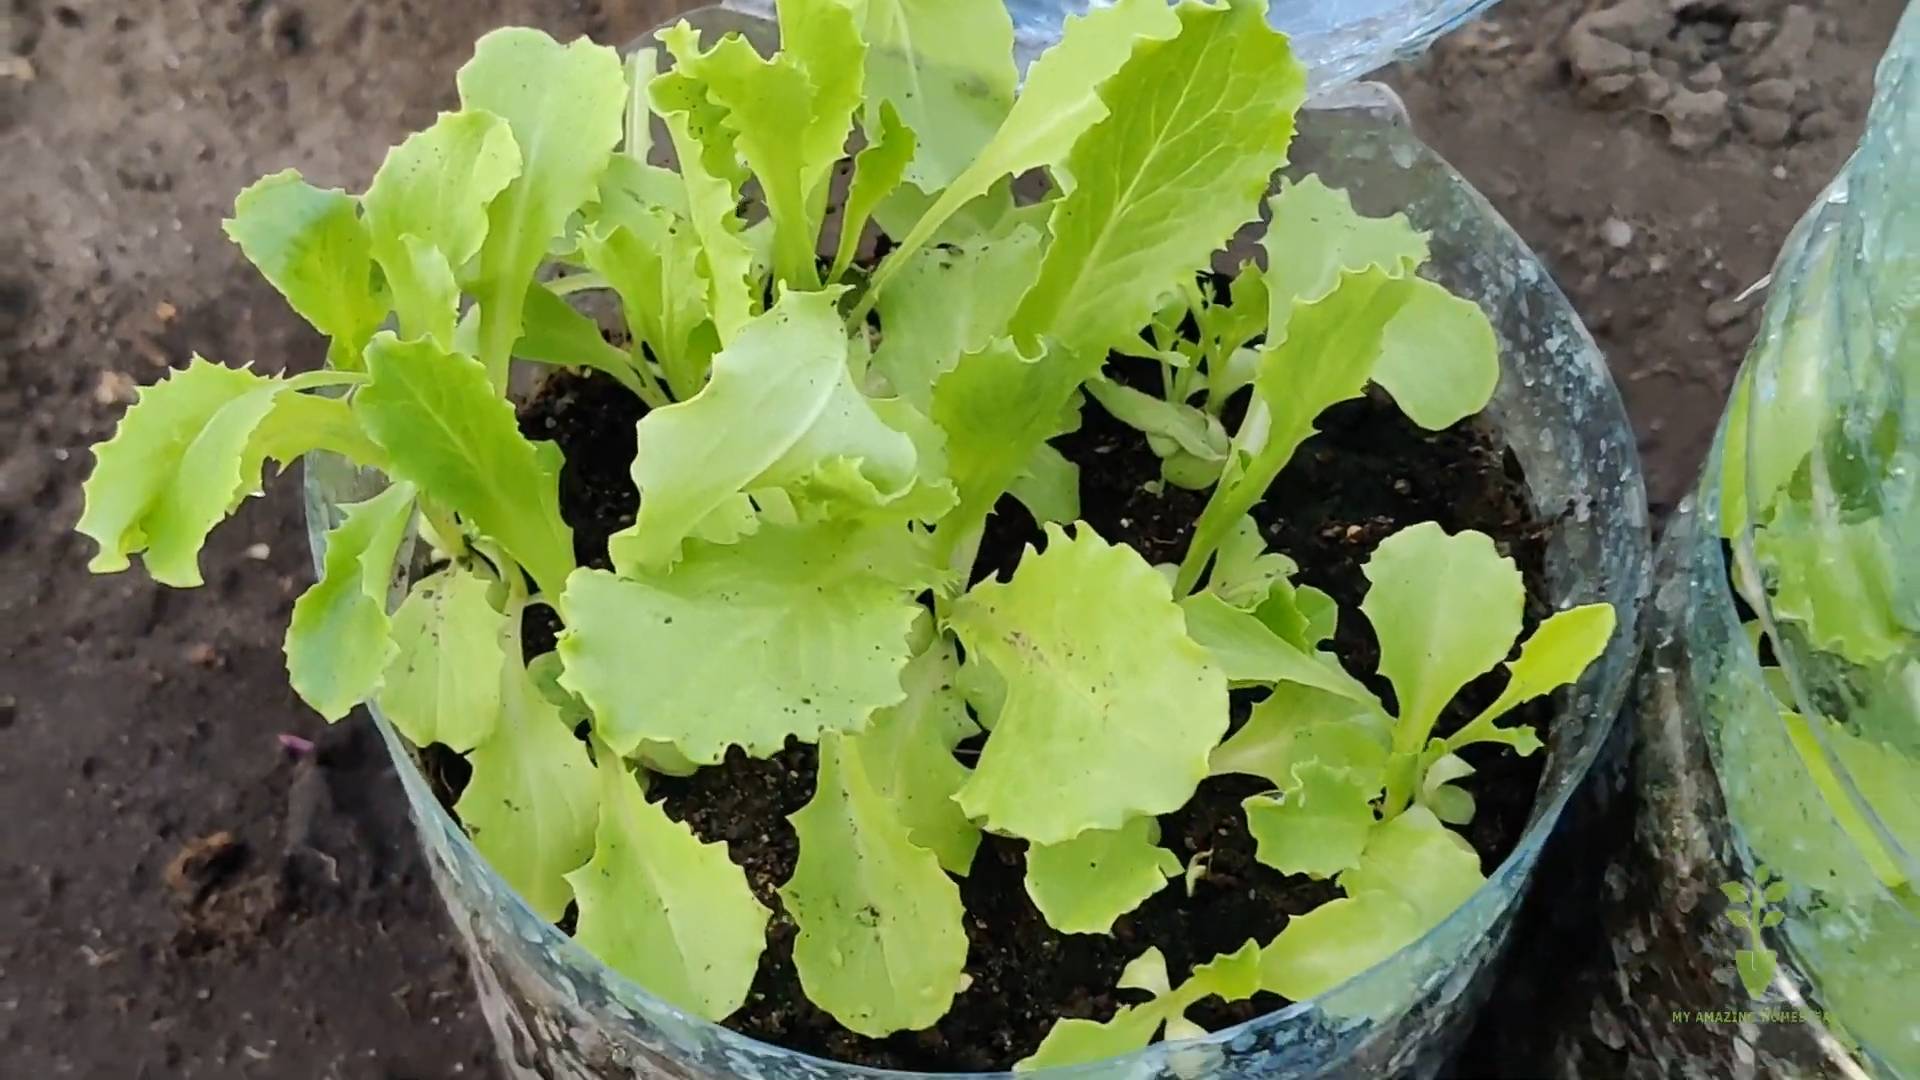
This easy homegrown lettuce method is a game-changer for anyone who loves fresh, flavorful salads but doesn’t have the space or time for a full-scale garden. The incredible taste difference between homegrown lettuce and store-bought varieties is undeniable. You’ll be amazed by the crispness, the vibrant green color, and the intense, slightly sweet flavor that only comes from harvesting your own produce. Beyond the superior taste, growing your own lettuce offers a rewarding connection to nature, a sense of accomplishment, and the satisfaction of knowing exactly where your food comes from. This DIY approach requires minimal effort and investment, making it accessible to even the most novice gardeners. It’s a sustainable choice, reducing your carbon footprint by eliminating transportation and packaging waste associated with commercially grown lettuce. Ultimately, this simple method empowers you to enjoy fresh, healthy lettuce year-round, regardless of your gardening experience. Don’t just take our word for it – try it yourself and experience the magic of homegrown goodness! Share your results and photos with us on social media – we’d love to see your thriving lettuce patches and hear about your culinary creations featuring your homegrown bounty. You might even discover a new favorite salad recipe using your fresh, flavorful homegrown lettuce!
Variations and Suggestions
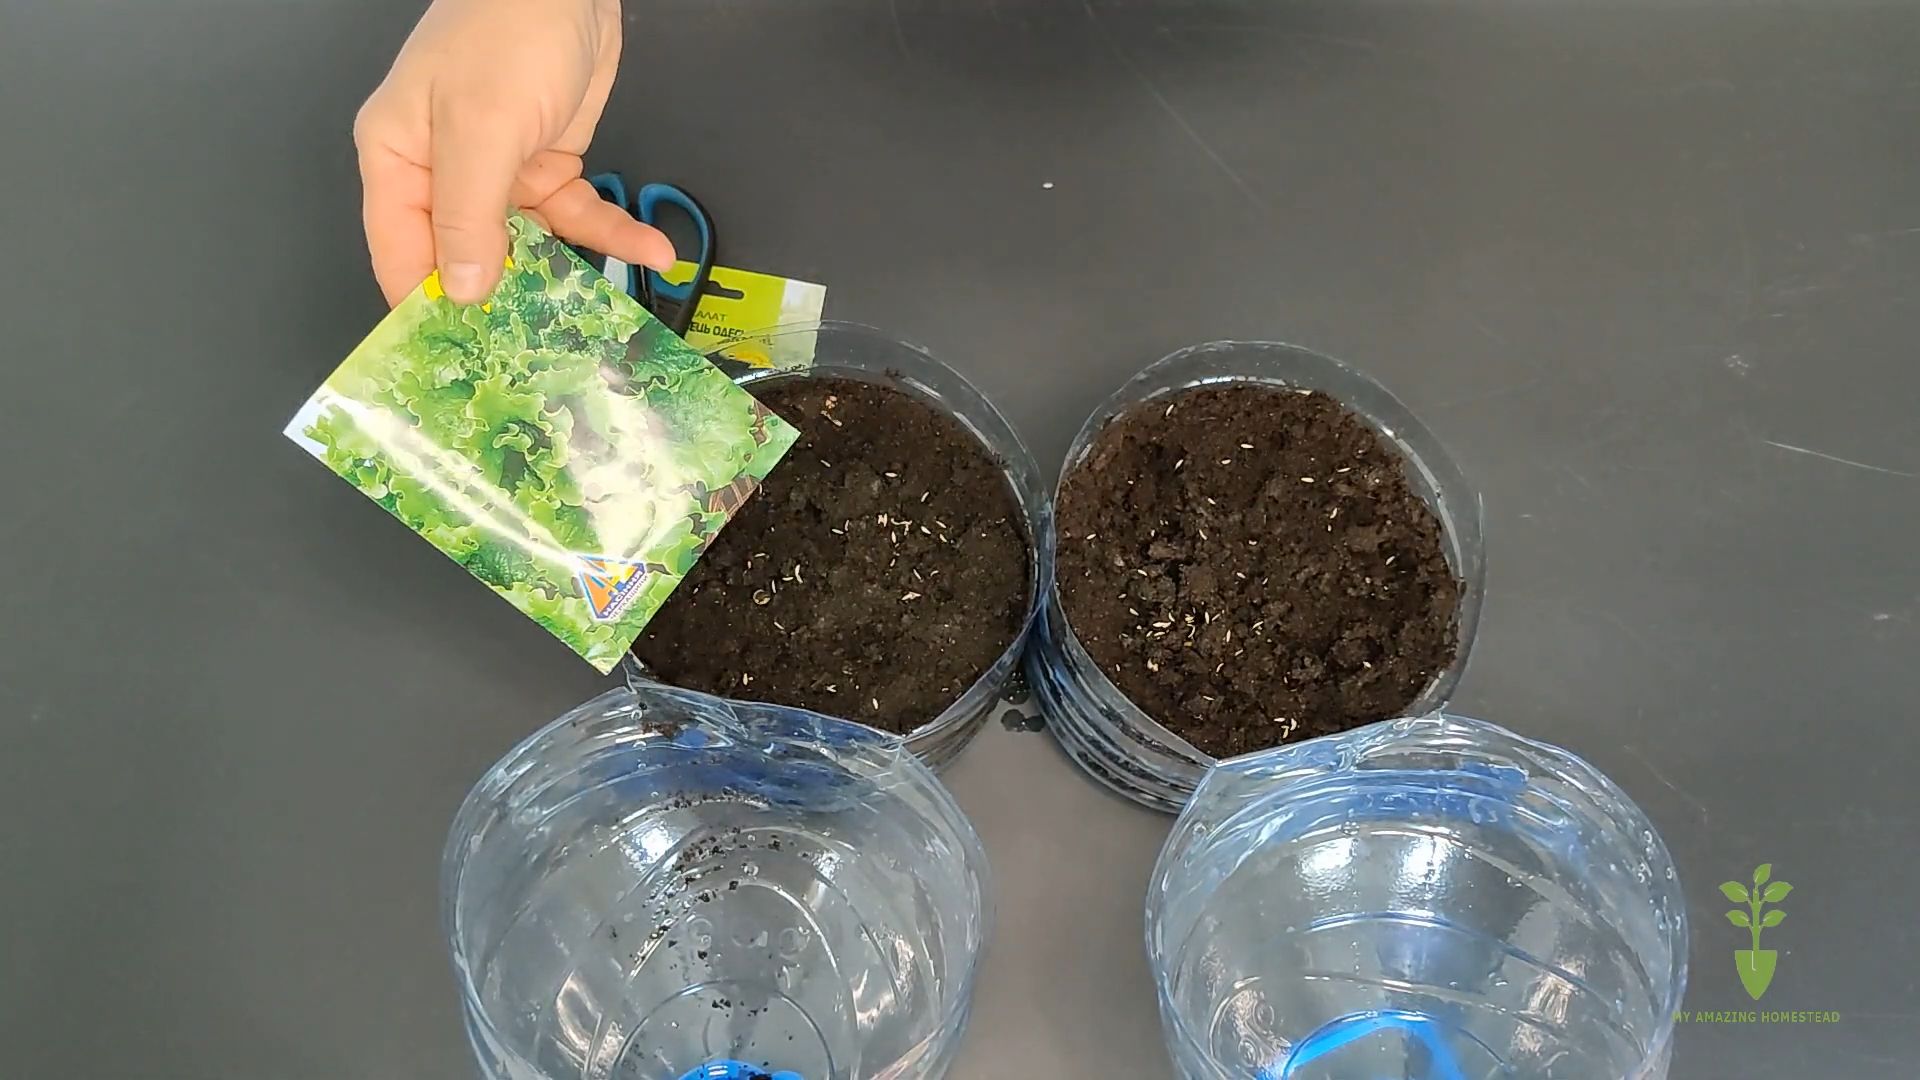
While the basic method outlined is incredibly effective, there are several ways to customize your homegrown lettuce experience. Experiment with different lettuce varieties! Loose-leaf lettuces like Red Sails or Black Seeded Simpson are excellent choices for beginners, offering quick growth and a forgiving nature. Consider adding other leafy greens to your setup, such as spinach, arugula, or kale. These plants thrive under similar conditions and can add diversity to your salads. If you have limited space, try vertical gardening techniques using hanging planters or stacked containers. For those with even less space, consider growing lettuce in recycled containers, such as yogurt cups or egg cartons. Remember to always use well-draining soil to prevent root rot. During the hotter months, consider providing some shade to prevent your lettuce from bolting (going to seed prematurely). A simple shade cloth or strategically placed plants can make a big difference. Finally, don’t be afraid to experiment with different growing mediums. Coco coir, for instance, is a sustainable and effective alternative to traditional soil.
Frequently Asked Questions
What type of lettuce is best for beginners?
Loose-leaf lettuces are generally the easiest to grow for beginners. They are less demanding than head lettuces and are more forgiving of minor mistakes. Red Sails and Black Seeded Simpson are excellent choices for their fast growth and delicious flavor.
How much sunlight does lettuce need?
Lettuce prefers partial shade, especially during the hottest parts of the day. Aim for at least 4-6 hours of sunlight daily, but avoid direct, intense sunlight, which can scorch the leaves.
How often should I water my lettuce?
Keep the soil consistently moist but not waterlogged. Water regularly, especially during dry periods, but avoid overwatering, which can lead to root rot. The frequency of watering will depend on your climate and the type of container you are using.
How long does it take for lettuce to grow?
The time it takes for lettuce to mature depends on the variety and growing conditions. Loose-leaf lettuces typically mature in 4-6 weeks, while head lettuces may take 8-10 weeks.
What should I do if my lettuce bolts?
Bolting, or going to seed, is a natural process that occurs when lettuce is exposed to stress, such as heat or drought. While the leaves may become bitter, you can still harvest and eat them. To prevent bolting, ensure your lettuce receives adequate water and shade during hot weather.
Can I grow lettuce indoors?
Yes, you can grow lettuce indoors using a sunny windowsill or grow lights. Ensure adequate ventilation to prevent fungal diseases.
What are the benefits of growing my own lettuce?
Growing your own lettuce offers numerous benefits, including fresher, tastier lettuce, reduced environmental impact, a rewarding gardening experience, and the satisfaction of knowing exactly where your food comes from. It’s also a cost-effective way to enjoy fresh salads throughout the year. Furthermore, homegrown lettuce is often free from pesticides and other harmful chemicals commonly found in commercially grown produce.
What should I do with my harvested lettuce?
Once harvested, store your lettuce in a plastic bag in the refrigerator to maintain its freshness. Use your homegrown lettuce in salads, sandwiches, wraps, or any recipe that calls for fresh lettuce. Consider experimenting with different dressings and toppings to enhance the flavor of your homegrown lettuce. Remember to wash your lettuce thoroughly before consumption.
What if my lettuce has pests?
Regularly inspect your lettuce for pests. Common pests include aphids and slugs. If you notice pests, try removing them manually or using organic pest control methods, such as insecticidal soap or neem oil. Maintaining a clean growing environment can also help prevent pest infestations.
Is this method suitable for all climates?
This method is adaptable to various climates, but success depends on providing the right conditions for your specific location. In hotter climates, providing shade and adequate watering is crucial. In colder climates, you may need to use a greenhouse or grow lights to supplement sunlight. Remember to adjust your watering schedule based on your local climate and weather conditions. This easy homegrown lettuce method is a rewarding and delicious adventure waiting for you. So, get started today and enjoy the freshest lettuce of your life!


Leave a Comment