

Chili Planting for Better Yield: Are you dreaming of a garden bursting with vibrant, fiery chilies, ready to spice up your culinary creations? I know I am! But sometimes, despite our best efforts, our chili plants just don’t seem to produce the bountiful harvest we crave. Don’t worry, you’re not alone, and I’m here to help!
For centuries, chilies have been cultivated across the globe, adding flavor and heat to dishes from Mexico to Thailand. Their journey from the Americas to the rest of the world is a testament to their enduring appeal. But even with this rich history, getting the most out of your chili plants can be a challenge. That’s where these simple yet effective DIY tricks come in.
Let’s face it, store-bought chilies can be expensive, and nothing beats the satisfaction of harvesting your own fresh produce. Plus, knowing exactly where your food comes from and how it’s grown is a huge bonus! This article is packed with easy-to-follow tips and hacks that will help you maximize your chili planting efforts and achieve a truly impressive yield. From soil preparation to watering techniques and pest control, I’ll share my secrets to ensure your chili plants thrive. Get ready to transform your garden into a chili paradise!
Chili Planting for Better Yield: My Foolproof Guide
Okay, chili lovers, gather ’round! I’m going to share my secrets to getting a bumper crop of chilies, year after year. Forget those puny supermarket peppers – we’re talking about a chili explosion that will have you making hot sauce for days! This isn’t just about sticking a seed in the ground; it’s about creating the perfect environment for your chili plants to thrive. So, let’s get started!
Choosing the Right Chili Variety
Before we even think about soil, we need to pick our players. There are literally hundreds of chili varieties, each with its own unique flavor, heat level, and growing requirements. Here’s what I consider:
* Heat Level: Do you want a mild jalapeño, a fiery habanero, or something in between? Be honest with yourself! Starting with something too hot can be discouraging.
* Growing Conditions: Some chilies are more tolerant of cooler climates or shorter growing seasons. Check the seed packet or online descriptions to make sure your chosen variety is suitable for your area.
* Plant Size: Consider how much space you have. Some chili plants can get quite large, while others stay relatively compact.
* Intended Use: Are you planning to make chili powder, hot sauce, or just eat them fresh? Different varieties are better suited for different purposes.
My personal favorites include jalapeños (versatile and easy to grow), serranos (a bit more heat), and cayenne peppers (great for drying and making powder). But don’t be afraid to experiment!
Starting Your Chili Seeds Indoors (Recommended)
While you *can* direct sow chili seeds, I highly recommend starting them indoors, especially if you live in a region with a shorter growing season. This gives your plants a head start and ensures a better yield.
Here’s my step-by-step guide:
1. Gather Your Supplies: You’ll need:
* Chili seeds (obviously!)
* Seed starting trays or small pots (I prefer trays with a humidity dome)
* Seed starting mix (this is crucial – regular potting soil is too heavy)
* A spray bottle filled with water
* A heat mat (optional, but highly recommended)
* A grow light (also optional, but beneficial)
* A permanent marker for labeling
2. Sow the Seeds:
* Moisten the seed starting mix thoroughly. It should be damp, but not soggy.
* Fill your seed starting trays or pots with the moistened mix.
* Make a small indentation (about ¼ inch deep) in the center of each cell or pot.
* Place 2-3 chili seeds in each indentation. This increases your chances of germination.
* Gently cover the seeds with the seed starting mix.
* Lightly mist the surface with water.
3. Create the Ideal Germination Environment:
* Cover the seed starting trays with a humidity dome (if using). This helps to retain moisture.
* Place the trays on a heat mat. Chili seeds germinate best in warm temperatures (around 80-85°F).
* If you’re using a grow light, position it a few inches above the trays.
* If you don’t have a grow light, place the trays in a warm, sunny location.
4. Maintain Moisture and Temperature:
* Check the seed starting mix daily and mist with water as needed to keep it consistently moist. Don’t let it dry out!
* Monitor the temperature of the heat mat. Adjust as needed to maintain the optimal range.
5. Wait Patiently:
* Chili seeds can take anywhere from 7 to 21 days to germinate, depending on the variety and conditions. Be patient!
* Once the seedlings emerge, remove the humidity dome and move the trays closer to the grow light (if using).
6. Thin the Seedlings:
* Once the seedlings have their first true leaves (the second set of leaves that appear after the initial seed leaves), thin them out by snipping off the weaker seedlings at the soil line. Leave only the strongest seedling in each cell or pot.
Transplanting Your Chili Seedlings
Once your seedlings are a few inches tall and have a few sets of true leaves, it’s time to transplant them into larger pots. This will give them more room to grow and develop a strong root system.
1. Prepare Your Pots:
* Choose pots that are at least 4 inches in diameter.
* Fill the pots with a good quality potting mix.
2. Gently Remove the Seedlings:
* Carefully loosen the soil around the seedlings with a small trowel or spoon.
* Gently lift the seedlings out of the seed starting trays or pots, being careful not to damage the roots.
3. Transplant the Seedlings:
* Make a hole in the center of each pot that is large enough to accommodate the root ball of the seedling.
* Place the seedling in the hole and gently backfill with potting mix.
* Water the seedlings thoroughly.
4. Harden Off the Seedlings:
* Before planting your chili seedlings outdoors, you need to “harden them off.” This means gradually exposing them to outdoor conditions over a period of 7-10 days.
* Start by placing the seedlings in a sheltered location outdoors for a few hours each day, gradually increasing the amount of time they spend outside.
* Protect the seedlings from direct sunlight and strong winds.
Planting Your Chili Plants Outdoors
Now for the exciting part – getting those chili plants into the ground!
1. Choose the Right Location:
* Chili plants need at least 6-8 hours of sunlight per day.
* Choose a location with well-drained soil.
* Avoid planting in areas that are prone to frost.
2. Prepare the Soil:
* Amend the soil with compost or other organic matter to improve drainage and fertility.
* Till the soil to a depth of at least 12 inches.
3. Plant the Chili Plants:
* Dig holes that are slightly larger than the root balls of the chili plants.
* Gently remove the chili plants from their pots and place them in the holes.
* Backfill with soil and water thoroughly.
* Space the plants about 18-24 inches apart, depending on the variety.
4. Mulch the Plants:
* Apply a layer of mulch around the chili plants to help retain moisture, suppress weeds, and regulate soil temperature. I like to use straw or wood chips.
Caring for Your Chili Plants
Once your chili plants are in the ground, it’s important to provide them with the care they need to thrive.
1. Watering:
* Water your chili plants regularly, especially during hot, dry weather.
* Water deeply, but avoid overwatering. Soggy soil can lead to root rot.
* Water at the base of the plants to avoid wetting the foliage, which can encourage fungal diseases.
2. Fertilizing:
* Fertilize your chili plants every 2-3 weeks with a balanced fertilizer.
* You can also use a fertilizer that is specifically formulated for peppers.
* Avoid over-fertilizing, as this can lead to excessive foliage growth and reduced fruit production.
3. Pruning:
* Pruning is not essential for chili plants, but it can help to improve air circulation and encourage bushier growth.
* Remove any dead or damaged leaves or branches.
* You can also pinch back the tips of the branches to encourage branching.
4. Pest and Disease Control:
* Keep an eye out for pests and diseases, such as aphids, whiteflies, and fungal diseases.
* Treat any infestations or infections promptly with appropriate organic or chemical controls.
* I prefer using neem oil for pest control and copper fungicide for fungal diseases.
5. Support:
* Some chili varieties, especially those with heavy fruit production, may need support to prevent the branches from breaking.
* You can use stakes, cages, or trellises to support the plants.
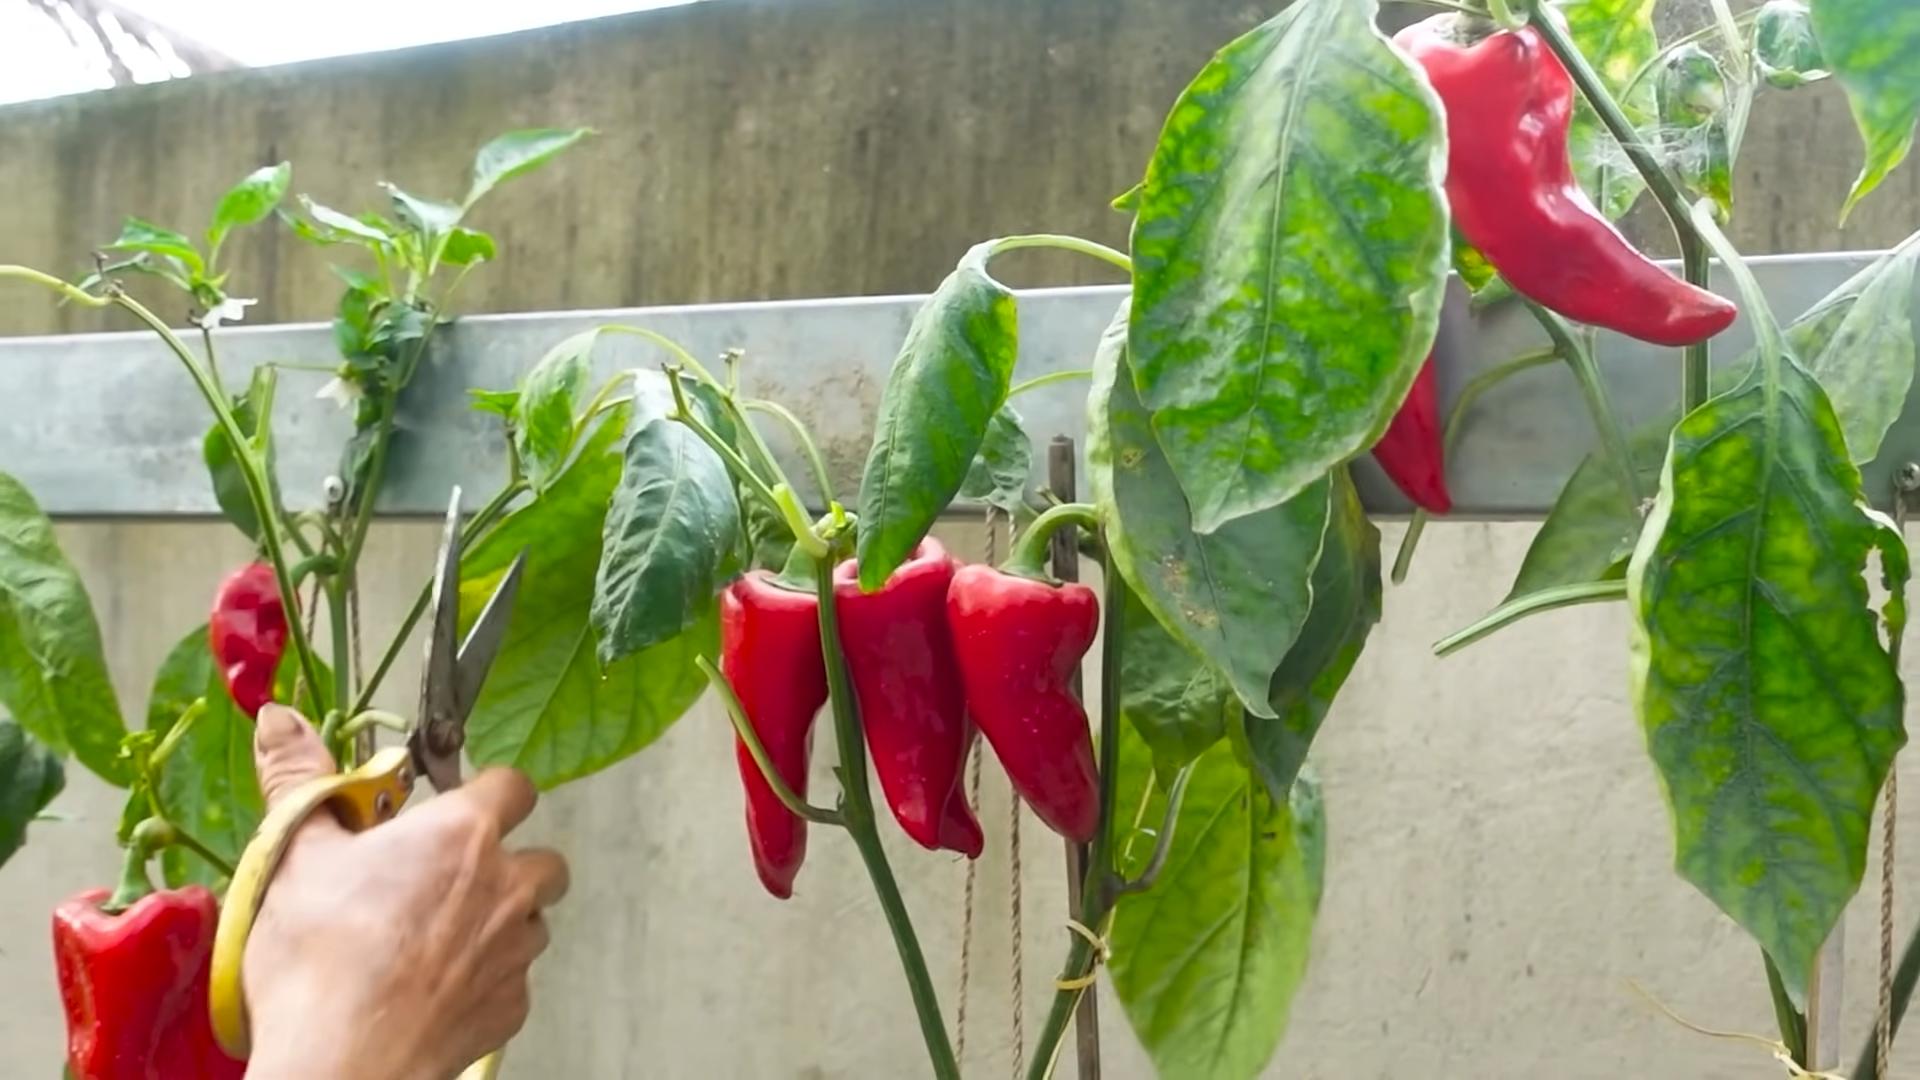
Harvesting Your Chilies
The moment we’ve all been waiting for! Harvesting your delicious chilies.
1. When to Harvest:
* Chilies are typically ready to harvest when they have reached their mature color and size.
* The exact timing will depend on the variety.
Okay, chili lovers, gather ’round! I’m going to share my secrets to getting a bumper crop of chilies, year after year. Forget those puny supermarket peppers – we’re talking about a chili explosion that will have you making hot sauce for days! This isn’t just about sticking a seed in the ground; it’s about creating the perfect environment for your chili plants to thrive. So, let’s get started!
Choosing the Right Chili Variety
Before we even think about soil, we need to pick our players. There are literally hundreds of chili varieties, each with its own unique flavor, heat level, and growing requirements. Here’s what I consider:
* Heat Level: Do you want a mild jalapeño, a fiery habanero, or something in between? Be honest with yourself! Starting with something too hot can be discouraging.
* Growing Conditions: Some chilies are more tolerant of cooler climates or shorter growing seasons. Check the seed packet or online descriptions to make sure your chosen variety is suitable for your area.
* Plant Size: Consider how much space you have. Some chili plants can get quite large, while others stay relatively compact.
* Intended Use: Are you planning to make chili powder, hot sauce, or just eat them fresh? Different varieties are better suited for different purposes.
My personal favorites include jalapeños (versatile and easy to grow), serranos (a bit more heat), and cayenne peppers (great for drying and making powder). But don’t be afraid to experiment!
Starting Your Chili Seeds Indoors (Recommended)
While you *can* direct sow chili seeds, I highly recommend starting them indoors, especially if you live in a region with a shorter growing season. This gives your plants a head start and ensures a better yield.
Here’s my step-by-step guide:
1. Gather Your Supplies: You’ll need:
* Chili seeds (obviously!)
* Seed starting trays or small pots (I prefer trays with a humidity dome)
* Seed starting mix (this is crucial – regular potting soil is too heavy)
* A spray bottle filled with water
* A heat mat (optional, but highly recommended)
* A grow light (also optional, but beneficial)
* A permanent marker for labeling
2. Sow the Seeds:
* Moisten the seed starting mix thoroughly. It should be damp, but not soggy.
* Fill your seed starting trays or pots with the moistened mix.
* Make a small indentation (about ¼ inch deep) in the center of each cell or pot.
* Place 2-3 chili seeds in each indentation. This increases your chances of germination.
* Gently cover the seeds with the seed starting mix.
* Lightly mist the surface with water.
3. Create the Ideal Germination Environment:
* Cover the seed starting trays with a humidity dome (if using). This helps to retain moisture.
* Place the trays on a heat mat. Chili seeds germinate best in warm temperatures (around 80-85°F).
* If you’re using a grow light, position it a few inches above the trays.
* If you don’t have a grow light, place the trays in a warm, sunny location.
4. Maintain Moisture and Temperature:
* Check the seed starting mix daily and mist with water as needed to keep it consistently moist. Don’t let it dry out!
* Monitor the temperature of the heat mat. Adjust as needed to maintain the optimal range.
5. Wait Patiently:
* Chili seeds can take anywhere from 7 to 21 days to germinate, depending on the variety and conditions. Be patient!
* Once the seedlings emerge, remove the humidity dome and move the trays closer to the grow light (if using).
6. Thin the Seedlings:
* Once the seedlings have their first true leaves (the second set of leaves that appear after the initial seed leaves), thin them out by snipping off the weaker seedlings at the soil line. Leave only the strongest seedling in each cell or pot.
Transplanting Your Chili Seedlings
Once your seedlings are a few inches tall and have a few sets of true leaves, it’s time to transplant them into larger pots. This will give them more room to grow and develop a strong root system.
1. Prepare Your Pots:
* Choose pots that are at least 4 inches in diameter.
* Fill the pots with a good quality potting mix.
2. Gently Remove the Seedlings:
* Carefully loosen the soil around the seedlings with a small trowel or spoon.
* Gently lift the seedlings out of the seed starting trays or pots, being careful not to damage the roots.
3. Transplant the Seedlings:
* Make a hole in the center of each pot that is large enough to accommodate the root ball of the seedling.
* Place the seedling in the hole and gently backfill with potting mix.
* Water the seedlings thoroughly.
4. Harden Off the Seedlings:
* Before planting your chili seedlings outdoors, you need to “harden them off.” This means gradually exposing them to outdoor conditions over a period of 7-10 days.
* Start by placing the seedlings in a sheltered location outdoors for a few hours each day, gradually increasing the amount of time they spend outside.
* Protect the seedlings from direct sunlight and strong winds.
Planting Your Chili Plants Outdoors
Now for the exciting part – getting those chili plants into the ground!
1. Choose the Right Location:
* Chili plants need at least 6-8 hours of sunlight per day.
* Choose a location with well-drained soil.
* Avoid planting in areas that are prone to frost.
2. Prepare the Soil:
* Amend the soil with compost or other organic matter to improve drainage and fertility.
* Till the soil to a depth of at least 12 inches.
3. Plant the Chili Plants:
* Dig holes that are slightly larger than the root balls of the chili plants.
* Gently remove the chili plants from their pots and place them in the holes.
* Backfill with soil and water thoroughly.
* Space the plants about 18-24 inches apart, depending on the variety.
4. Mulch the Plants:
* Apply a layer of mulch around the chili plants to help retain moisture, suppress weeds, and regulate soil temperature. I like to use straw or wood chips.
Caring for Your Chili Plants
Once your chili plants are in the ground, it’s important to provide them with the care they need to thrive.
1. Watering:
* Water your chili plants regularly, especially during hot, dry weather.
* Water deeply, but avoid overwatering. Soggy soil can lead to root rot.
* Water at the base of the plants to avoid wetting the foliage, which can encourage fungal diseases.
2. Fertilizing:
* Fertilize your chili plants every 2-3 weeks with a balanced fertilizer.
* You can also use a fertilizer that is specifically formulated for peppers.
* Avoid over-fertilizing, as this can lead to excessive foliage growth and reduced fruit production.
3. Pruning:
* Pruning is not essential for chili plants, but it can help to improve air circulation and encourage bushier growth.
* Remove any dead or damaged leaves or branches.
* You can also pinch back the tips of the branches to encourage branching.
4. Pest and Disease Control:
* Keep an eye out for pests and diseases, such as aphids, whiteflies, and fungal diseases.
* Treat any infestations or infections promptly with appropriate organic or chemical controls.
* I prefer using neem oil for pest control and copper fungicide for fungal diseases.
5. Support:
* Some chili varieties, especially those with heavy fruit production, may need support to prevent the branches from breaking.
* You can use stakes, cages, or trellises to support the plants.
Harvesting Your Chilies
The moment we’ve all been waiting for! Harvesting your delicious chilies.
1. When to Harvest:
* Chilies are typically ready to harvest when they have reached their mature color and size.
* The exact timing will depend on the variety.
* You can also harvest chilies when they are green, but they will be less flavorful and less spicy.
2. How to Harvest:
* Use

Conclusion
So, there you have it! This simple yet effective DIY trick for chili planting is a game-changer for anyone looking to maximize their yield and enjoy a bountiful harvest of spicy peppers. We’ve walked you through the process, highlighting the benefits of this method, and hopefully, inspired you to give it a try.
Why is this a must-try? Because it addresses some of the most common challenges faced by chili growers: nutrient deficiencies, poor root development, and inadequate support for heavy fruiting. By implementing this DIY approach, you’re proactively tackling these issues, setting your chili plants up for success from the very beginning. Imagine the satisfaction of harvesting baskets full of vibrant, flavorful chilies, knowing that you played a direct role in their abundance.
But don’t stop there! Feel free to experiment and adapt this technique to suit your specific needs and growing conditions. For example, if you’re growing in containers, consider adding slow-release fertilizer pellets to the planting hole for an extra boost of nutrients. Or, if you live in a windy area, you might want to use sturdier stakes or cages to provide additional support for your chili plants.
Here are a few variations to consider:
* Companion Planting: Plant basil or marigolds near your chili plants to deter pests and attract beneficial insects.
* Soil Amendments: Incorporate compost or well-rotted manure into the soil to improve its fertility and drainage.
* Watering Techniques: Use a soaker hose or drip irrigation system to deliver water directly to the roots of your chili plants, minimizing water waste and reducing the risk of fungal diseases.
* Different Chili Varieties: This method works well with a wide range of chili varieties, from mild bell peppers to fiery habaneros. Experiment with different types to find your favorites.
Ultimately, the best way to discover what works best for you is to get your hands dirty and try it out! We’re confident that you’ll be amazed by the results. Remember, successful chili planting is a journey of learning and experimentation.
We encourage you to embrace this DIY trick and share your experiences with us. Did you notice a significant increase in your chili yield? Did you encounter any challenges along the way? What variations did you try? We’d love to hear your stories and learn from your successes (and even your failures!). Share your photos and tips on social media using #ChiliPlantingDIY and let’s create a community of passionate chili growers.
Don’t delay, start planning your chili garden today and unlock the secrets to a truly abundant harvest! Happy growing!
Frequently Asked Questions (FAQ)
What type of soil is best for chili planting?
Chili plants thrive in well-draining, fertile soil with a slightly acidic to neutral pH (around 6.0 to 7.0). A good mix would include equal parts of garden soil, compost, and perlite or vermiculite. The compost provides essential nutrients, while the perlite or vermiculite improves drainage and aeration. Avoid heavy clay soils, as they can become waterlogged and lead to root rot. If you have clay soil, amend it with plenty of organic matter to improve its structure and drainage. You can also purchase a pre-made potting mix specifically formulated for vegetables.
How often should I water my chili plants?
Water your chili plants deeply and regularly, especially during hot, dry weather. The frequency of watering will depend on factors such as the weather, soil type, and size of the plant. As a general rule, water when the top inch of soil feels dry to the touch. Avoid overwatering, as this can lead to root rot. It’s best to water in the morning so that the foliage has time to dry before nightfall, which can help prevent fungal diseases. Using a soaker hose or drip irrigation system can help deliver water directly to the roots and minimize water waste.
What kind of fertilizer should I use for chili plants?
Chili plants benefit from regular fertilization throughout the growing season. Start with a balanced fertilizer (e.g., 10-10-10) when planting, and then switch to a fertilizer with a higher phosphorus content (e.g., 5-10-5) once the plants start to flower. Phosphorus promotes strong root development and abundant flowering, which translates to more chilies. You can also use organic fertilizers such as compost tea, fish emulsion, or bone meal. Avoid over-fertilizing, as this can lead to excessive foliage growth at the expense of fruit production. Follow the instructions on the fertilizer label carefully.
How much sunlight do chili plants need?
Chili plants need at least 6-8 hours of direct sunlight per day to thrive. Choose a sunny location in your garden where your plants will receive plenty of sunlight throughout the day. If you’re growing chili plants indoors, place them near a south-facing window or use grow lights to supplement natural light. Insufficient sunlight can lead to weak, leggy growth and reduced fruit production.
How do I protect my chili plants from pests and diseases?
Chili plants are susceptible to a variety of pests and diseases, including aphids, spider mites, whiteflies, and fungal diseases. To prevent pest and disease problems, start by choosing disease-resistant varieties and providing your plants with optimal growing conditions. Inspect your plants regularly for signs of pests or diseases, and take action promptly if you notice any problems. You can use insecticidal soap or neem oil to control aphids, spider mites, and whiteflies. For fungal diseases, improve air circulation around your plants and avoid overwatering. You can also use a fungicide if necessary. Companion planting with basil or marigolds can also help deter pests.
When is the best time to harvest chilies?
The best time to harvest chilies depends on the variety and your personal preference. Some chilies are harvested when they are green, while others are harvested when they are fully ripe and have turned red, yellow, or orange. The color of the chili will also affect its flavor and heat level. Generally, chilies will become hotter as they ripen. To harvest chilies, use a sharp knife or scissors to cut the stem just above the fruit. Avoid pulling the chilies off the plant, as this can damage the plant.
Can I grow chili plants in containers?
Yes, chili plants can be grown successfully in containers. Choose a container that is at least 12 inches in diameter and has drainage holes. Use a well-draining potting mix and water regularly. Container-grown chili plants may need to be fertilized more frequently than those grown in the ground. Place the container in a sunny location and provide support for the plants as they grow.
What are some common problems with chili plants and how can I fix them?
Some common problems with chili plants include:
* Blossom end rot: This is caused by a calcium deficiency and can be prevented by adding calcium to the soil or using a calcium-rich fertilizer.
* Leaf curl: This can be caused by aphids, spider mites, or viral diseases. Treat the pests or remove the infected plants.
* Lack of fruit: This can be caused by insufficient sunlight, over-fertilizing, or poor pollination. Provide more sunlight, adjust your fertilizer, and hand-pollinate the flowers if necessary.
* Yellowing leaves: This can be caused by nutrient deficiencies, overwatering, or underwatering. Adjust your watering and fertilizing practices accordingly.
By addressing these common problems promptly, you can keep your chili plants healthy and productive.

Leave a Comment