

Grow Potatoes Fast? Absolutely! Imagine harvesting a bounty of fresh, earthy potatoes from your very own backyard, weeks ahead of schedule. Sounds like a dream, right? Well, it doesn’t have to be! For centuries, gardeners have sought ways to accelerate the growing process, experimenting with techniques passed down through generations. From ancient Incan farmers carefully cultivating potatoes in the Andes Mountains to modern-day homesteaders maximizing their yields, the quest for a faster harvest is a timeless pursuit.
Let’s be honest, waiting for potatoes to mature can feel like an eternity. We all crave that instant gratification, especially when it comes to delicious, homegrown food. Maybe you’re short on space, or perhaps you simply want to enjoy the fruits (or rather, vegetables!) of your labor sooner rather than later. Whatever your reason, I’m here to share some incredible DIY tricks and hacks that will help you grow potatoes fast and enjoy a plentiful harvest in record time. Get ready to roll up your sleeves and transform your garden into a potato-producing powerhouse!
Grow Potatoes Like a Pro: My Foolproof DIY Method for a Bountiful Harvest!
Hey there, fellow gardening enthusiasts! I’m so excited to share my tried-and-true method for growing potatoes quickly and efficiently. Forget waiting months for a meager harvest – with this DIY hack, you’ll be digging up delicious spuds in no time. I’ve perfected this technique over years of experimenting, and I’m confident you’ll see amazing results too. Let’s get started!
What You’ll Need: The Potato Powerhouse Arsenal
Before we dive into the nitty-gritty, let’s gather our supplies. This is crucial for a smooth and successful potato-growing adventure.
* Seed Potatoes: These are your starting point. Choose certified seed potatoes from a reputable source. Avoid using potatoes from the grocery store, as they may be treated to prevent sprouting or carry diseases. Look for varieties suited to your climate and taste preferences. I personally love Yukon Gold for their creamy texture and all-purpose use. Red potatoes are also a great choice for boiling and salads.
* Large Container(s): Think big! We’re going for a “potato tower” effect, so a container at least 2 feet in diameter and 2 feet deep is ideal. A large trash can, a repurposed plastic storage bin, or even a fabric grow bag will work wonders. Make sure it has drainage holes!
* Potting Mix: A well-draining potting mix is essential. Avoid using garden soil, as it can compact and hinder potato growth. I recommend a mix of compost, peat moss (or coconut coir), and perlite or vermiculite. This combination provides the perfect balance of nutrients, moisture retention, and aeration.
* Compost: This is the black gold of gardening! Compost adds essential nutrients to the soil and improves its structure. Use well-rotted compost from your own compost bin or purchase it from a garden center.
* Fertilizer (Optional): While not strictly necessary, a slow-release fertilizer formulated for vegetables can give your potatoes an extra boost. Look for a fertilizer with a balanced NPK ratio (nitrogen, phosphorus, and potassium).
* Watering Can or Hose: Consistent watering is key to potato success.
* Shovel or Trowel: For planting and adding soil.
* Mulch (Optional): Straw or shredded leaves can help retain moisture and suppress weeds.
Step-by-Step: Building Your Potato Paradise
Now for the fun part! Follow these steps carefully, and you’ll be well on your way to a potato bonanza.
1. Prepare Your Seed Potatoes: This is called “chitting” or “sprouting.” About 2-3 weeks before planting, place your seed potatoes in a cool, bright location (but not in direct sunlight). This encourages them to develop sprouts, which will give them a head start when planted. You can cut larger seed potatoes into smaller pieces, ensuring each piece has at least 2-3 “eyes” (the little buds where sprouts emerge). Let the cut pieces callous over for a day or two before planting to prevent rotting.
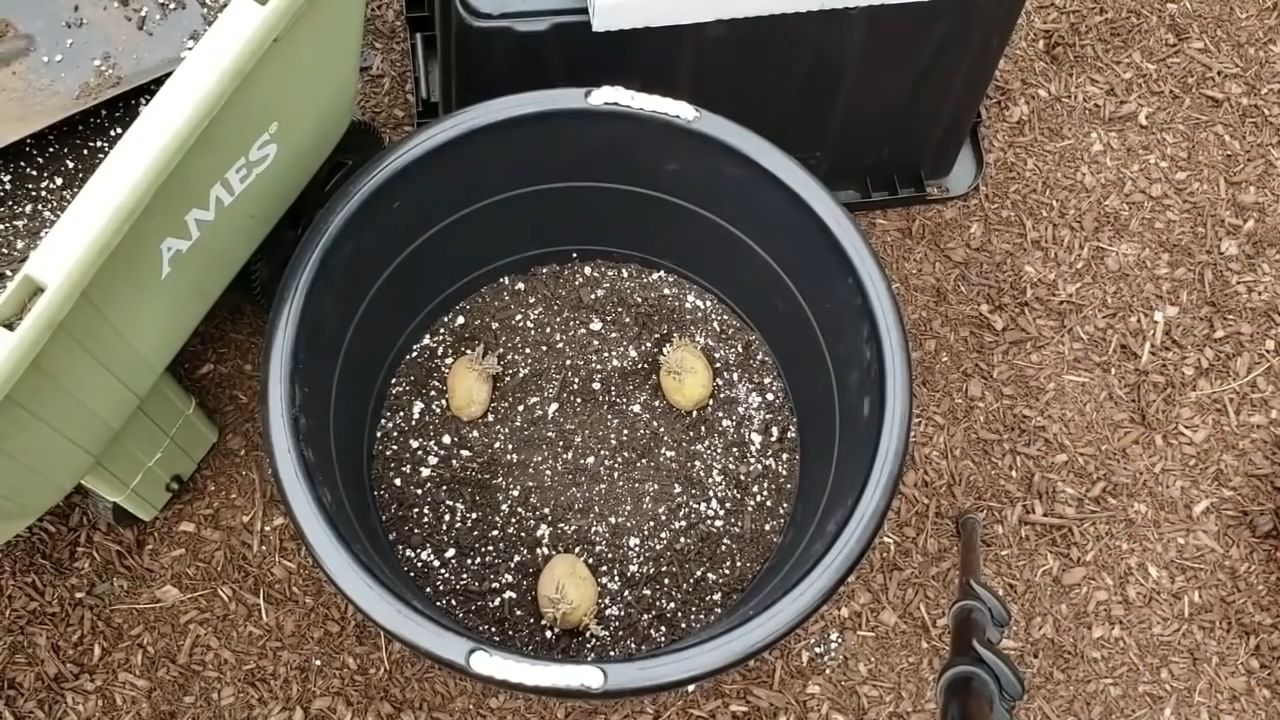
2. Layer the Foundation: In your chosen container, add a layer of potting mix about 6 inches deep. Mix in a generous amount of compost. This will be the initial home for your seed potatoes.
3. Plant the Seed Potatoes: Place the seed potatoes on top of the soil layer, with the sprouts facing upwards. Space them evenly, about 8-10 inches apart. If you’re using cut pieces, make sure the cut side is facing down.
4. Cover the Potatoes: Cover the seed potatoes with another 4-6 inches of potting mix and compost. Gently water the soil until it’s moist but not soggy.
5. Water and Wait: Keep the soil consistently moist, but avoid overwatering. Check the soil moisture regularly by sticking your finger into the soil. If it feels dry an inch or two below the surface, it’s time to water.
The “Hilling” Technique: The Secret to More Potatoes!
This is where the magic happens! “Hilling” is the process of adding more soil to the potato plants as they grow. This encourages the plants to produce more potatoes along the buried stems.
1. Observe Growth: As your potato plants grow, you’ll notice the stems emerging from the soil. Wait until the stems are about 6-8 inches tall.
2. Add More Soil: Carefully add more potting mix and compost around the base of the plants, burying the lower portion of the stems. Leave the top few inches of the plant exposed.
3. Repeat the Process: Continue hilling every 2-3 weeks as the plants grow taller. Each time, add enough soil to bury the lower portion of the stems, leaving only the top few inches exposed. This encourages the plants to produce more potatoes along the buried stems. I usually hill about 3-4 times during the growing season.
4. Maintain Moisture: Remember to keep the soil consistently moist throughout the hilling process.
Caring for Your Potato Plants: The TLC They Deserve
Growing potatoes is relatively easy, but a little extra care can go a long way.
* Sunlight: Potatoes need at least 6-8 hours of sunlight per day. Place your container in a sunny location.
* Watering: As mentioned earlier, consistent watering is crucial. Avoid letting the soil dry out completely, especially during hot weather.
* Fertilizing (Optional): If you’re using fertilizer, follow the instructions on the package. Avoid over-fertilizing, as this can lead to excessive foliage growth at the expense of potato production.
* Pest Control: Keep an eye out for common potato pests like aphids, potato beetles, and flea beetles. Hand-picking pests or using organic insecticides can help control infestations.
* Weed Control: Remove any weeds that pop up in your container. Weeds compete with your potato plants for nutrients and water.
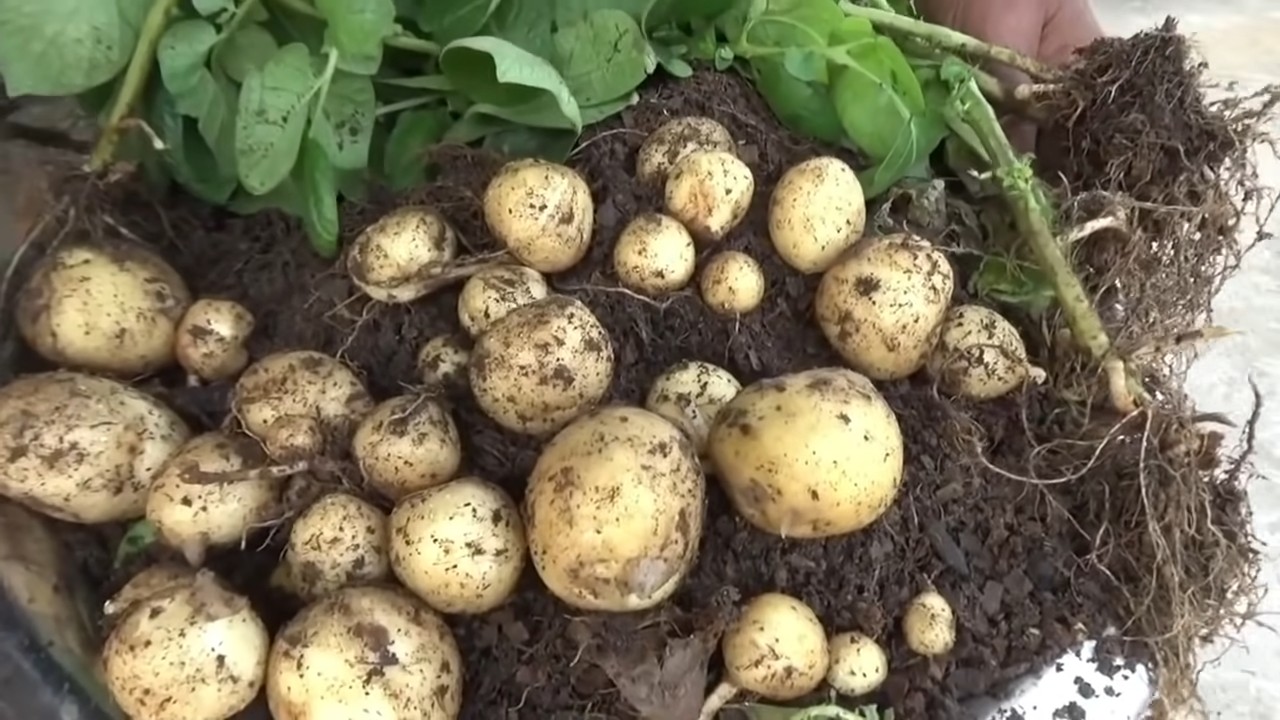
Harvest Time: The Grand Finale!
After about 70-90 days (depending on the variety), your potato plants will start to flower. This is a good indication that potatoes are forming underground.
1. Check for Readiness: To check if your potatoes are ready to harvest, gently dig around the base of one of the plants. If the potatoes are the size you desire, it’s time to harvest!
2. Harvesting: Carefully dig up the potatoes, being careful not to damage them. I like to use a garden fork to gently loosen the soil around the plants.
3. Curing (Optional): To improve their storage life, you can cure your potatoes for a week or two. Spread them out in a cool, dark, and well-ventilated place. This allows the skins to harden and helps prevent rotting.
4. Storage: Store your cured potatoes in a cool, dark, and dry place. A root cellar or a cool basement is ideal. Avoid storing them in the refrigerator, as this can cause them to develop a sweet taste.
Troubleshooting: Common Potato Problems and Solutions
Even with the best care, you might encounter some challenges along the way. Here are some common potato problems and how to address them:
* Potato Blight: This fungal disease can cause brown spots on the leaves and stems. To prevent blight, choose disease-resistant varieties, provide good air circulation, and avoid overhead watering. If blight does occur, remove infected foliage immediately.
* Scab: This disease causes rough, scabby patches on the potato skins. Scab is more common in alkaline soils. To prevent scab, maintain a slightly acidic soil pH (around 6.0).
* Pests: As mentioned earlier, aphids, potato beetles, and flea beetles can damage potato plants. Hand-picking pests or using organic insecticides can help control infestations.
* Green Potatoes: Potatoes that are exposed to sunlight will turn green and produce a toxic substance called solanine. Avoid eating green potatoes. To prevent greening, make sure the potatoes are well-covered with soil.
Extra Tips for Potato Perfection
* Succession Planting: Plant seed potatoes every few weeks to extend your harvest season.
* Companion Planting: Plant potatoes with beneficial companion plants like marigolds, nasturtiums, and basil. These plants can help deter pests and attract beneficial insects.
* Soil Testing: Test your soil pH before planting to ensure it’s suitable for potatoes.
* Record Keeping: Keep track of your planting dates, varieties, and yields. This will help you improve your potato-growing skills over time.
I hope this guide has inspired you to grow your own potatoes! It’s a rewarding and delicious experience. With a little effort and these simple techniques, you’ll be enjoying homegrown potatoes in no time. Happy gardening!
Conclusion
So, there you have it! Growing potatoes fast isn’t some mythical gardening feat reserved for professionals. It’s an achievable goal for any home gardener, regardless of experience level, with a little planning and this simple DIY trick. We’ve walked you through the process, highlighting the key steps to accelerate your potato harvest and enjoy those delicious, homegrown spuds sooner than you ever thought possible.
Why is this DIY method a must-try? Because it’s efficient, cost-effective, and incredibly rewarding. Imagine the satisfaction of harvesting your own potatoes just weeks after planting, knowing you played an active role in nurturing them from seed to table. This method bypasses many of the traditional waiting periods, allowing you to enjoy fresh, flavorful potatoes when you want them. Plus, it’s a fantastic way to extend your growing season, potentially yielding multiple harvests in a single year.
But the beauty of gardening lies in its adaptability. Feel free to experiment with different potato varieties to find your favorites. Some varieties, like Yukon Gold or Red Norland, are known for their early maturity and may respond particularly well to this accelerated growing technique. Consider also adjusting the size of your container based on the space you have available. Even a small balcony can accommodate a potato-growing setup with the right container size.
Furthermore, you can enhance the soil mixture with additional organic matter, such as compost or well-rotted manure, to provide your potatoes with an extra boost of nutrients. Remember to monitor the moisture levels regularly and adjust your watering schedule accordingly, especially during hot weather.
Don’t be afraid to get creative with your setup. Some gardeners have successfully used grow bags or even repurposed containers like old tires or laundry baskets. The key is to ensure proper drainage and provide ample space for the potatoes to develop.
We are confident that this method will revolutionize your potato-growing experience. It’s a game-changer for anyone eager to enjoy the taste of homegrown potatoes without the long wait.
Now, it’s your turn! We wholeheartedly encourage you to try this DIY trick for growing potatoes fast. Plant those seed potatoes, follow our simple steps, and watch the magic unfold. And most importantly, don’t forget to share your experience with us! We’d love to hear about your successes, challenges, and any variations you’ve tried. Share your photos and stories in the comments below or on our social media channels. Let’s build a community of potato-growing enthusiasts and learn from each other’s experiences. Happy gardening!
Frequently Asked Questions (FAQ)
What kind of potatoes are best for this fast-growing method?
While this method works well with most potato varieties, some are naturally faster growers. Yukon Gold, Red Norland, and Irish Cobbler are excellent choices for early harvests. These varieties tend to mature quicker than others, making them ideal for this accelerated growing technique. Experimenting with different varieties is also a great way to discover your personal favorites and see which ones thrive best in your specific climate and growing conditions. Remember to source certified seed potatoes from a reputable supplier to ensure they are disease-free and have the best chance of success.
How often should I water my potatoes grown in containers?
Watering frequency depends on several factors, including the weather, the size of your container, and the type of soil you’re using. Generally, you should aim to keep the soil consistently moist but not waterlogged. Check the soil moisture level regularly by sticking your finger about an inch or two into the soil. If it feels dry to the touch, it’s time to water. During hot, dry weather, you may need to water daily, while during cooler, wetter periods, you can reduce the frequency. Ensure your container has adequate drainage to prevent water from pooling at the bottom, which can lead to root rot.
What type of soil is best for growing potatoes in containers?
Potatoes prefer well-draining, slightly acidic soil. A good mix consists of equal parts potting soil, compost, and perlite or vermiculite. The potting soil provides a base for the plants, the compost adds essential nutrients, and the perlite or vermiculite improves drainage and aeration. Avoid using garden soil, as it can be too heavy and compact, hindering root growth. You can also amend the soil with a slow-release fertilizer specifically formulated for vegetables to provide a steady supply of nutrients throughout the growing season.
How much sunlight do potatoes need to grow well?
Potatoes need at least six to eight hours of direct sunlight per day to thrive. Choose a location that receives plenty of sunlight throughout the day. If you’re growing potatoes indoors or in a partially shaded area, you may need to supplement with artificial lighting, such as grow lights. Insufficient sunlight can result in weak, leggy plants and reduced potato production.
How do I know when my potatoes are ready to harvest?
The timing of your harvest will depend on the variety of potatoes you’re growing and the specific growing conditions. Generally, early-maturing varieties are ready to harvest about 70-80 days after planting, while late-maturing varieties may take up to 100 days or more. A good indicator that your potatoes are ready to harvest is when the foliage starts to turn yellow and die back. You can also gently dig around the base of the plant to check the size of the potatoes. If they are the size you desire, you can begin harvesting.
Can I grow potatoes in a small space, like a balcony?
Absolutely! Growing potatoes in containers is an excellent option for small spaces like balconies or patios. Choose a container that is at least 15-20 gallons in size to provide ample space for the potatoes to develop. You can also use grow bags, which are lightweight and easy to move around. Make sure the container has adequate drainage and is placed in a sunny location. With a little planning and care, you can enjoy a bountiful potato harvest even in a limited space.
What are some common pests and diseases that affect potatoes, and how can I prevent them?
Potatoes can be susceptible to various pests and diseases, including potato beetles, aphids, blight, and scab. To prevent these problems, start with certified disease-free seed potatoes. Practice crop rotation to avoid building up pests and diseases in the soil. Monitor your plants regularly for signs of infestation or disease and take action promptly. You can use organic pest control methods, such as insecticidal soap or neem oil, to control pests. Ensure good air circulation around your plants to prevent fungal diseases. If you encounter a severe infestation or disease outbreak, you may need to use chemical controls, but always follow the instructions carefully.
Can I reuse the soil from my potato containers for other plants?
It’s generally not recommended to reuse soil from potato containers for other plants, especially if you’ve had any issues with pests or diseases. Potatoes can deplete the soil of nutrients, so it’s best to replenish the soil with fresh compost and other amendments before planting other crops. If you do choose to reuse the soil, be sure to sterilize it first by baking it in the oven or solarizing it in the sun to kill any potential pathogens.
What if my potato plants are growing tall and leafy but not producing many potatoes?
This could be due to several factors, including excessive nitrogen in the soil, insufficient sunlight, or overcrowding. Too much nitrogen can promote leafy growth at the expense of tuber development. Make sure you’re using a balanced fertilizer or one that is lower in nitrogen. Ensure your plants are receiving at least six to eight hours of direct sunlight per day. If you’re growing multiple plants in the same container, make sure they have enough space to grow and develop properly. Thinning out the plants may help improve potato production.
How can I store my harvested potatoes to keep them fresh for longer?
Store your harvested potatoes in a cool, dark, and well-ventilated place, such as a root cellar or basement. The ideal temperature is between 40-50°F (4-10°C). Avoid storing potatoes in the refrigerator, as this can cause them to develop a sweet taste. Before storing, cure the potatoes by allowing them to dry in a well-ventilated area for a few days. This helps to toughen the skin and prevent rot. Store the potatoes in a single layer in a cardboard box or burlap sack. Check them regularly for signs of spoilage and remove any that are starting to rot. Properly stored potatoes can last for several months.
Leave a Comment