

Grow carrots easily? Absolutely! Imagine pulling vibrant, sweet carrots straight from your own backyard, bursting with flavor and freshness that you just can’t find in the grocery store. It’s not just a dream; it’s an achievable reality with a few simple tricks and DIY hacks. For centuries, cultivating our own food has been a cornerstone of self-sufficiency and a connection to the earth. From ancient civilizations nurturing their gardens to modern-day urban farmers, the desire to grow carrots easily and other vegetables remains strong.
But let’s be honest, sometimes growing carrots can feel like a frustrating game of hide-and-seek with tiny, misshapen roots. That’s where this guide comes in! I’m here to share my tried-and-true DIY secrets that will transform your carrot-growing experience. Whether you’re a seasoned gardener or just starting out, these tips will help you overcome common challenges like poor germination, stunted growth, and pest infestations. Get ready to unlock the secrets to a bountiful carrot harvest and enjoy the satisfaction of growing your own delicious, healthy food. Let’s get our hands dirty!
Growing Malabar Spinach Indoors: A Complete Guide
Okay, so you want to grow Malabar spinach indoors? Awesome! It’s a fantastic plant to have around, adding a unique flavor and texture to your meals. Plus, it’s a beautiful vine that can brighten up any indoor space. I’ve been growing it indoors for a while now, and I’m excited to share my tips and tricks with you. Let’s get started!
What You’ll Need
Before we dive into the nitty-gritty, let’s gather all the supplies you’ll need. Trust me, having everything ready beforehand will make the whole process much smoother.
* Malabar Spinach Seeds or Cuttings: You can find seeds online or at your local garden center. Cuttings are another great option if you know someone who already has a plant.
* Pot: Choose a pot that’s at least 12 inches in diameter and depth. Malabar spinach likes to spread out its roots.
* Well-Draining Potting Mix: This is crucial! Malabar spinach doesn’t like soggy soil. A mix designed for vegetables or herbs works perfectly.
* Grow Light (Optional but Recommended): While Malabar spinach loves sunlight, it can be tricky to provide enough indoors, especially during winter. A grow light will ensure your plant gets the light it needs.
* Trellis or Support Structure: Malabar spinach is a vine, so it needs something to climb on. A trellis, bamboo stakes, or even a sturdy tomato cage will work.
* Watering Can or Spray Bottle: For watering, of course!
* Fertilizer: A balanced liquid fertilizer will help your plant thrive.
* Pruning Shears or Scissors: For harvesting and keeping your plant tidy.
* Spray Bottle with Water: For misting the leaves.
Starting from Seeds: A Step-by-Step Guide
Starting from seeds is a rewarding experience, although it takes a bit longer than using cuttings. Don’t worry, I’ll walk you through it.
1. Soaking the Seeds: Malabar spinach seeds have a hard outer shell, so soaking them beforehand helps with germination. Place the seeds in a small bowl of warm water and let them soak for 24-48 hours. This will soften the shell and make it easier for the seedlings to emerge.
2. Preparing the Pot: Fill your pot with the well-draining potting mix, leaving about an inch of space at the top. Gently pat down the soil to remove any air pockets.
3. Sowing the Seeds: Make small indentations in the soil, about half an inch deep and a few inches apart. Place one or two seeds in each indentation and cover them with soil. Lightly water the soil to moisten it.
4. Creating a Humid Environment: To encourage germination, you can create a mini-greenhouse effect. Cover the pot with a clear plastic bag or plastic wrap. This will help retain moisture and warmth. Make sure to poke a few holes in the plastic for ventilation.
5. Finding the Right Spot: Place the pot in a warm location with indirect sunlight. A temperature of around 70-80°F (21-27°C) is ideal for germination.
6. Monitoring and Watering: Check the soil moisture daily. Keep the soil consistently moist, but not waterlogged. Remove the plastic bag or wrap once the seedlings emerge.
7. Providing Light: Once the seedlings have sprouted, they’ll need plenty of light. If you’re not using a grow light, place the pot in a sunny window that receives at least 6 hours of direct sunlight per day. If you’re using a grow light, position it a few inches above the seedlings and keep it on for 12-14 hours per day.
8. Thinning the Seedlings: Once the seedlings have developed a few sets of true leaves, thin them out, leaving only the strongest seedling in each spot.
Starting from Cuttings: A Faster Route
If you have access to a Malabar spinach plant, starting from cuttings is a much faster way to get your indoor garden going.
1. Taking the Cuttings: Choose healthy stems that are about 4-6 inches long. Use clean pruning shears or scissors to cut the stems just below a node (the point where leaves grow from the stem). Remove the lower leaves from the cutting, leaving only a few leaves at the top.
2. Rooting the Cuttings in Water: Place the cuttings in a glass or jar of water, making sure that the nodes are submerged. Change the water every few days to prevent bacterial growth.
3. Waiting for Roots to Develop: In a week or two, you should start to see roots emerging from the nodes. Once the roots are about an inch long, the cuttings are ready to be planted.
4. Planting the Cuttings: Fill your pot with the well-draining potting mix. Make a small hole in the soil and gently place the rooted cutting in the hole. Cover the roots with soil and lightly water the soil.
5. Providing Support: Install your trellis or support structure in the pot. Gently guide the vines of the Malabar spinach plant onto the support.
Caring for Your Indoor Malabar Spinach Plant
Now that your Malabar spinach plant is growing, it’s important to provide it with the right care to keep it healthy and productive.
* Light: Malabar spinach needs plenty of light to thrive. If you’re growing it indoors, a grow light is highly recommended. Position the light a few inches above the plant and keep it on for 12-14 hours per day. If you’re using natural light, place the plant in a sunny window that receives at least 6 hours of direct sunlight per day.
* Watering: Water your Malabar spinach plant regularly, keeping the soil consistently moist but not waterlogged. Check the soil moisture daily and water when the top inch of soil feels dry to the touch. Avoid overwatering, as this can lead to root rot.
* Humidity: Malabar spinach prefers high humidity. To increase humidity, you can mist the leaves regularly with a spray bottle of water. You can also place a tray of water near the plant or use a humidifier.
* Fertilizing: Feed your Malabar spinach plant with a balanced liquid fertilizer every two weeks during the growing season (spring and summer). Follow the instructions on the fertilizer label.
* Pruning: Prune your Malabar spinach plant regularly to encourage bushier growth and prevent it from becoming too leggy. Pinch off the tips of the vines to promote branching. You can also harvest the leaves as needed.
* Pest Control: Keep an eye out for pests such as aphids, spider mites, and whiteflies. If you notice any pests, treat them with an insecticidal soap or neem oil.
Harvesting Your Malabar Spinach
One of the best parts of growing your own Malabar spinach is harvesting the delicious leaves!
* When to Harvest: You can start harvesting the leaves when the plant is about 6-8 inches tall.
* How to Harvest: Use pruning shears or scissors to cut off the leaves and stems. You can harvest individual leaves or entire stems.
* Harvesting Regularly: Harvesting regularly will encourage the plant to produce more leaves.
* Using Your Harvest: Malabar spinach leaves can be used in a variety of dishes, such as salads, soups, stir-fries, and curries. They have a slightly mucilaginous texture, similar to okra.
Troubleshooting Common Problems
Even with the best care, you might encounter some problems while growing Malabar spinach indoors. Here are some common issues and how to address them:
* Yellowing Leaves: Yellowing leaves can be a sign of overwatering, underwatering, or nutrient deficiency. Check the soil moisture and adjust your watering accordingly. If the soil is consistently moist, you may be overwatering. If the soil is dry, you may be underwatering. If the leaves are yellowing all over, it could be a sign of nutrient deficiency. Try fertilizing the plant with a balanced liquid fertilizer.
* Leggy Growth: Leggy growth (long, spindly stems with few leaves) is usually a sign of insufficient light. Make sure your plant is getting enough light, either from a grow light or a sunny window.
* Pest Infestations: Pests such as aphids, spider mites, and whiteflies can infest Malabar spinach plants. Treat infestations with insecticidal soap or neem oil.
* Slow Growth: Slow growth can be caused by a variety of factors, including insufficient light, poor soil, or nutrient deficiency. Make sure your plant is getting enough light and that the soil is well-draining and nutrient-rich. Fertilize the plant regularly with a balanced liquid fertilizer.
Enjoying Your Homegrown Malabar Spinach
Growing Malabar spinach indoors is a rewarding experience. Not only do you get
Conclusion
So, there you have it! Growing carrots easily doesn’t have to be a daunting task filled with misshapen roots and frustrating failures. By implementing these simple yet effective DIY tricks, you’re setting yourself up for a bountiful harvest of sweet, crisp, and perfectly formed carrots. This isn’t just about saving money; it’s about connecting with your food, understanding the growing process, and experiencing the immense satisfaction of nurturing something from seed to table.
The key takeaways are simple: proper soil preparation, strategic seed spacing, consistent watering, and diligent weed control. These elements, when combined with the DIY tricks we’ve discussed, create the ideal environment for your carrots to thrive. Remember, carrots need loose, well-drained soil to develop properly. Amending your soil with compost and sand can make a world of difference. And don’t underestimate the power of thinning! Giving your carrots enough space to grow is crucial for preventing overcrowding and ensuring they reach their full potential.
But the beauty of gardening lies in experimentation! Feel free to adapt these techniques to suit your specific climate, soil type, and personal preferences. For example, if you live in a particularly hot climate, consider providing your carrots with some afternoon shade to prevent them from bolting (going to seed prematurely). You could also try companion planting with onions or garlic, which are known to deter carrot root flies.
Variations and Suggestions:
* Container Gardening: If you’re short on space, don’t despair! Carrots can also be grown successfully in containers. Just make sure to choose a deep container (at least 12 inches) and use a high-quality potting mix. Dwarf varieties like ‘Thumbelina’ are particularly well-suited for container gardening.
* Succession Planting: To enjoy a continuous harvest of carrots throughout the growing season, try succession planting. Sow a new batch of seeds every two to three weeks. This will ensure that you always have a fresh supply of carrots ready to be picked.
* Different Varieties: Explore the wide world of carrot varieties! From the classic orange ‘Nantes’ to the colorful ‘Rainbow Blend,’ there’s a carrot out there for everyone. Experiment with different varieties to find your favorites.
* DIY Seed Tape: Create your own seed tape using strips of paper towel and a mixture of flour and water. This is a great way to ensure even spacing and prevent overcrowding. Simply place a few carrot seeds along the tape at the desired intervals, let it dry, and then plant the tape in your garden.
* Soil Solarization: If you’re struggling with soilborne pests or diseases, consider solarizing your soil before planting. This involves covering the soil with clear plastic for several weeks during the hottest part of the year. The heat trapped under the plastic will kill off many harmful organisms.
Ultimately, the best way to learn is by doing. So, grab your seeds, prepare your soil, and get ready to embark on your carrot-growing adventure! We’re confident that with these DIY tricks, you’ll be amazed at how easy it is to grow your own delicious and nutritious carrots.
Don’t be afraid to experiment, make mistakes, and learn from your experiences. Gardening is a journey, not a destination. And remember, the most important ingredient is patience.
We’re eager to hear about your experiences! Share your tips, tricks, and photos in the comments below. Let’s create a community of carrot-growing enthusiasts and help each other achieve gardening success. Happy growing! Let us know how you are growing carrots easily!
FAQ
What kind of soil is best for growing carrots?
Carrots thrive in loose, well-drained soil that is free of rocks and debris. Rocky soil can cause the roots to split and become misshapen. The ideal soil pH is between 6.0 and 6.8. Amend heavy clay soil with compost, sand, and other organic matter to improve drainage and aeration. Raised beds are also an excellent option for growing carrots, as they provide excellent drainage and allow you to control the soil composition.
How often should I water my carrots?
Carrots need consistent moisture to develop properly. Water deeply and regularly, especially during dry periods. Aim to keep the soil consistently moist but not waterlogged. A good rule of thumb is to water when the top inch of soil feels dry to the touch. Mulching around your carrot plants can help to retain moisture and suppress weeds. Avoid overhead watering, as this can increase the risk of fungal diseases. Drip irrigation is an excellent way to water carrots, as it delivers water directly to the roots.
When should I thin my carrot seedlings?
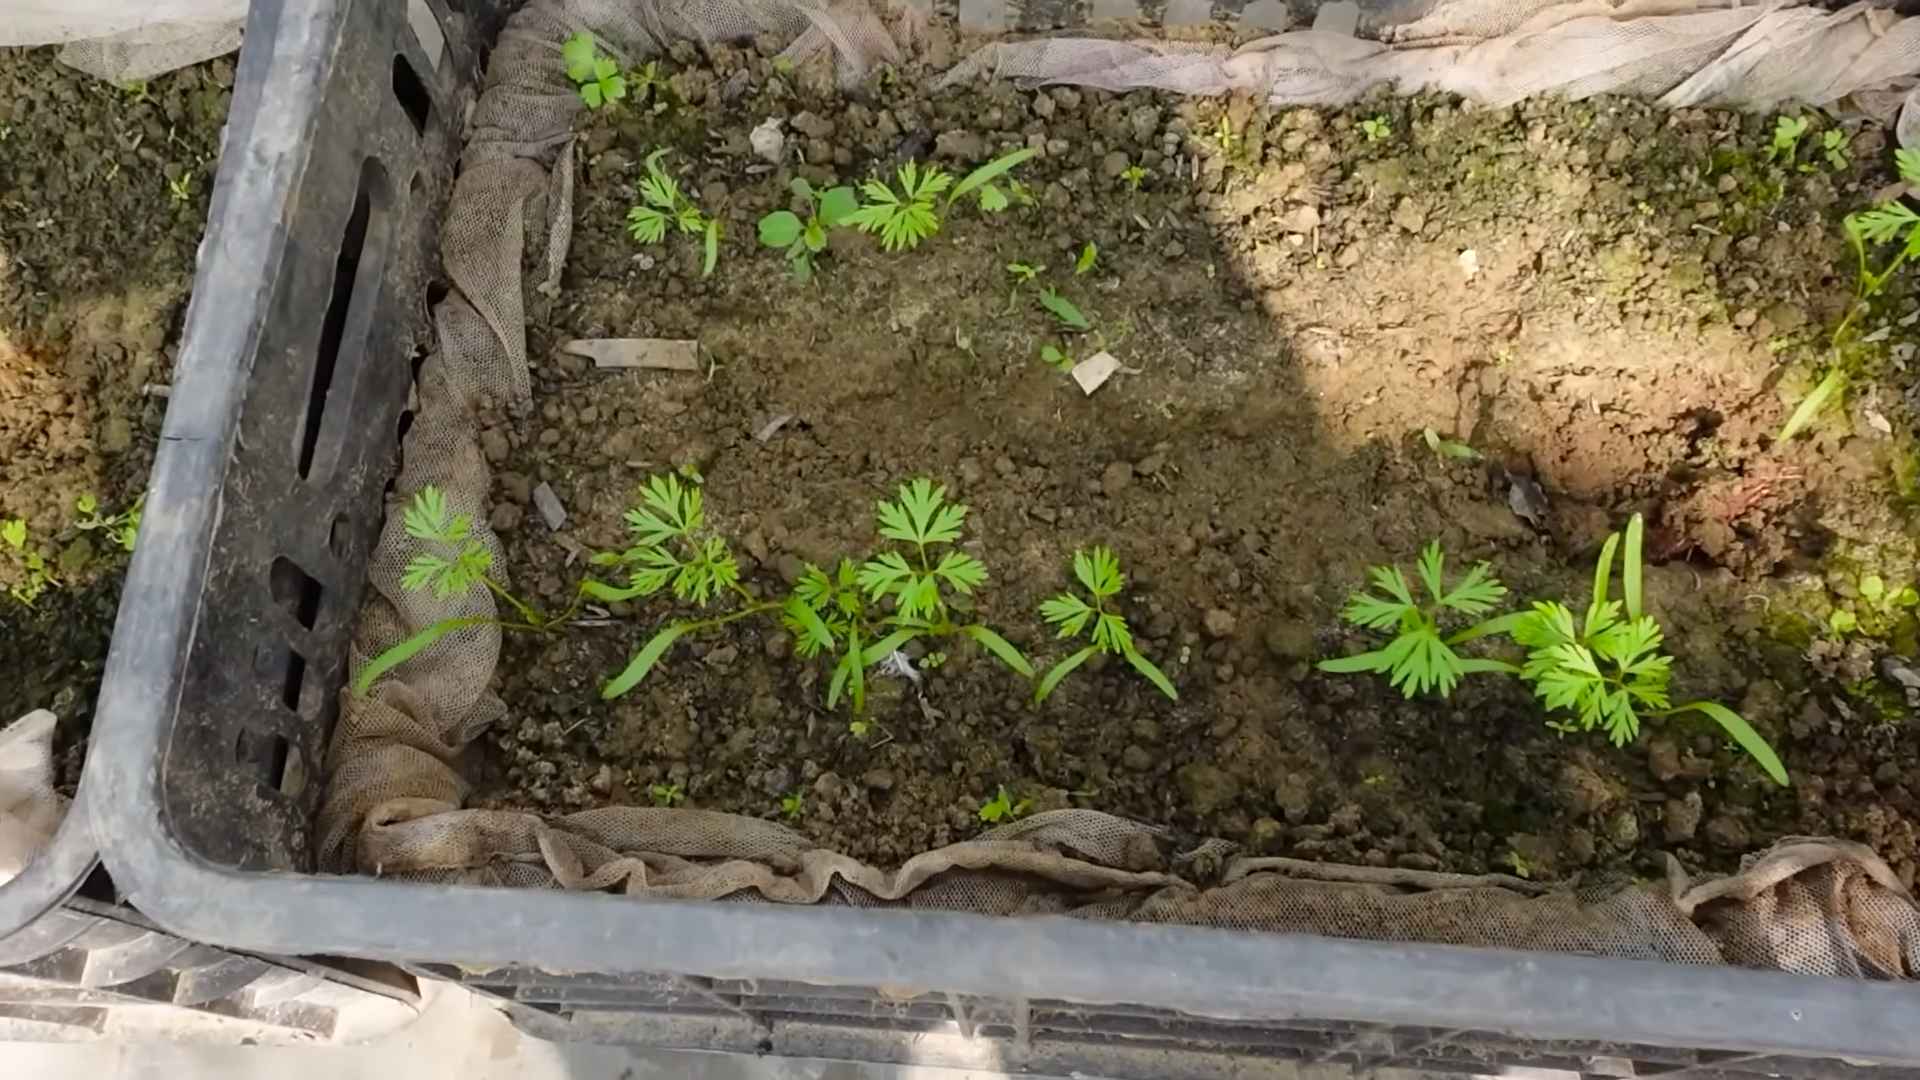
Thinning is crucial for preventing overcrowding and ensuring that your carrots have enough space to grow. Thin your seedlings when they are about 2 inches tall, spacing them about 1-2 inches apart. You may need to thin them again later as they grow larger. Use scissors or small clippers to carefully snip off the unwanted seedlings at the soil line. Avoid pulling them out, as this can disturb the roots of the remaining plants.
What are some common pests and diseases that affect carrots?
Carrot root flies are a common pest that can damage carrot roots. They lay their eggs near the base of the plants, and the larvae burrow into the roots, causing them to become riddled with tunnels. Other common pests include aphids, nematodes, and wireworms. Diseases that can affect carrots include leaf blight, powdery mildew, and root rot. Practice good garden hygiene to prevent pests and diseases. Rotate your crops regularly, remove any diseased plants promptly, and use organic pest control methods when necessary. Companion planting with onions or garlic can help to deter carrot root flies.
How do I know when my carrots are ready to harvest?
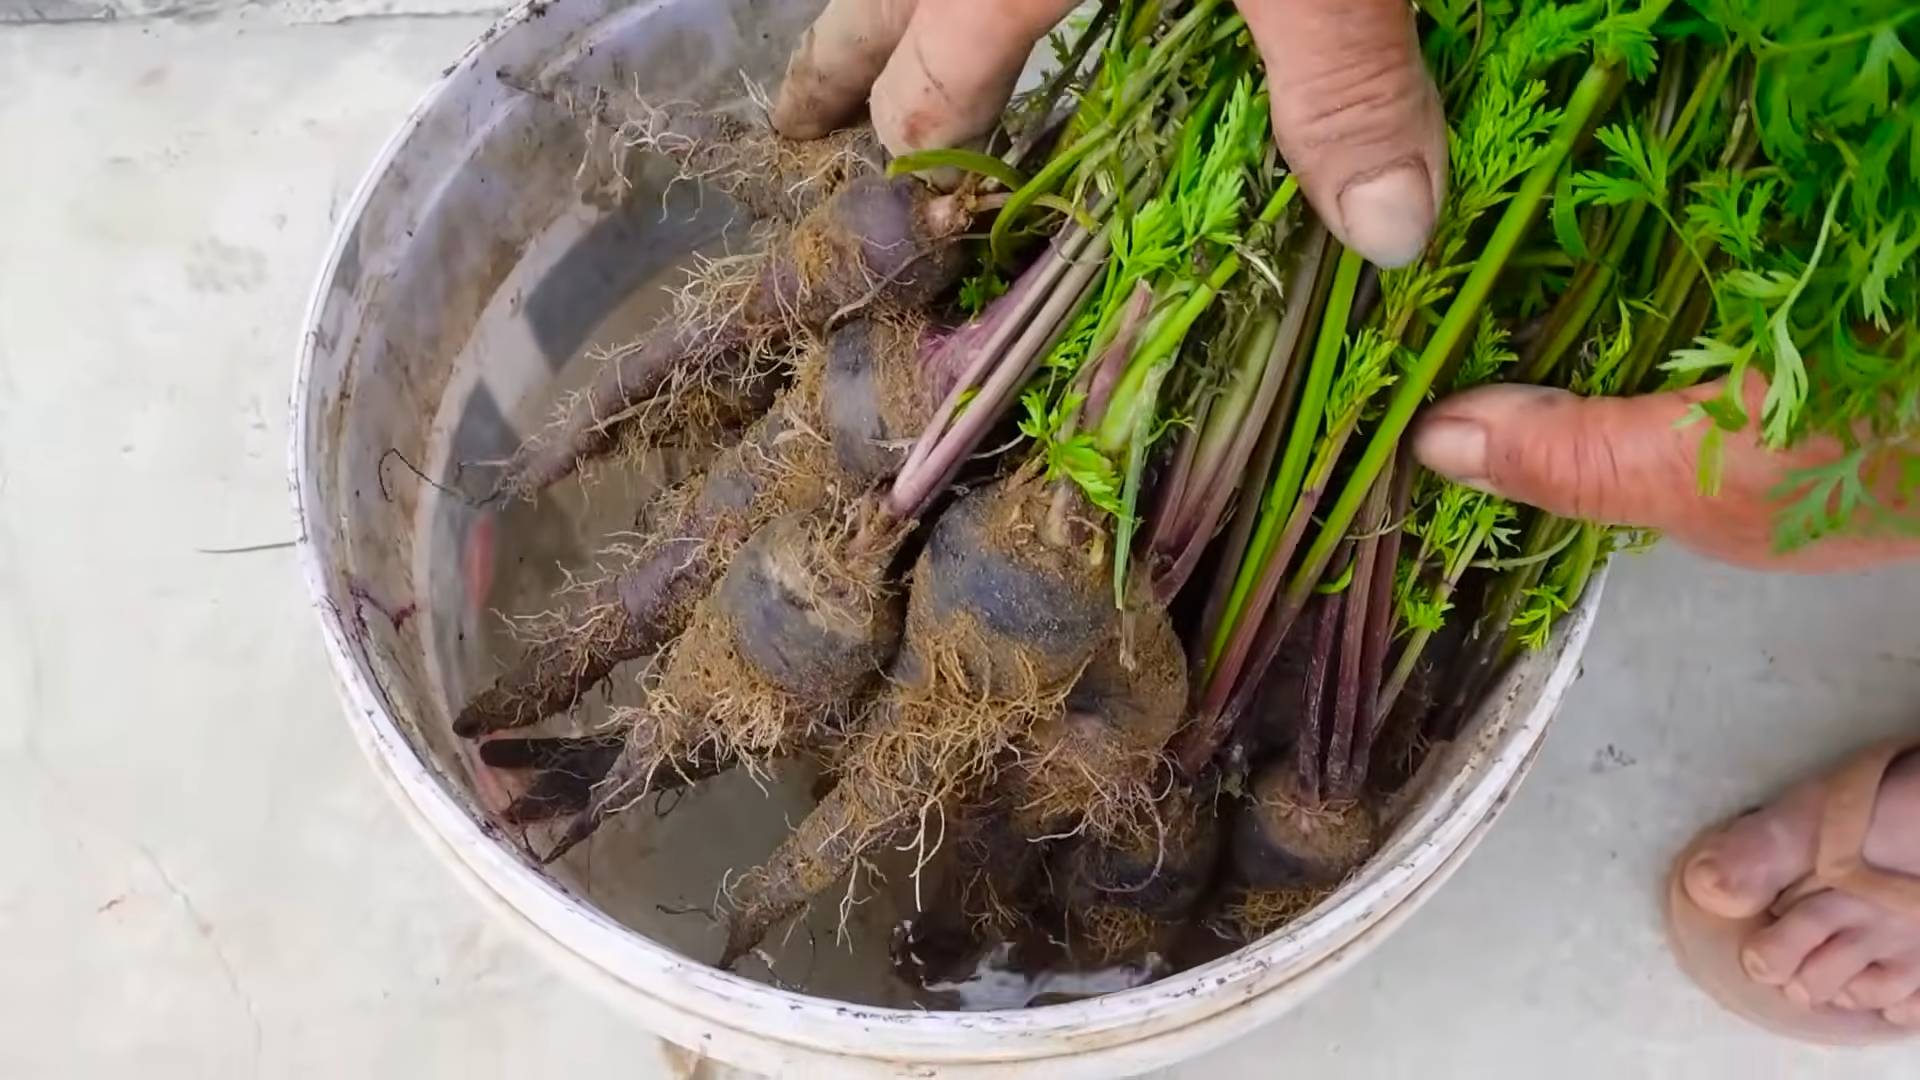
Carrots are typically ready to harvest 60-80 days after planting, depending on the variety. The best way to tell if they are ready is to check the size of the roots. Gently brush away the soil around the base of the plants to get a better look. Carrots are usually ready to harvest when they are about 1-2 inches in diameter at the top. You can also harvest them earlier if you prefer smaller, baby carrots. To harvest, gently loosen the soil around the carrots with a garden fork and then pull them out by the tops.
Can I grow carrots in the shade?
While carrots prefer full sun (6-8 hours of sunlight per day), they can tolerate some partial shade, especially in hot climates. However, if they don’t get enough sunlight, they may not develop as well and the roots may be smaller. If you live in a particularly hot climate, providing your carrots with some afternoon shade can help to prevent them from bolting.
Why are my carrots splitting?
Carrot splitting is often caused by inconsistent watering. If the soil dries out and then is suddenly flooded with water, the carrots can absorb too much water too quickly, causing them to split. To prevent splitting, water your carrots consistently and avoid letting the soil dry out completely. Amending your soil with organic matter can also help to improve its water-holding capacity.
Can I leave carrots in the ground over winter?
In mild climates, you can often leave carrots in the ground over winter and harvest them as needed. However, in colder climates, the ground may freeze, making it difficult to harvest them. If you live in a cold climate, you can protect your carrots by covering them with a thick layer of mulch, such as straw or leaves. This will help to insulate the soil and prevent it from freezing.
Are carrot greens edible?
Yes, carrot greens are edible and nutritious! They have a slightly bitter taste, similar to parsley. You can use them in salads, soups, stews, or pesto. Just be sure to wash them thoroughly before using them. Some people may be sensitive to carrot greens, so it’s best to start with a small amount to see how you react.
How do I store carrots after harvesting?
To store carrots, remove the greens and gently brush off any excess soil. Do not wash them until you are ready to use them. Store them in a cool, dark, and humid place, such as the refrigerator crisper drawer. You can also store them in a container filled with damp sand or sawdust. Carrots stored properly can last for several weeks or even months.

Leave a Comment