

Backyard Cauliflower Growing Guide: Ever dream of strolling into your backyard and harvesting a crisp, creamy cauliflower head, ready for roasting, steaming, or even pickling? I know I have! For centuries, cauliflower has been a culinary staple, gracing tables from ancient Rome to modern-day kitchens. Its versatility and nutritional benefits have made it a beloved vegetable across cultures.
But let’s be honest, growing cauliflower can seem a bit intimidating. Many gardeners shy away, fearing it’s too difficult or requires too much space. That’s where this DIY guide comes in! I’m here to show you that with a few simple tricks and hacks, you can absolutely master backyard cauliflower growing, even if you’re a beginner or have limited space.
Imagine the satisfaction of serving a delicious, homegrown cauliflower dish to your family, knowing you nurtured it from seed to plate. Plus, growing your own produce is a fantastic way to save money, reduce your carbon footprint, and enjoy the freshest, most flavorful vegetables possible. So, ditch the grocery store cauliflower and let’s get our hands dirty! This guide will equip you with everything you need to succeed, from choosing the right varieties to troubleshooting common problems. Let’s transform your backyard into a cauliflower haven!
Growing Cauliflower in Your Backyard: A Comprehensive DIY Guide
Hey there, fellow gardening enthusiasts! I’m so excited to share my tried-and-true method for growing gorgeous, delicious cauliflower right in your own backyard. Forget those expensive, sometimes lackluster heads from the grocery store – with a little effort, you can harvest your own fresh, flavorful cauliflower. This guide will walk you through every step, from seed to harvest, ensuring you have a bountiful crop.
Choosing the Right Cauliflower Variety
Before we even think about planting, let’s talk varieties. Not all cauliflower is created equal! Some are better suited for certain climates, and some mature faster than others. Here are a few of my favorites:
* Snowball Y Improved: A classic, reliable variety that produces medium-sized, pure white heads. It’s relatively heat-tolerant, making it a good choice for warmer climates.
* Early White Hybrid: As the name suggests, this one matures quickly, making it ideal if you’re impatient (like me!). It produces compact, dense heads.
* Graffiti: Want to add some color to your garden? Graffiti cauliflower produces vibrant purple heads that are just as delicious as the white varieties.
* Cheddar: Another colorful option, Cheddar cauliflower boasts beautiful orange heads. It’s also known for its mild, slightly sweet flavor.
* Romanesco: This one’s a showstopper! Romanesco cauliflower features a stunning fractal pattern and a nutty, slightly sweet taste.
Consider your local climate and growing season when making your choice. Check seed packets for information on days to maturity and recommended growing zones.
Starting Your Cauliflower Seeds
Cauliflower can be a bit finicky, so I highly recommend starting your seeds indoors, especially if you live in an area with a short growing season. This gives them a head start and protects them from early-season pests and diseases.
* When to Start: Start your seeds about 4-6 weeks before the last expected frost in your area.
* What You’ll Need:
* Seed starting trays or small pots
* Seed starting mix (a light, well-draining mix is essential)
* Seeds of your chosen cauliflower variety
* A spray bottle filled with water
* A heat mat (optional, but helpful for germination)
* A grow light (also optional, but provides consistent light)
Step-by-Step Instructions:
1. Prepare Your Seed Starting Trays: Fill your seed starting trays or pots with seed starting mix. Gently tap the trays to settle the mix.
2. Sow the Seeds: Make a small indentation (about ¼ inch deep) in the center of each cell or pot. Place 2-3 seeds in each indentation. This increases the chances of at least one seed germinating.
3. Cover the Seeds: Gently cover the seeds with a thin layer of seed starting mix.
4. Water Carefully: Use a spray bottle to mist the soil thoroughly. You want the soil to be moist but not waterlogged.
5. Provide Warmth: Place the trays on a heat mat (if using) and cover them with a humidity dome or plastic wrap to create a warm, humid environment.
6. Provide Light: Place the trays under a grow light (if using) or in a bright, sunny window. If using a grow light, keep it about 2-4 inches above the trays.
7. Monitor and Water: Check the soil moisture daily. Water as needed to keep the soil consistently moist.
8. Remove Humidity Dome: Once the seeds germinate (usually within 5-10 days), remove the humidity dome or plastic wrap.
9. Thin Seedlings: Once the seedlings have their first true leaves (the second set of leaves), thin them to one seedling per cell or pot. Choose the strongest, healthiest seedling and snip off the others at the soil line.
Preparing Your Garden Bed
While your seedlings are growing indoors, it’s time to prepare your garden bed. Cauliflower needs rich, well-drained soil and plenty of sunlight.
* Sunlight: Choose a location that receives at least 6 hours of direct sunlight per day.
* Soil: Cauliflower thrives in soil that is rich in organic matter and has a pH between 6.0 and 7.0.
* Amendments: Amend your soil with compost, well-rotted manure, or other organic matter to improve its fertility and drainage.
* Fertilizer: Incorporate a balanced fertilizer into the soil before planting. Look for a fertilizer with a ratio of 10-10-10 or something similar.
Step-by-Step Instructions:
1. Clear the Area: Remove any weeds, rocks, or debris from the planting area.
2. Till the Soil: Till the soil to a depth of at least 12 inches. This will help to loosen the soil and improve drainage.
3. Amend the Soil: Spread a 2-3 inch layer of compost, well-rotted manure, or other organic matter over the soil.
4. Incorporate Fertilizer: Sprinkle a balanced fertilizer over the soil according to the package directions.
5. Mix Thoroughly: Use a garden fork or tiller to mix the amendments and fertilizer into the soil.
6. Smooth the Surface: Rake the soil smooth and level.
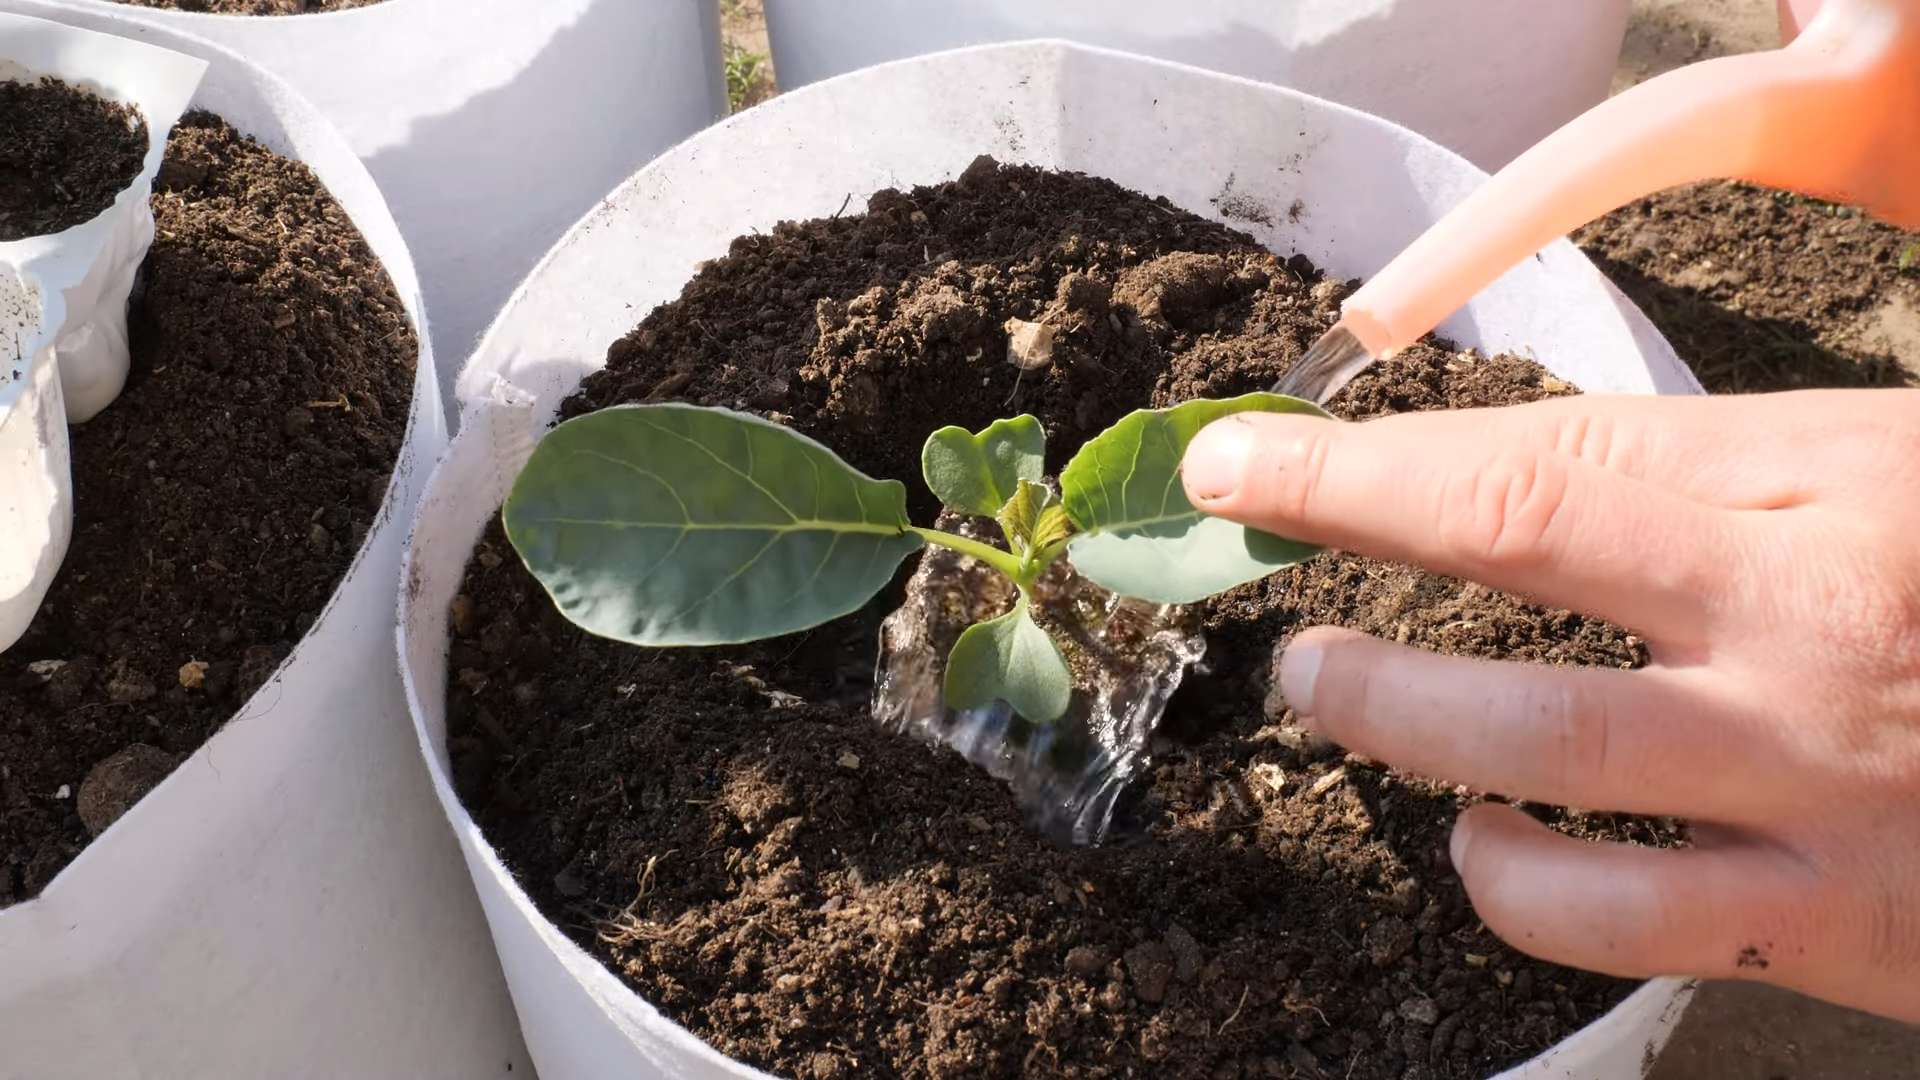
Transplanting Your Cauliflower Seedlings
Once your seedlings have developed several sets of true leaves and the weather has warmed up (after the last frost), it’s time to transplant them into your garden bed.
* Hardening Off: Before transplanting, you’ll need to harden off your seedlings. This means gradually exposing them to outdoor conditions over a period of 7-10 days. Start by placing them in a sheltered location for a few hours each day, gradually increasing the amount of time they spend outdoors.
* Spacing: Space your cauliflower plants 18-24 inches apart in rows that are 24-36 inches apart.
Step-by-Step Instructions:
1. Water the Seedlings: Water your seedlings thoroughly a few hours before transplanting.
2. Dig Holes: Dig holes in your prepared garden bed that are slightly larger than the root balls of your seedlings.
3. Remove Seedlings from Trays: Gently remove the seedlings from their trays or pots. Be careful not to damage the roots.
4. Place Seedlings in Holes: Place each seedling in a hole, making sure the top of the root ball is level with the surrounding soil.
5. Fill Holes with Soil: Fill the holes with soil and gently firm the soil around the base of the plants.
6. Water Thoroughly: Water the newly transplanted seedlings thoroughly.
Caring for Your Cauliflower Plants
Now that your cauliflower plants are in the ground, it’s important to provide them with the care they need to thrive.
* Watering: Cauliflower needs consistent moisture, especially during head formation. Water deeply and regularly, especially during dry spells. Aim for about 1-2 inches of water per week.
* Fertilizing: Side-dress your cauliflower plants with a nitrogen-rich fertilizer every 2-3 weeks. This will help to promote healthy growth and head development.
* Weeding: Keep your garden bed free of weeds, which can compete with your cauliflower plants for nutrients and water.
* Pest Control: Cauliflower is susceptible to several pests, including cabbage worms, aphids, and flea beetles. Monitor your plants regularly and take action if you see any signs of infestation. I prefer using organic pest control methods, such as insecticidal soap or neem oil.
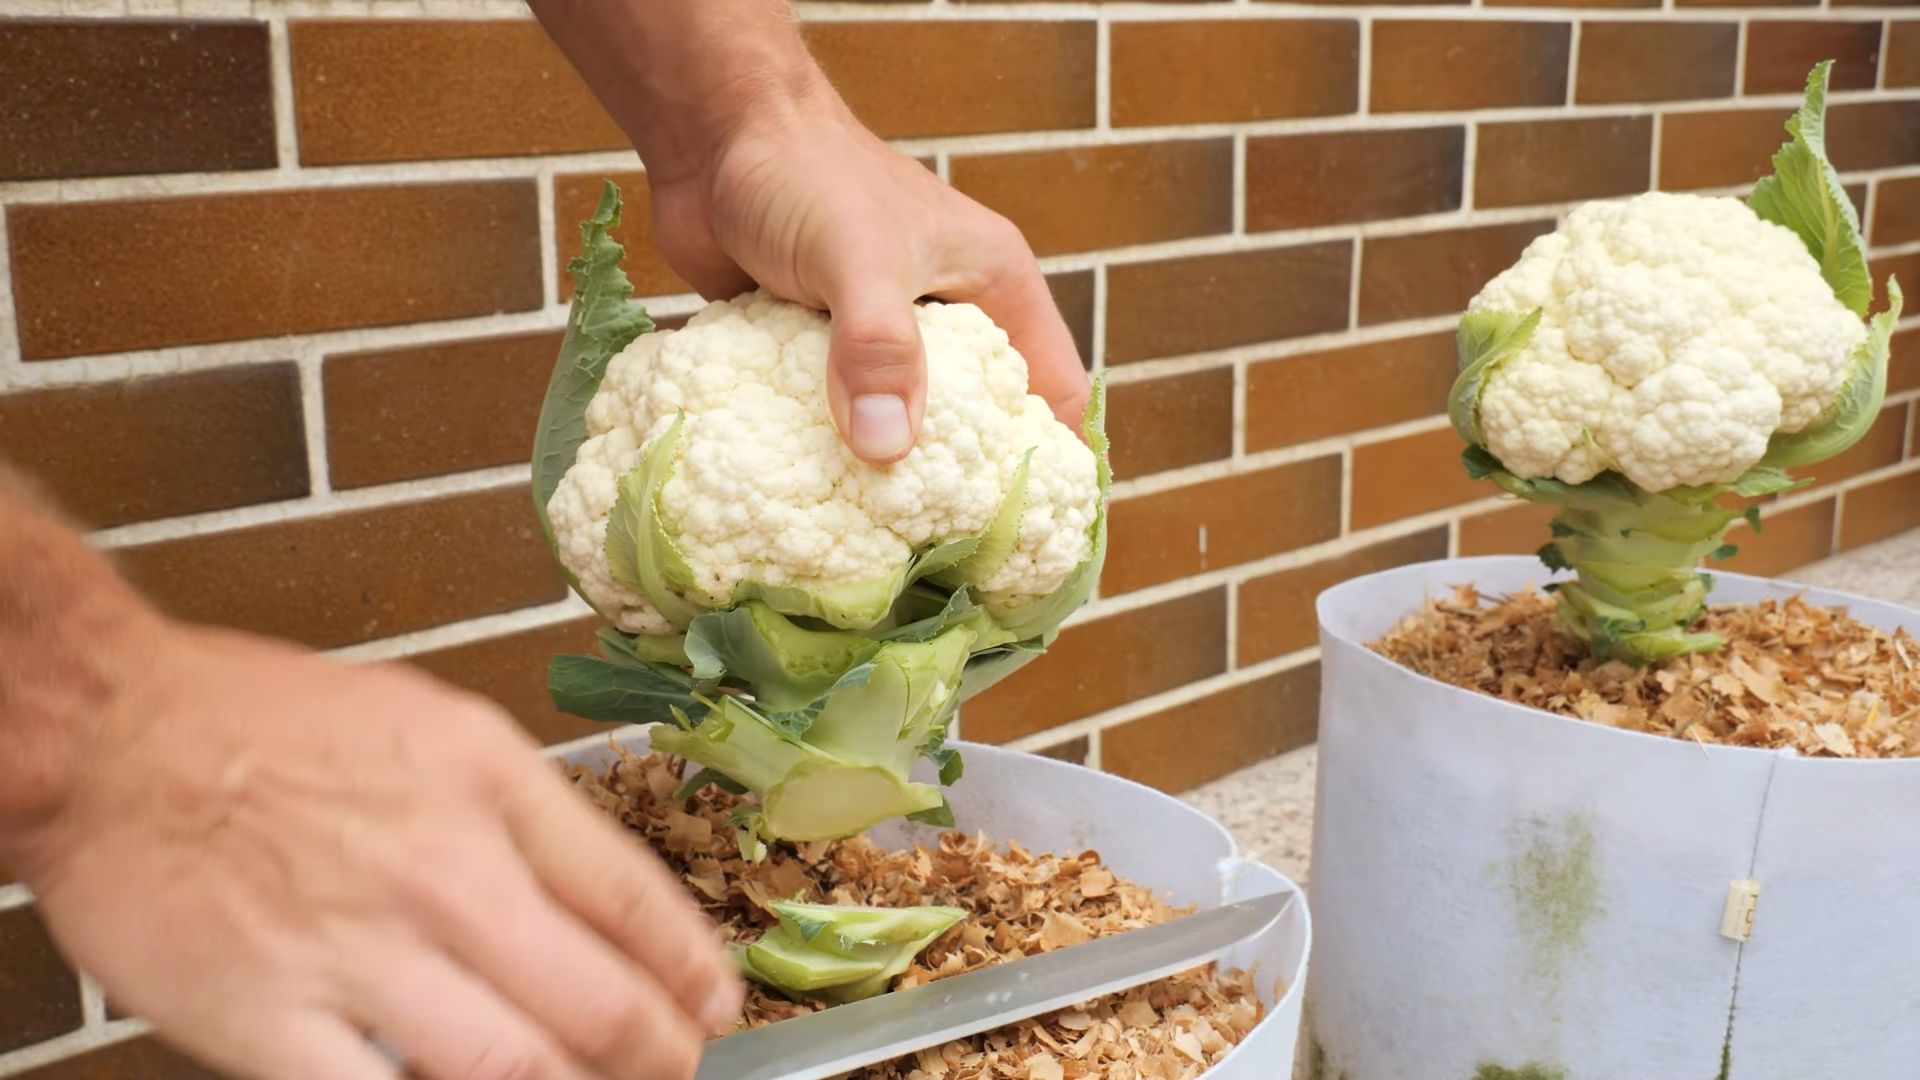
* Blanching (for White Varieties): If you’re growing a white cauliflower variety, you’ll need to blanch the heads to keep them white. This involves covering the developing head with the plant’s leaves to protect it from sunlight. When the head is about 2-3 inches in diameter, tie the outer leaves together over the head with twine or rubber bands. Check the heads regularly and harvest them when they reach the desired size.
Dealing with Common Cauliflower Problems
Even with the best care, you might encounter some problems while growing cauliflower. Here are a few common issues and how to address them:
* Buttoning: This occurs when the cauliflower head forms prematurely and remains small. It’s often caused by stress, such as lack of water or nutrients. Make sure your plants are getting enough water and fertilizer.
* Riciness: This is when the cauliflower head becomes loose and grainy. It’s often caused by hot weather or over-maturity. Harvest your cauliflower heads promptly when they reach the desired size.
* Clubroot: This is a soilborne disease that causes the roots of cauliflower plants to swell and become distorted. It can be prevented by practicing crop rotation and maintaining a soil pH between 6.
Conclusion
So, there you have it! Transforming your backyard into a thriving cauliflower patch is not only achievable but also incredibly rewarding. We’ve walked you through the entire process, from selecting the right varieties to battling common pests, ensuring you have all the knowledge you need for a successful harvest. But why is this DIY backyard cauliflower growing guide a must-try?
Firstly, the taste. Forget the bland, often rubbery cauliflower you find in supermarkets. Homegrown cauliflower, picked at its peak ripeness, boasts a sweetness and delicate flavor that is simply unmatched. Imagine roasting florets with a drizzle of olive oil and a sprinkle of sea salt, or whipping up a creamy cauliflower soup that bursts with fresh, earthy notes. The difference is truly remarkable.
Secondly, control. By growing your own cauliflower, you have complete control over what goes into your food. You can choose to use organic methods, avoiding harmful pesticides and herbicides, ensuring that your family is consuming the healthiest possible produce. This peace of mind is invaluable in today’s world.
Thirdly, the satisfaction. There’s an undeniable sense of accomplishment that comes from nurturing a plant from seed to harvest. Watching your cauliflower heads swell and mature, knowing that you played a direct role in their growth, is a deeply gratifying experience. It connects you to nature in a tangible way and provides a welcome respite from the stresses of modern life.
But the journey doesn’t end here! Feel free to experiment with different varieties of cauliflower. Try growing purple cauliflower for a vibrant splash of color on your plate, or Romanesco cauliflower for its stunning fractal patterns. Consider companion planting to deter pests and improve soil health. Plant herbs like rosemary and thyme nearby, or interplant with marigolds to ward off unwanted insects.
And don’t be afraid to get creative in the kitchen! Beyond roasting and soup, cauliflower can be used in countless dishes. Try making cauliflower rice as a healthy alternative to traditional rice, or use it as a pizza crust for a low-carb option. You can even grill cauliflower steaks for a hearty vegetarian meal.
We strongly encourage you to give this DIY backyard cauliflower growing guide a try. It’s an investment in your health, your taste buds, and your well-being. And most importantly, it’s a fun and rewarding experience that you can share with your family and friends.
Once you’ve harvested your first head of homegrown cauliflower, we want to hear about it! Share your experiences, your successes, and even your challenges in the comments below. What varieties did you grow? What pests did you encounter? What delicious dishes did you create? Your insights will help other aspiring gardeners and contribute to a thriving community of cauliflower enthusiasts. Let’s grow together!
Frequently Asked Questions (FAQ)
1. What is the best time of year to plant cauliflower?
The timing for planting cauliflower depends largely on your climate. Cauliflower thrives in cool weather, so it’s generally best to plant it in the spring or fall. For a spring crop, start seeds indoors 6-8 weeks before the last expected frost. Transplant seedlings outdoors 2-3 weeks before the last frost, providing protection if necessary. For a fall crop, start seeds indoors in mid-summer and transplant seedlings outdoors in late summer or early fall. The goal is to have the cauliflower mature during cool weather, as high temperatures can cause the heads to become loose and bitter. Check your local extension office for specific planting dates in your area.
2. How much sunlight does cauliflower need?
Cauliflower requires at least 6 hours of direct sunlight per day to thrive. Choose a planting location that receives full sun for optimal growth and head development. If you live in a particularly hot climate, some afternoon shade may be beneficial to prevent the plants from overheating.
3. What kind of soil is best for growing cauliflower?
Cauliflower prefers well-drained, fertile soil that is rich in organic matter. The ideal soil pH is between 6.0 and 7.0. Before planting, amend the soil with compost or well-rotted manure to improve its fertility and drainage. You can also add a slow-release fertilizer to provide essential nutrients throughout the growing season. Avoid planting cauliflower in heavy clay soil, as this can lead to waterlogging and root rot.
4. How often should I water cauliflower?
Cauliflower needs consistent moisture to grow properly. Water deeply and regularly, especially during dry periods. Aim to keep the soil consistently moist but not waterlogged. A good rule of thumb is to water when the top inch of soil feels dry to the touch. Mulching around the plants can help to retain moisture and suppress weeds.
5. What are some common pests and diseases that affect cauliflower?
Cauliflower is susceptible to several pests and diseases, including cabbage worms, aphids, flea beetles, clubroot, and black rot. To prevent pest problems, consider using row covers to protect young plants. Regularly inspect your plants for signs of infestation and take action promptly. Organic pest control methods, such as insecticidal soap or neem oil, can be effective against many common pests. To prevent diseases, choose disease-resistant varieties and practice good sanitation in the garden. Rotate your crops each year to avoid the buildup of soilborne pathogens.
6. How do I know when my cauliflower is ready to harvest?
Cauliflower is ready to harvest when the head is firm, compact, and reaches the desired size. The size of the head will vary depending on the variety, but most varieties are ready to harvest when the head is 6-8 inches in diameter. Check the head regularly as it matures, as it can quickly become overripe and loose. To harvest, cut the head from the plant with a sharp knife, leaving a few leaves attached to protect the head.
7. Can I grow cauliflower in containers?
Yes, you can grow cauliflower in containers, but you’ll need to choose a large container that is at least 12 inches in diameter and 12 inches deep. Use a high-quality potting mix and provide regular watering and fertilization. Container-grown cauliflower may require more frequent watering than plants grown in the ground. Choose a dwarf or compact variety for best results.
8. What are some good companion plants for cauliflower?
Companion planting can help to deter pests, improve soil health, and enhance the growth of cauliflower. Some good companion plants for cauliflower include:
* **Herbs:** Rosemary, thyme, sage, dill
* **Flowers:** Marigolds, nasturtiums
* **Vegetables:** Onions, garlic, beans, peas
Avoid planting cauliflower near broccoli, cabbage, or other members of the brassica family, as they can attract the same pests and diseases.
9. How do I blanch cauliflower?
Blanching is the process of covering the cauliflower head to prevent it from turning yellow or brown. To blanch cauliflower, tie the outer leaves together over the head when it is about 2-3 inches in diameter. Use twine or rubber bands to secure the leaves. Check the head regularly and adjust the leaves as needed. Blanching is not always necessary, but it can help to produce a whiter, more attractive head. Some newer varieties are self-blanching, meaning that the leaves naturally curl inward to protect the head.
10. Can I freeze cauliflower?
Yes, you can freeze cauliflower for later use. To freeze cauliflower, wash and cut it into florets. Blanch the florets in boiling water for 3 minutes, then immediately transfer them to an ice bath to stop the cooking process. Drain the florets thoroughly and spread them out on a baking sheet to freeze individually. Once frozen, transfer the florets to a freezer bag or container. Frozen cauliflower can be stored in the freezer for up to 12 months.

Leave a Comment