

Growing Turnips Backyard can seem daunting, but trust me, it’s easier than you think! Have you ever dreamt of plucking fresh, crisp turnips straight from your own garden? Imagine the satisfaction of serving a meal featuring vegetables you nurtured from seed to table. For centuries, turnips have been a staple in diets across the globe, from ancient Rome to medieval Europe, prized for their hardiness and nutritional value. They’re not just a root vegetable; they’re a piece of history!
But why should you bother with growing turnips backyard? Well, store-bought turnips often lack the vibrant flavor and freshness of homegrown ones. Plus, gardening is incredibly therapeutic! In this DIY guide, I’m going to share some simple yet effective tricks and hacks that will transform your backyard into a thriving turnip patch, even if you’re a complete beginner. We’ll cover everything from soil preparation to pest control, ensuring you have a bountiful harvest. Get ready to discover the joy of growing your own food and impress your friends and family with your newfound green thumb!
Growing Artichokes: A Beginner’s Guide to Homegrown Goodness
Okay, artichoke lovers, listen up! I’m going to walk you through the surprisingly simple (yes, really!) process of growing your own artichokes at home. Forget those pricey grocery store globes; we’re about to have a garden overflowing with these delicious thistles. It might seem intimidating, but trust me, with a little patience and the right know-how, you’ll be harvesting your own artichokes in no time.
Choosing Your Artichoke Variety
Before we get our hands dirty, let’s talk varieties. Not all artichokes are created equal, and some are better suited for certain climates than others. Here are a few popular choices:
* Green Globe: This is the classic artichoke you see everywhere. It’s reliable, produces large, meaty globes, and is relatively easy to grow. A great choice for beginners!
* Violetta: If you’re looking for something a little different, Violetta artichokes are stunning with their purple-tinged leaves. They’re also known for their tender hearts.
* Imperial Star: This variety is known for its early maturity, meaning you’ll be harvesting sooner than with other types. It’s also a good choice for cooler climates.
* Big Heart: As the name suggests, this artichoke boasts a large, meaty heart with fewer prickly chokes.
Consider your climate and personal preferences when making your selection. I personally love Green Globe for its reliability and classic flavor.
Getting Started: Seeds vs. Transplants
You have two main options for starting your artichoke journey: seeds or transplants.
* Seeds: Starting from seed is the most economical option, but it requires more patience. Artichokes started from seed may not produce in their first year.
* Transplants: Buying transplants (young plants) from a nursery is the faster route to artichoke glory. You’ll likely get a harvest in the first year, and it’s generally easier for beginners.
I usually recommend transplants for first-timers. It gives you a head start and increases your chances of success.
Preparing Your Artichoke Bed
Artichokes are hungry plants, so soil preparation is key. They need well-drained soil that’s rich in organic matter.
* Sunlight: Artichokes need at least 6-8 hours of sunlight per day. Choose a sunny spot in your garden.
* Soil: Amend your soil with plenty of compost or well-rotted manure. This will provide the nutrients your artichokes need to thrive. Aim for a slightly acidic to neutral soil pH (around 6.0-7.0).
* Drainage: Artichokes hate soggy feet! Make sure your soil drains well. If you have heavy clay soil, consider adding sand or perlite to improve drainage.
* Spacing: Give your artichokes plenty of room to grow. Space them at least 3-4 feet apart. They can get quite large!
Planting Your Artichokes
Alright, let’s get those artichokes in the ground!
Planting Transplants:
1. Dig a Hole: Dig a hole that’s slightly larger than the root ball of your transplant.
2. Amend the Hole: Mix some compost into the bottom of the hole.
3. Gently Remove the Transplant: Carefully remove the transplant from its container, being careful not to damage the roots.
4. Place the Transplant: Place the transplant in the hole, making sure the top of the root ball is level with the surrounding soil.
5. Backfill: Backfill the hole with soil, gently firming it around the plant.
6. Water Thoroughly: Water the transplant thoroughly to help it settle in.
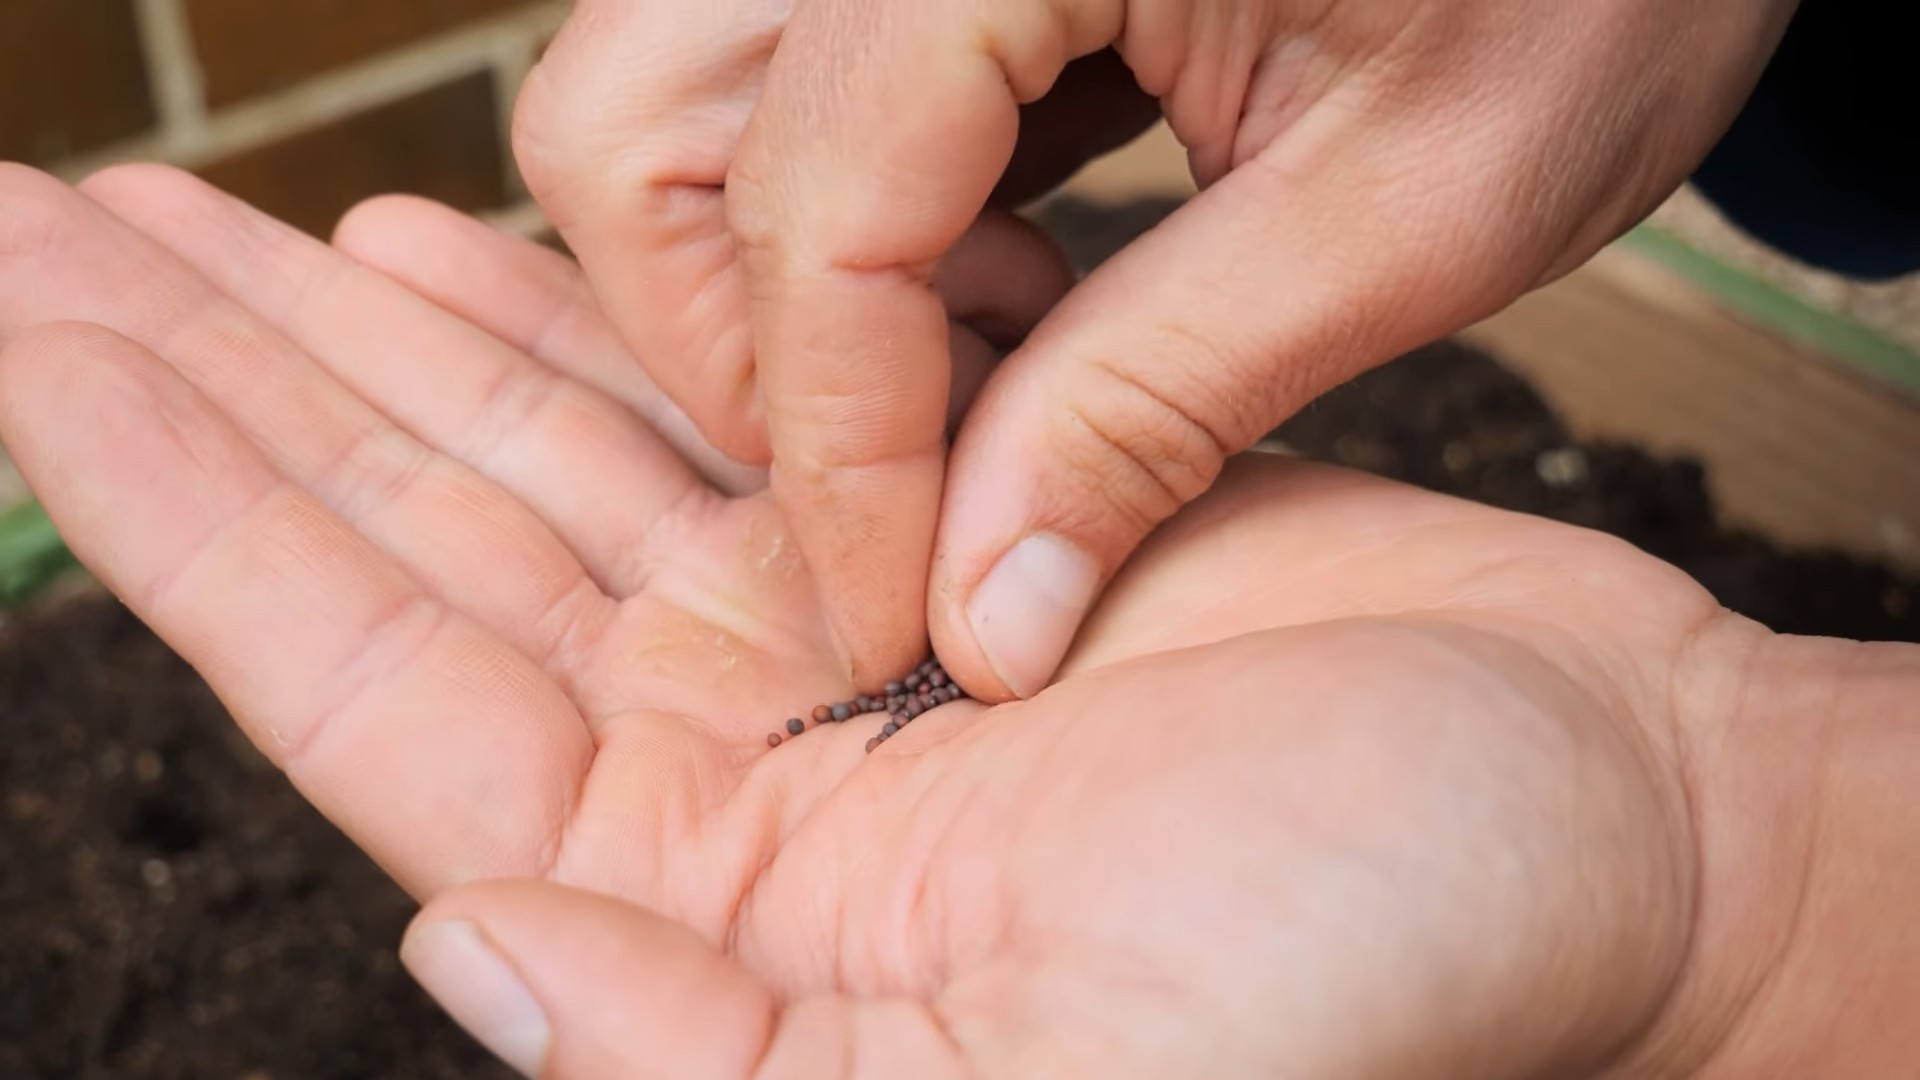
Starting from Seed (if you’re feeling ambitious!):
1. Start Indoors: Start your seeds indoors 8-10 weeks before the last expected frost.
2. Sow Seeds: Sow seeds about 1/4 inch deep in seed-starting trays or pots filled with seed-starting mix.
3. Keep Moist: Keep the soil consistently moist but not soggy.
4. Provide Light: Provide plenty of light, either from a sunny window or a grow light.
5. Harden Off: Once the seedlings have several sets of true leaves, gradually acclimate them to outdoor conditions by hardening them off for a week or two before transplanting.
6. Transplant: Transplant the seedlings into your prepared garden bed, following the same steps as for transplants.
Caring for Your Artichokes
Now that your artichokes are planted, it’s time to give them some TLC.
* Watering: Artichokes need consistent moisture, especially during dry periods. Water deeply and regularly, especially when the buds are forming. Avoid overhead watering, which can lead to fungal diseases.
* Fertilizing: Feed your artichokes regularly with a balanced fertilizer. I like to use a slow-release fertilizer in the spring and then supplement with liquid fertilizer throughout the growing season.
* Mulching: Apply a layer of mulch around your artichokes to help retain moisture, suppress weeds, and regulate soil temperature. Straw, wood chips, or shredded leaves are all good options.
* Pest Control: Keep an eye out for pests like aphids, slugs, and snails. Handpick them off the plants or use organic pest control methods like insecticidal soap or diatomaceous earth.
* Weed Control: Keep your artichoke bed free of weeds, which can compete with your plants for nutrients and water.
Overwintering Artichokes
Artichokes are perennials in warmer climates (zones 7-10), meaning they’ll come back year after year. In colder climates, you’ll need to take steps to protect them over the winter.
* Cut Back Foliage: In late fall, after the first frost, cut back the foliage to about 6 inches above the ground.
* Mulch Heavily: Apply a thick layer of mulch (straw, leaves, or pine needles) around the base of the plant to insulate the roots.
* Cover with a Blanket (Optional): In very cold climates, you can also cover the plants with a blanket or tarp for extra protection.
* Remove Protection in Spring: In the spring, after the last frost, remove the mulch and any other protective coverings.
Harvesting Your Artichokes
This is the moment we’ve all been waiting for! Harvesting your own artichokes is incredibly rewarding.
* Timing: Harvest artichokes when the buds are plump and the scales are still tightly closed. The size of the bud will vary depending on the variety.
* Cutting: Use a sharp knife to cut the artichoke stem about 2-3 inches below the bud.
* Side Shoots: After harvesting the main bud, you can also harvest the smaller side shoots that develop later in the season. These are often more tender than the main bud.
Enjoying Your Homegrown Artichokes
Now for the best part: eating your homegrown artichokes! There are countless ways to enjoy them.
* Steaming: Steaming is the classic way to cook artichokes. Simply steam them for 20-30 minutes, or until the leaves are tender and easily pulled off.
* Grilling: Grilled artichokes are smoky and delicious. Cut them in half, brush them with olive oil, and grill them over medium heat until tender.
* Roasting: Roasting artichokes brings out their nutty flavor. Cut them in half, toss them with olive oil and herbs, and roast them in the oven until tender.
* Dipping Sauces: Serve your cooked artichokes with your favorite dipping sauce, such as melted butter, aioli, or a vinaigrette.
Troubleshooting
Even with the best care, you might encounter some challenges along the way. Here are a few common problems and how to address them:
* Aphids: These tiny pests can suck the sap from your artichoke plants. Spray them with insecticidal soap or neem oil.
* Slugs and Snails: These slimy creatures can munch on the leaves of your artichokes. Handpick them off the plants or use slug bait.
* Fungal Diseases: Overwatering or poor air circulation can lead to fungal diseases. Make sure your soil drains well and avoid overhead watering.
* Lack of Bud Production: If your artichokes aren’t producing buds, it could be due to insufficient sunlight, poor soil, or lack of water. Make sure they’re getting enough of everything they need.
Propagating Artichokes
If you want to expand your artichoke patch, you can propagate them by dividing the root clumps.
1. Dig Up the Plant: In the spring, after the last frost, carefully dig up the entire artichoke plant.
2.
Conclusion
So, there you have it! Growing turnips in your backyard is not only achievable but also incredibly rewarding. From the crisp, peppery greens to the sweet, earthy roots, you’ll be amazed at the versatility and flavor this humble vegetable brings to your table. We’ve walked you through the entire process, from selecting the right variety and preparing your soil to planting, nurturing, and harvesting your very own crop of homegrown turnips.
But why should you bother with growing turnips in your backyard when you can simply buy them at the grocery store? The answer lies in the unparalleled freshness and flavor you simply can’t replicate with store-bought produce. Imagine the satisfaction of harvesting turnips just minutes before adding them to your favorite dish. The vibrant greens, bursting with nutrients, and the firm, flavorful roots, free from any artificial preservatives or chemicals, will elevate your meals to a whole new level.
Beyond the superior taste and quality, growing turnips in your backyard offers a unique connection to nature and a sense of accomplishment. It’s a chance to get your hands dirty, learn about the natural world, and appreciate the journey from seed to table. Plus, it’s a sustainable and eco-friendly way to source your food, reducing your reliance on industrial agriculture and minimizing your carbon footprint.
And the best part? Growing turnips is surprisingly easy, even for beginner gardeners. With just a little bit of planning and effort, you can enjoy a bountiful harvest of these nutritious and delicious vegetables.
Ready to take your turnip game to the next level? Consider experimenting with different varieties to discover your favorites. Try growing purple top turnips for their beautiful color and mild flavor, or explore the spicier taste of Japanese turnips. You can also adjust your planting schedule to extend your harvest season, ensuring a continuous supply of fresh turnips throughout the year.
Another fun variation is to interplant your turnips with other vegetables, such as radishes or lettuce. This can help to maximize your garden space and create a more diverse and resilient ecosystem. You can also use turnip greens as a cover crop to improve soil health and suppress weeds.
Don’t be afraid to get creative and experiment with different growing techniques. Try growing turnips in raised beds or containers if you have limited space. Or, if you live in a warmer climate, try growing them as a winter crop.
We are confident that you’ll find growing turnips in your backyard to be a fun, rewarding, and delicious experience. So, grab your gardening gloves, get your hands dirty, and start growing your own turnips today!
We encourage you to share your experiences with us! Post photos of your turnip harvest on social media using #BackyardTurnips and let us know what delicious dishes you’ve created with your homegrown bounty. We can’t wait to see what you come up with! Happy gardening!
Frequently Asked Questions (FAQ)
What is the best time of year to plant turnips?
The best time to plant turnips depends on your climate. In general, turnips are a cool-season crop, meaning they thrive in cooler temperatures. For a spring harvest, plant turnips 4-6 weeks before the last expected frost. For a fall harvest, plant turnips 6-8 weeks before the first expected frost. In warmer climates, you can grow turnips as a winter crop. Check your local planting calendar for specific recommendations for your region.
How much sunlight do turnips need?
Turnips need at least 6 hours of sunlight per day to grow properly. Choose a location in your backyard that receives full sun for optimal growth. If you live in a particularly hot climate, some afternoon shade can be beneficial to prevent the leaves from scorching.
What kind of soil is best for growing turnips?
Turnips prefer well-drained, fertile soil with a pH between 6.0 and 6.8. Amend your soil with compost or other organic matter to improve drainage and fertility. Avoid planting turnips in heavy clay soil, as this can lead to root rot. If your soil is compacted, consider tilling or double-digging to improve aeration.
How often should I water my turnips?
Turnips need consistent moisture to grow properly. Water deeply and regularly, especially during dry periods. Aim to keep the soil consistently moist but not waterlogged. A good rule of thumb is to water when the top inch of soil feels dry to the touch. Mulching around your turnip plants can help to retain moisture and suppress weeds.
How do I fertilize my turnips?
Turnips benefit from regular fertilization, especially during the early stages of growth. Use a balanced fertilizer with equal amounts of nitrogen, phosphorus, and potassium. Apply fertilizer according to the package directions. Avoid over-fertilizing, as this can lead to excessive foliage growth at the expense of root development. You can also amend the soil with compost tea or other organic fertilizers.
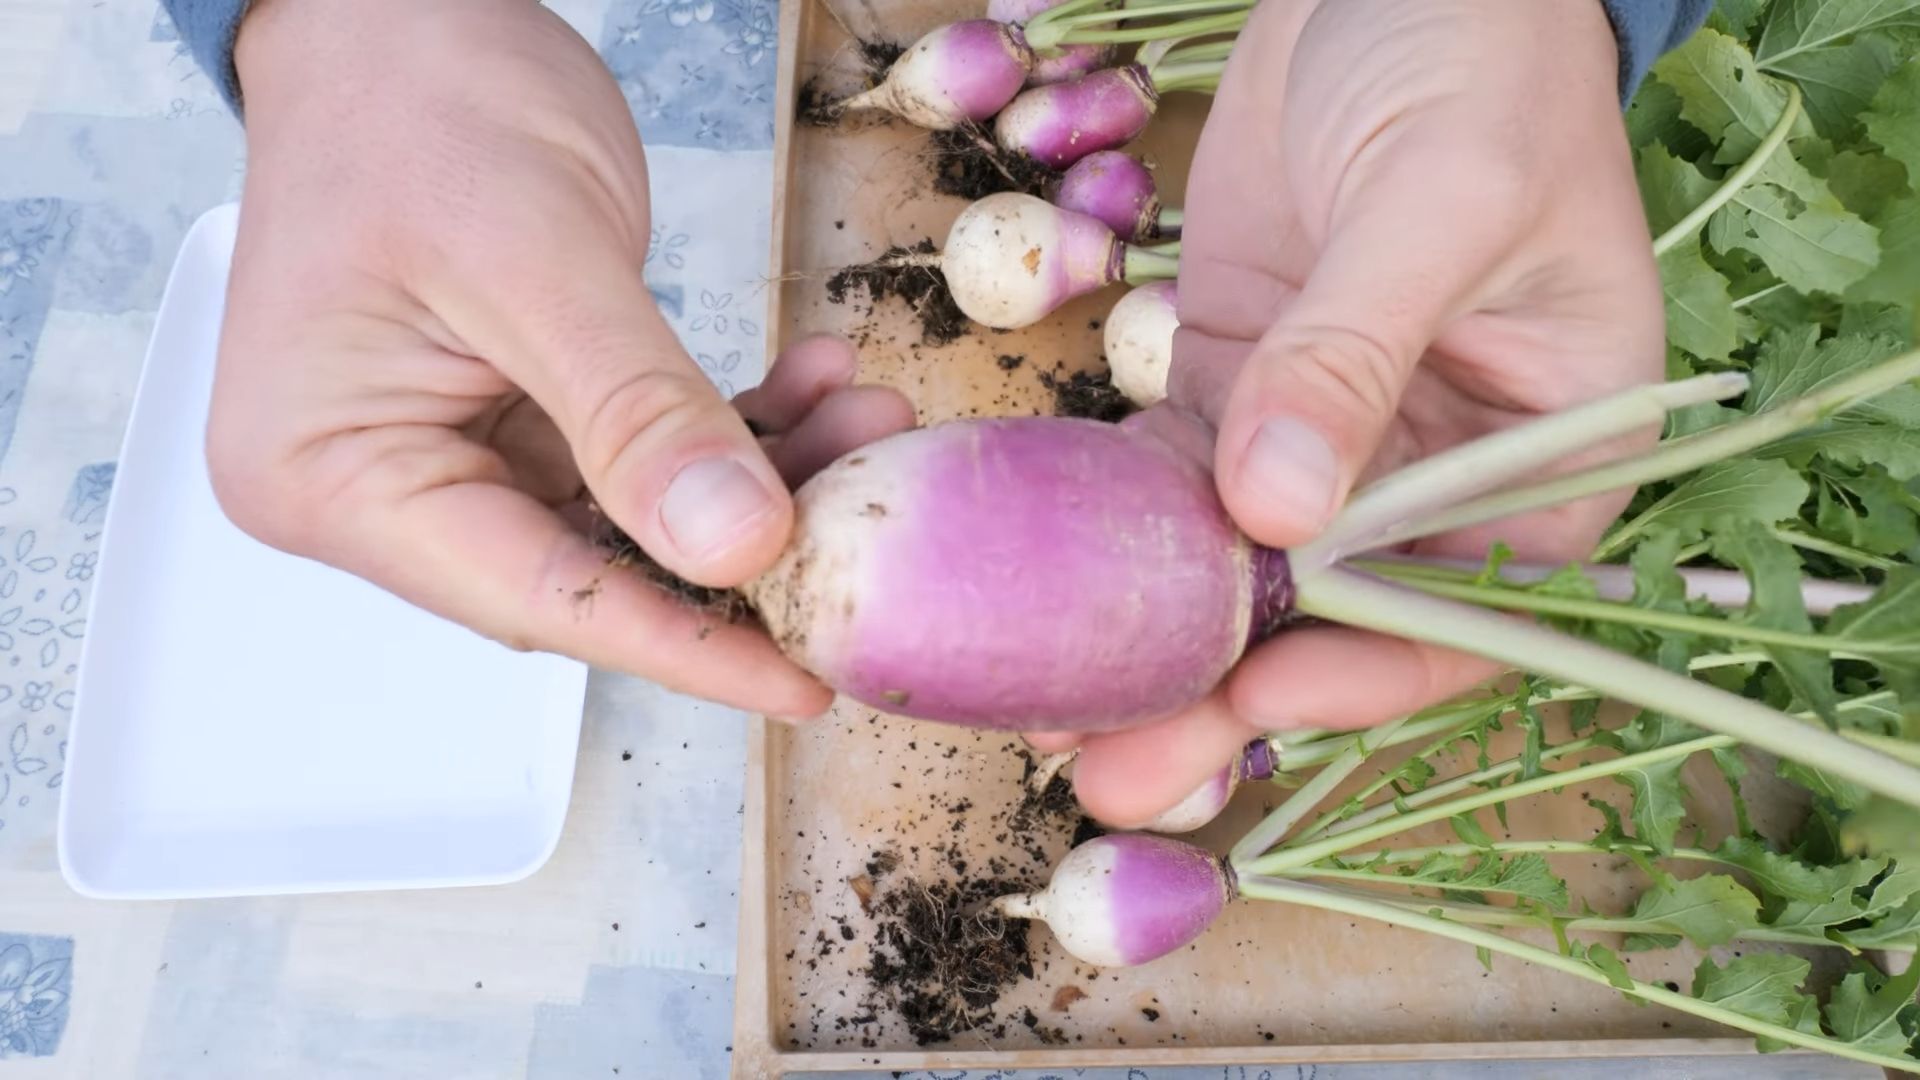
When are turnips ready to harvest?
Turnips are typically ready to harvest 50-60 days after planting. The greens can be harvested at any time, but the roots are best harvested when they are 2-3 inches in diameter. To harvest turnips, gently loosen the soil around the roots and pull them up by the greens. Be careful not to damage the roots during harvest.
Can I eat both the turnip greens and the roots?
Yes, both the turnip greens and the roots are edible and nutritious. The greens are a good source of vitamins A and C, as well as calcium and iron. The roots are a good source of fiber and vitamin C. Both the greens and the roots can be eaten raw or cooked.
How do I store turnips?
Turnips can be stored in the refrigerator for several weeks. To store turnips, remove the greens and store them separately. Place the roots in a plastic bag or container and store them in the crisper drawer of your refrigerator. The greens can be stored in a plastic bag in the refrigerator for up to a week.
What are some common pests and diseases that affect turnips?
Some common pests that affect turnips include aphids, flea beetles, and cabbage worms. Common diseases include clubroot and downy mildew. To prevent pests and diseases, practice good garden hygiene, such as removing weeds and debris from your garden. You can also use organic pest control methods, such as insecticidal soap or neem oil. Choose disease-resistant varieties of turnips to minimize the risk of disease.
Can I grow turnips in containers?
Yes, you can grow turnips in containers, especially if you have limited space. Choose a container that is at least 12 inches deep and wide. Use a well-draining potting mix and water regularly. Fertilize your container-grown turnips as needed. Be sure to provide adequate sunlight and protection from extreme temperatures.
Leave a Comment