

DIY Tomato Growing: Imagine biting into a juicy, sun-ripened tomato, bursting with flavor, knowing you nurtured it from a tiny seed right in your own backyard! There’s something incredibly satisfying about growing your own food, and tomatoes are a fantastic place to start. For centuries, tomatoes have been a staple in cuisines around the world, from the vibrant sauces of Italy to the refreshing salads of the Mediterranean. Their journey from South America to our plates is a testament to their adaptability and deliciousness.
But let’s be honest, sometimes getting those perfect, plump tomatoes can feel like a real challenge. Pests, diseases, and unpredictable weather can all throw a wrench in your plans. That’s where these DIY tomato growing tricks and hacks come in! I’m here to share some simple, effective, and budget-friendly methods to help you achieve a bountiful harvest, even if you’re a complete beginner.
Why do you need these DIY secrets? Because store-bought tomatoes simply can’t compare to the taste and satisfaction of homegrown ones. Plus, you’ll know exactly what went into growing them – no harmful pesticides or mystery ingredients! So, get ready to roll up your sleeves and discover how easy and rewarding DIY tomato growing can be. Let’s get started!
DIY Tomato Growing: From Seed to Salsa!
Okay, tomato lovers, gather ’round! I’m going to walk you through my tried-and-true method for growing the juiciest, most flavorful tomatoes you’ve ever tasted, right in your own backyard (or balcony!). Forget those bland, store-bought imposters – we’re talking homegrown goodness here. This guide is detailed, so you can’t miss a step. Let’s get started!
Section 1: Starting Your Tomato Seeds Indoors
This is where the magic begins! Starting seeds indoors gives you a head start on the growing season, especially if you live in a cooler climate.
What You’ll Need:
* Tomato seeds (choose your favorite varieties!)
* Seed starting trays or small pots (I prefer trays with drainage holes)
* Seed starting mix (this is crucial – don’t use regular potting soil)
* Spray bottle with water
* Heat mat (optional, but highly recommended)
* Grow light (also optional, but helps prevent leggy seedlings)
* Clear plastic dome or plastic wrap (to create a humid environment)
* Permanent marker and labels
Step-by-Step Instructions:
1. Prepare Your Seed Starting Trays: Fill your seed starting trays or pots with seed starting mix. Gently tap the trays to settle the mix, but don’t pack it down too tightly. You want it to be light and airy for the delicate roots.
2. Sow the Seeds: Make a small indentation (about ¼ inch deep) in the center of each cell or pot. Place 2-3 tomato seeds in each indentation. This increases your chances of at least one seed germinating. Cover the seeds lightly with seed starting mix.
3. Water Gently: Use your spray bottle to gently mist the surface of the soil. You want to moisten the soil without disturbing the seeds. Avoid pouring water directly onto the soil, as this can wash the seeds away.
4. Create a Humid Environment: Cover the seed starting trays with a clear plastic dome or plastic wrap. This will help to retain moisture and create a warm, humid environment that’s ideal for germination.
5. Provide Warmth: Place the seed starting trays on a heat mat. Tomato seeds germinate best in warm temperatures (around 75-85°F). If you don’t have a heat mat, you can place the trays in a warm spot in your house, such as near a radiator or on top of your refrigerator.
6. Provide Light: Place the seed starting trays under a grow light. If you don’t have a grow light, you can place the trays near a sunny window. However, seedlings grown near a window tend to become leggy (tall and spindly) as they reach for the light. A grow light provides consistent, even light that will help your seedlings grow strong and healthy.
7. Monitor and Water: Check the seed starting trays daily to make sure the soil is moist. If the soil feels dry to the touch, mist it with water. Remove the plastic dome or plastic wrap for a few hours each day to allow for air circulation. This will help to prevent fungal diseases.
8. Wait for Germination: Tomato seeds typically germinate in 5-10 days. Once the seedlings emerge, remove the plastic dome or plastic wrap completely.
9. Thin the Seedlings: Once the seedlings have developed their first set of true leaves (the leaves that look like miniature tomato leaves), thin them to one seedling per cell or pot. Choose the strongest, healthiest-looking seedling and snip off the others at the soil line with scissors. Don’t pull them out, as this can disturb the roots of the seedling you’re keeping.
10. Harden Off the Seedlings: About a week before you plan to transplant your seedlings outdoors, you’ll need to “harden them off.” This process gradually acclimates the seedlings to outdoor conditions, such as sunlight, wind, and temperature fluctuations. Start by placing the seedlings outdoors in a sheltered location for an hour or two each day. Gradually increase the amount of time they spend outdoors each day, until they can tolerate being outside for a full day.
Section 2: Preparing Your Garden Bed or Containers
Now that your seedlings are thriving, it’s time to get your garden bed or containers ready for planting.
What You’ll Need:
* Garden bed or large containers (at least 18 inches in diameter)
* Well-draining soil (a mix of garden soil, compost, and peat moss is ideal)
* Compost or other organic matter
* Tomato cages or stakes
* Gardening gloves
* Trowel or shovel
Step-by-Step Instructions:
1. Choose a Sunny Location: Tomatoes need at least 6-8 hours of sunlight per day to thrive. Choose a location in your garden or on your balcony that receives plenty of sun.
2. Prepare the Soil: If you’re planting in a garden bed, loosen the soil to a depth of at least 12 inches. Remove any rocks, weeds, or other debris. Amend the soil with compost or other organic matter to improve drainage and fertility. If you’re planting in containers, use a well-draining potting mix. I like to mix garden soil, compost, and peat moss for a rich and well-draining medium.
3. Add Nutrients: Tomatoes are heavy feeders, so it’s important to add nutrients to the soil before planting. You can use a balanced fertilizer or a slow-release fertilizer specifically formulated for tomatoes. Follow the instructions on the fertilizer package. I also like to add a handful of bone meal to each planting hole to provide phosphorus, which is essential for root development.
4. Install Tomato Cages or Stakes: Tomato plants can get quite large and heavy, so it’s important to provide them with support. Install tomato cages or stakes before you plant the seedlings. This will prevent the plants from falling over and breaking.
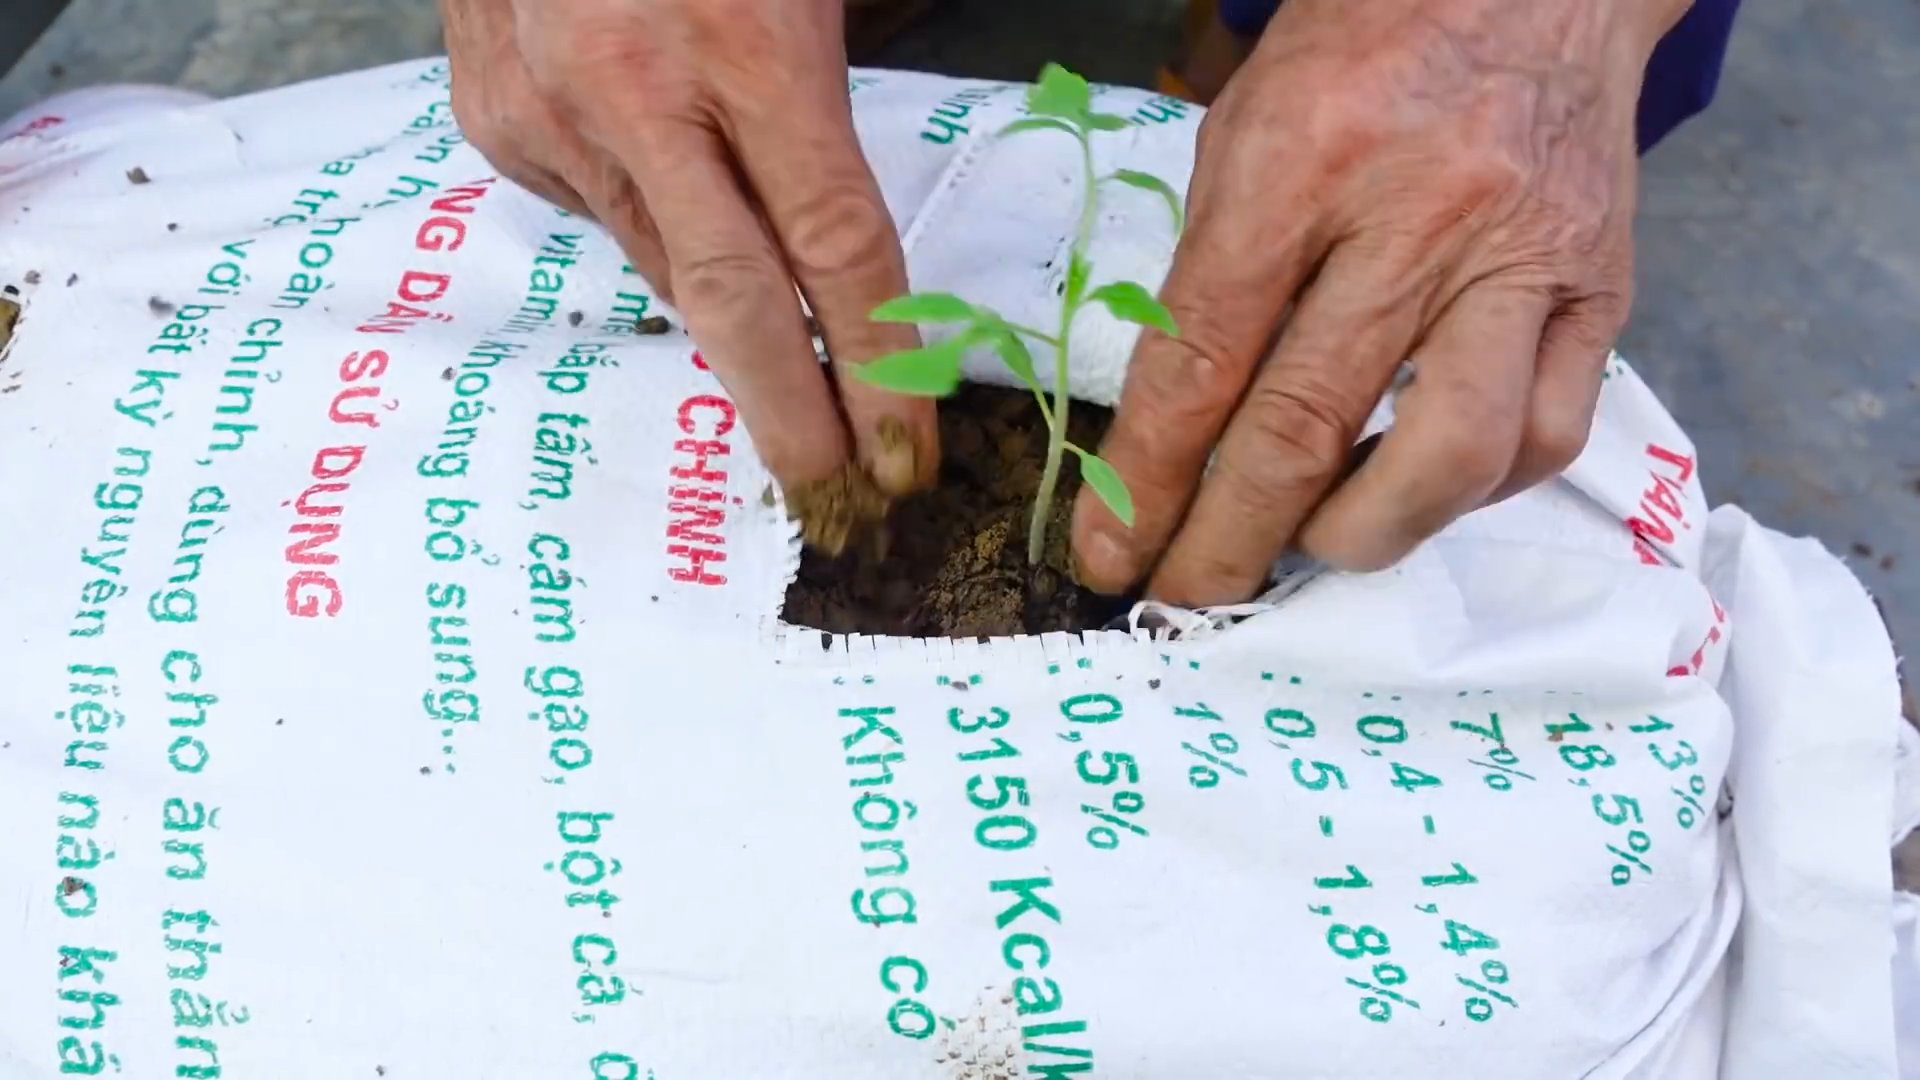
Section 3: Transplanting Your Tomato Seedlings Outdoors
The big day has arrived! It’s time to transplant your tomato seedlings into their permanent home.
What You’ll Need:
* Your hardened-off tomato seedlings
* Gardening gloves
* Trowel or shovel
* Watering can or hose
* Mulch (optional, but recommended)
Step-by-Step Instructions:
1. Choose the Right Time: Transplant your tomato seedlings outdoors after the last frost. The soil temperature should be at least 60°F.
2. Dig the Planting Holes: Dig planting holes that are slightly larger than the root balls of your seedlings. Space the holes about 2-3 feet apart, depending on the variety of tomato you’re growing.
3. Plant the Seedlings Deep: This is a crucial step! Tomatoes can develop roots along their stems, so planting them deep will encourage a stronger root system. Remove the lower leaves from the seedlings and plant them so that the lowest remaining leaves are just above the soil line.
4. Water Thoroughly: After planting, water the seedlings thoroughly. This will help to settle the soil around the roots and prevent transplant shock.
5. Add Mulch (Optional): Mulch helps to retain moisture in the soil, suppress weeds, and regulate soil temperature. Apply a layer of mulch around the base of the plants, being careful not to cover the stems. I like to use straw, shredded leaves, or wood chips as mulch.
Section 4: Caring for Your Tomato Plants
Now that your tomato plants are in the ground, it’s time to provide them with the care they need to thrive.
What You’ll Need:
* Watering can or hose
* Tomato fertilizer
* Pruning shears
* Insecticidal soap or other organic pest control
* Gardening gloves
Step-by-Step Instructions:
1. Water Regularly: Tomatoes need consistent watering, especially during hot, dry weather. Water deeply and regularly, aiming for about 1-2 inches of water per week. Avoid watering the foliage, as this can encourage fungal diseases. Water at the base of the plants.
2. Fertilize Regularly: Tomatoes are heavy feeders and need regular fertilization to produce a bountiful harvest. Fertilize every 2-3 weeks with a tomato fertilizer, following the instructions on the package.
3. Prune Your Plants: Pruning helps to improve air circulation, promote fruit production, and prevent diseases. Remove suckers (the small shoots that grow between the main stem and the branches) regularly. You can also remove yellowing or diseased leaves.
4. Control Pests and Diseases: Tomatoes are susceptible to a variety of pests and diseases. Monitor your plants regularly for signs of trouble. If you spot pests, such as aphids or tomato hornworms, treat them with insecticidal soap or other organic pest control. If you see signs of disease, such as leaf spots or blight, remove the affected leaves and treat the plants with a fungicide.
5.
Conclusion
So, there you have it! Mastering the art of DIY tomato growing is not just about saving money; it’s about connecting with nature, understanding the life cycle of your food, and enjoying the unparalleled flavor of homegrown tomatoes. Forget those bland, store-bought varieties – imagine sinking your teeth into a sun-ripened, juicy tomato bursting with flavor, all thanks to your own green thumb. This method offers a sustainable and rewarding alternative to purchasing seedlings or relying solely on commercial produce.
This DIY approach to tomato growing empowers you to control every aspect of the process, from the soil composition to the watering schedule. You’ll learn valuable skills and gain a deeper appreciation for the effort that goes into producing the food we often take for granted. Plus, it’s incredibly satisfying to watch those tiny seeds sprout and flourish into vibrant, fruit-bearing plants.
But the benefits don’t stop there. By starting your tomatoes from seed, you have access to a wider variety of heirloom and unique tomato types that are rarely found in nurseries or grocery stores. Think vibrant purple tomatoes, sweet yellow cherry tomatoes, or even uniquely shaped beefsteak varieties. The possibilities are endless!
Ready to take your tomato growing to the next level?
Consider experimenting with different soil amendments to find the perfect blend for your tomatoes. Adding compost, worm castings, or even coffee grounds can significantly improve soil fertility and drainage. You can also try different container sizes and materials to see what works best for your growing space.
For those with limited space, consider growing your tomatoes in hanging baskets or vertical planters. This is a great way to maximize your yield without sacrificing valuable garden real estate. And if you’re feeling adventurous, you can even try grafting different tomato varieties together to create a unique and productive plant.
Don’t be afraid to experiment and adapt the techniques to suit your specific needs and environment. The key is to observe your plants closely and learn from your mistakes. Every season is a learning opportunity, and with a little patience and dedication, you’ll be harvesting delicious, homegrown tomatoes in no time.
We encourage you to embark on this DIY tomato growing adventure and share your experiences with us! Let us know what varieties you’re growing, what challenges you’ve faced, and what successes you’ve achieved. Share your photos and tips in the comments below – we’d love to hear from you! Let’s build a community of passionate tomato growers and inspire others to embrace the joy of homegrown produce. So get your hands dirty, plant those seeds, and get ready to savor the taste of success!
Frequently Asked Questions (FAQ)
What are the best tomato varieties to grow from seed?
The best tomato varieties to grow from seed depend on your climate, growing space, and personal preferences. For beginners, determinate varieties like Roma or Celebrity are a good choice because they are compact and produce a concentrated harvest. Indeterminate varieties like Beefsteak, Brandywine, or Cherry tomatoes require more space and support but produce fruit throughout the growing season. Heirloom varieties offer unique flavors and colors but may be more susceptible to diseases. Research different varieties and choose those that are well-suited to your local conditions and your desired taste profile. Consider factors like disease resistance, days to maturity, and fruit size when making your selection.
How long does it take for tomato seeds to germinate?
Tomato seeds typically germinate within 5-10 days under optimal conditions. To ensure successful germination, maintain a soil temperature of 70-80°F (21-27°C) and keep the soil consistently moist but not waterlogged. Using a heat mat can help maintain the ideal soil temperature, especially in cooler climates. Once the seedlings emerge, provide them with plenty of light to prevent them from becoming leggy.
What kind of soil should I use for starting tomato seeds?
Use a seed-starting mix that is lightweight, well-draining, and sterile. Avoid using garden soil, as it may contain pathogens or weed seeds that can harm your seedlings. A good seed-starting mix typically contains peat moss, vermiculite, and perlite. You can also make your own mix by combining equal parts of these ingredients. Ensure the mix is thoroughly moistened before sowing the seeds.
When should I transplant my tomato seedlings outdoors?
Transplant your tomato seedlings outdoors after the last frost date in your area, when the soil has warmed up to at least 60°F (15°C). Harden off the seedlings by gradually exposing them to outdoor conditions for a week or two before transplanting. This will help them acclimate to the sun, wind, and temperature changes. Choose a sunny location with well-drained soil and space the plants according to the recommended spacing for the variety you are growing.
How often should I water my tomato plants?
Water your tomato plants deeply and regularly, especially during hot, dry weather. Aim to water at the base of the plant to avoid wetting the foliage, which can increase the risk of fungal diseases. The frequency of watering will depend on the soil type, climate, and size of the plant. Check the soil moisture regularly and water when the top inch of soil feels dry to the touch. Avoid overwatering, as this can lead to root rot.
What are some common tomato plant problems and how can I prevent them?
Common tomato plant problems include blossom end rot, early blight, and tomato hornworms. Blossom end rot is caused by calcium deficiency and can be prevented by ensuring consistent watering and adding calcium to the soil. Early blight is a fungal disease that can be prevented by providing good air circulation, avoiding overhead watering, and applying a fungicide if necessary. Tomato hornworms are large caterpillars that can defoliate tomato plants. Handpick them off the plants or use Bacillus thuringiensis (Bt) to control them. Regular monitoring and preventative measures can help minimize these problems.
Can I grow tomatoes in containers?
Yes, tomatoes can be successfully grown in containers. Choose a large container (at least 10 gallons) with drainage holes and fill it with a high-quality potting mix. Select determinate or dwarf varieties for container growing, as they are more compact. Provide the plants with plenty of sunlight, water, and fertilizer. You may need to water container-grown tomatoes more frequently than those grown in the ground.
What kind of fertilizer should I use for tomato plants?
Use a balanced fertilizer with a higher phosphorus content (the middle number) to promote root development and flowering. A fertilizer with an NPK ratio of 5-10-5 or 10-20-10 is a good choice. Apply fertilizer according to the package directions, typically every 2-3 weeks. You can also use organic fertilizers like compost tea or fish emulsion. Avoid over-fertilizing, as this can lead to excessive foliage growth and reduced fruit production.
How do I prune tomato plants?
Pruning tomato plants can improve air circulation, promote fruit production, and prevent diseases. For indeterminate varieties, prune off the suckers that grow between the main stem and the branches. This will encourage the plant to focus its energy on producing fruit. For determinate varieties, pruning is generally not necessary. Remove any yellowing or diseased leaves to improve air circulation and prevent the spread of disease.
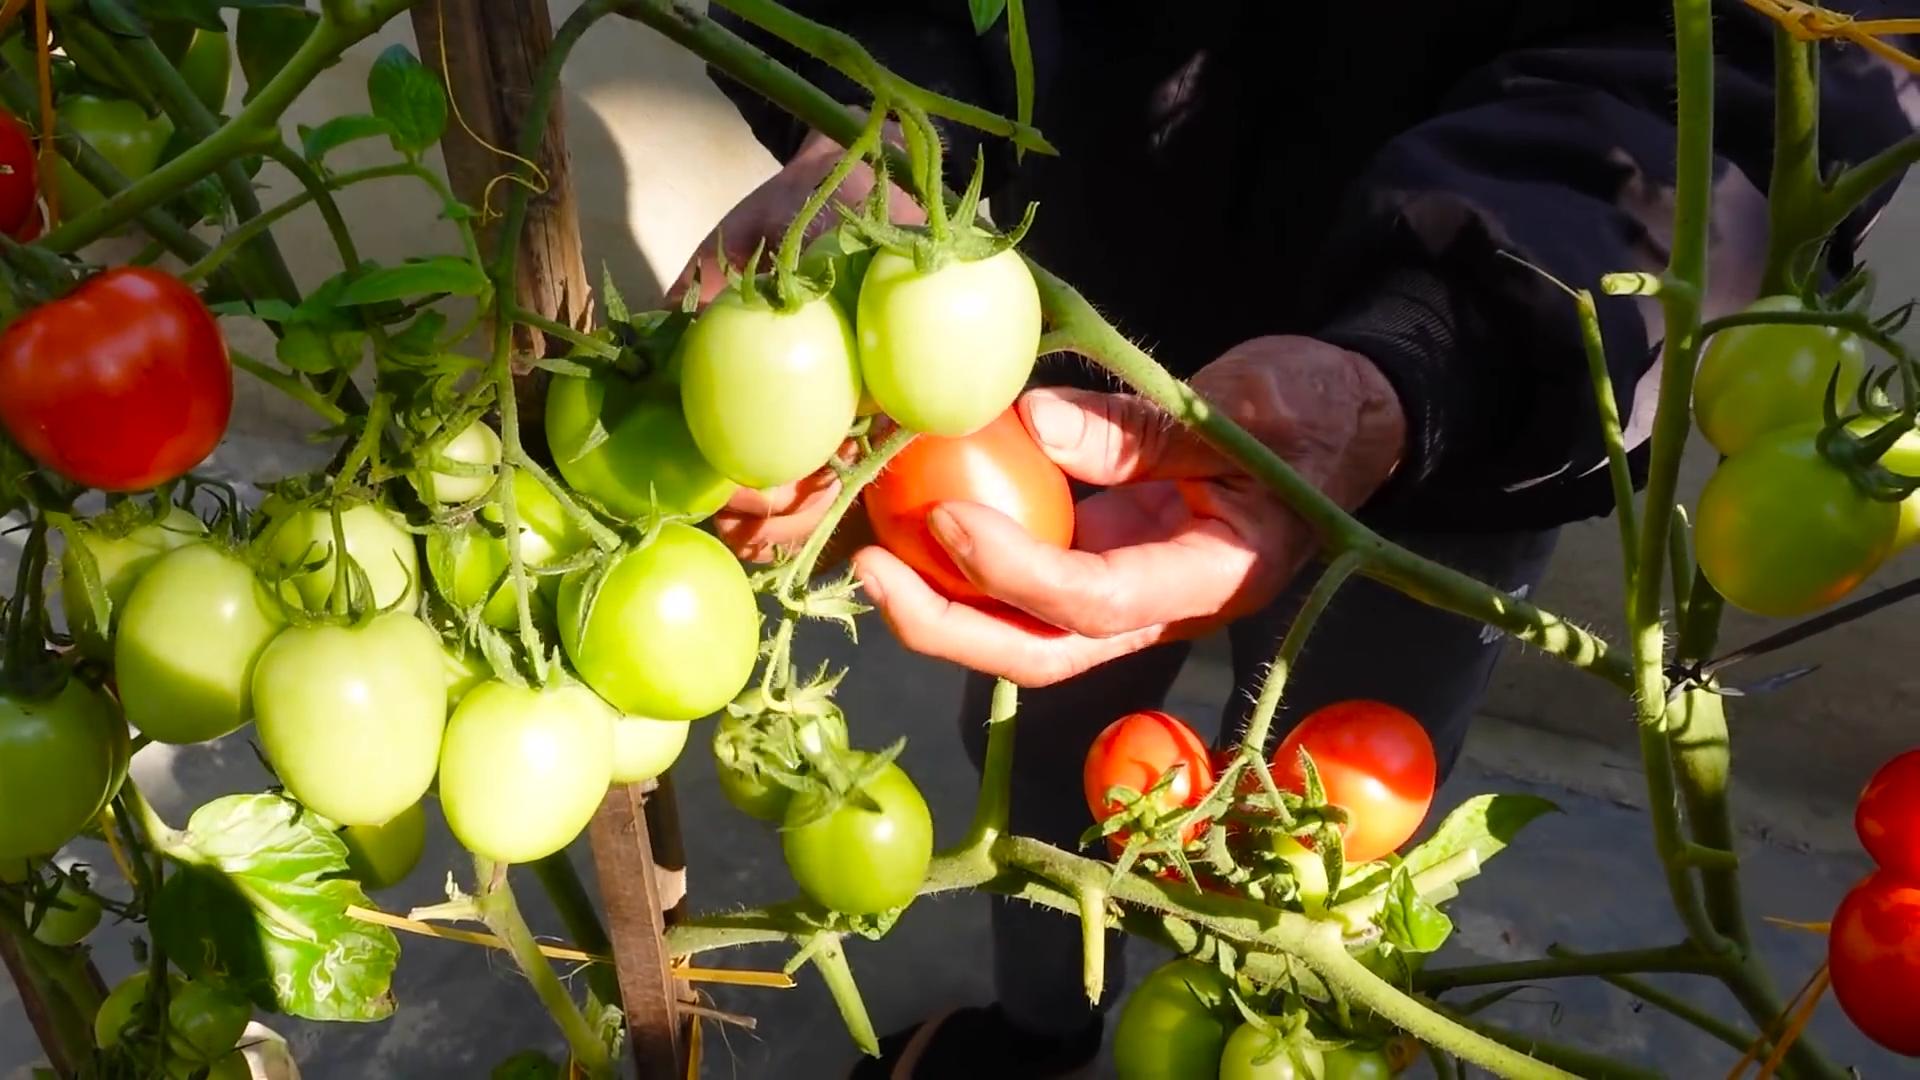
How do I know when my tomatoes are ripe?
Tomatoes are ripe when they have reached their mature color and are slightly soft to the touch. The color will vary depending on the variety. Gently twist the tomato off the vine, leaving the stem attached. Ripe tomatoes should be stored at room temperature and eaten within a few days for the best flavor. Avoid refrigerating tomatoes, as this can affect their texture and taste.

Leave a Comment