

Sage Gardening in Pots: Unlock the secrets to cultivating this fragrant and flavorful herb right on your patio or balcony! Have you ever dreamed of stepping outside and snipping fresh sage leaves to add a burst of earthy goodness to your favorite dishes? Well, dream no more! This DIY guide will empower you to grow thriving sage plants, even if you’re short on space.
Sage, with its silvery-green leaves and distinctive aroma, has a rich history steeped in tradition. For centuries, it’s been revered not only for its culinary uses but also for its medicinal properties. Ancient Romans considered sage a sacred herb, believing it could grant immortality. Today, while we might not be seeking eternal life, we can certainly appreciate the vitality and flavor sage brings to our lives.
But why sage gardening in pots, you ask? In today’s fast-paced world, many of us lack the time or space for a traditional garden. Container gardening offers a fantastic solution, allowing you to enjoy fresh herbs and vegetables without the commitment of a large plot. Plus, growing your own sage ensures you have access to organic, pesticide-free ingredients, adding a healthy and delicious touch to your meals. I’m excited to share these simple yet effective tricks and hacks that will have you harvesting your own sage in no time!
DIY Sage Garden in Pots: A Beginner’s Guide
Hey there, fellow plant enthusiasts! I’m so excited to share my experience with growing sage in pots. It’s easier than you might think, and having fresh sage on hand for cooking and other uses is incredibly rewarding. This guide will walk you through everything you need to know, from choosing the right pot to harvesting your fragrant leaves. Let’s get started!
Choosing the Right Pot and Soil
Before we even think about planting, we need to make sure our sage has a happy home. The right pot and soil are crucial for its success.
* Pot Size: Sage needs room to grow, so opt for a pot that’s at least 12 inches in diameter and 12 inches deep. This gives the roots plenty of space to spread out.
* Drainage: This is non-negotiable! Sage hates soggy roots. Make sure your pot has drainage holes at the bottom. If it doesn’t, you can drill some yourself (carefully, of course!).
* Material: Clay or terracotta pots are great because they allow the soil to breathe. Plastic pots work too, but they tend to retain more moisture, so be extra careful not to overwater.
* Soil: Sage thrives in well-draining soil that’s slightly alkaline. A mix of potting soil, perlite, and compost is ideal. Avoid heavy clay soils, as they can lead to root rot.
Planting Your Sage
Now for the fun part! Getting your sage planted is a simple process, but following these steps will ensure a healthy start.
1. Prepare the Pot: Place a layer of gravel or small stones at the bottom of the pot to improve drainage. This will help prevent the drainage holes from getting clogged with soil.
2. Add Soil: Fill the pot about two-thirds full with your chosen soil mix.
3. Planting from Seed (Optional): While I usually recommend starting with a young plant for quicker results, you can grow sage from seed. Sow the seeds thinly on the surface of the soil, then lightly cover them with more soil. Keep the soil consistently moist until the seeds germinate, which usually takes 10-21 days.
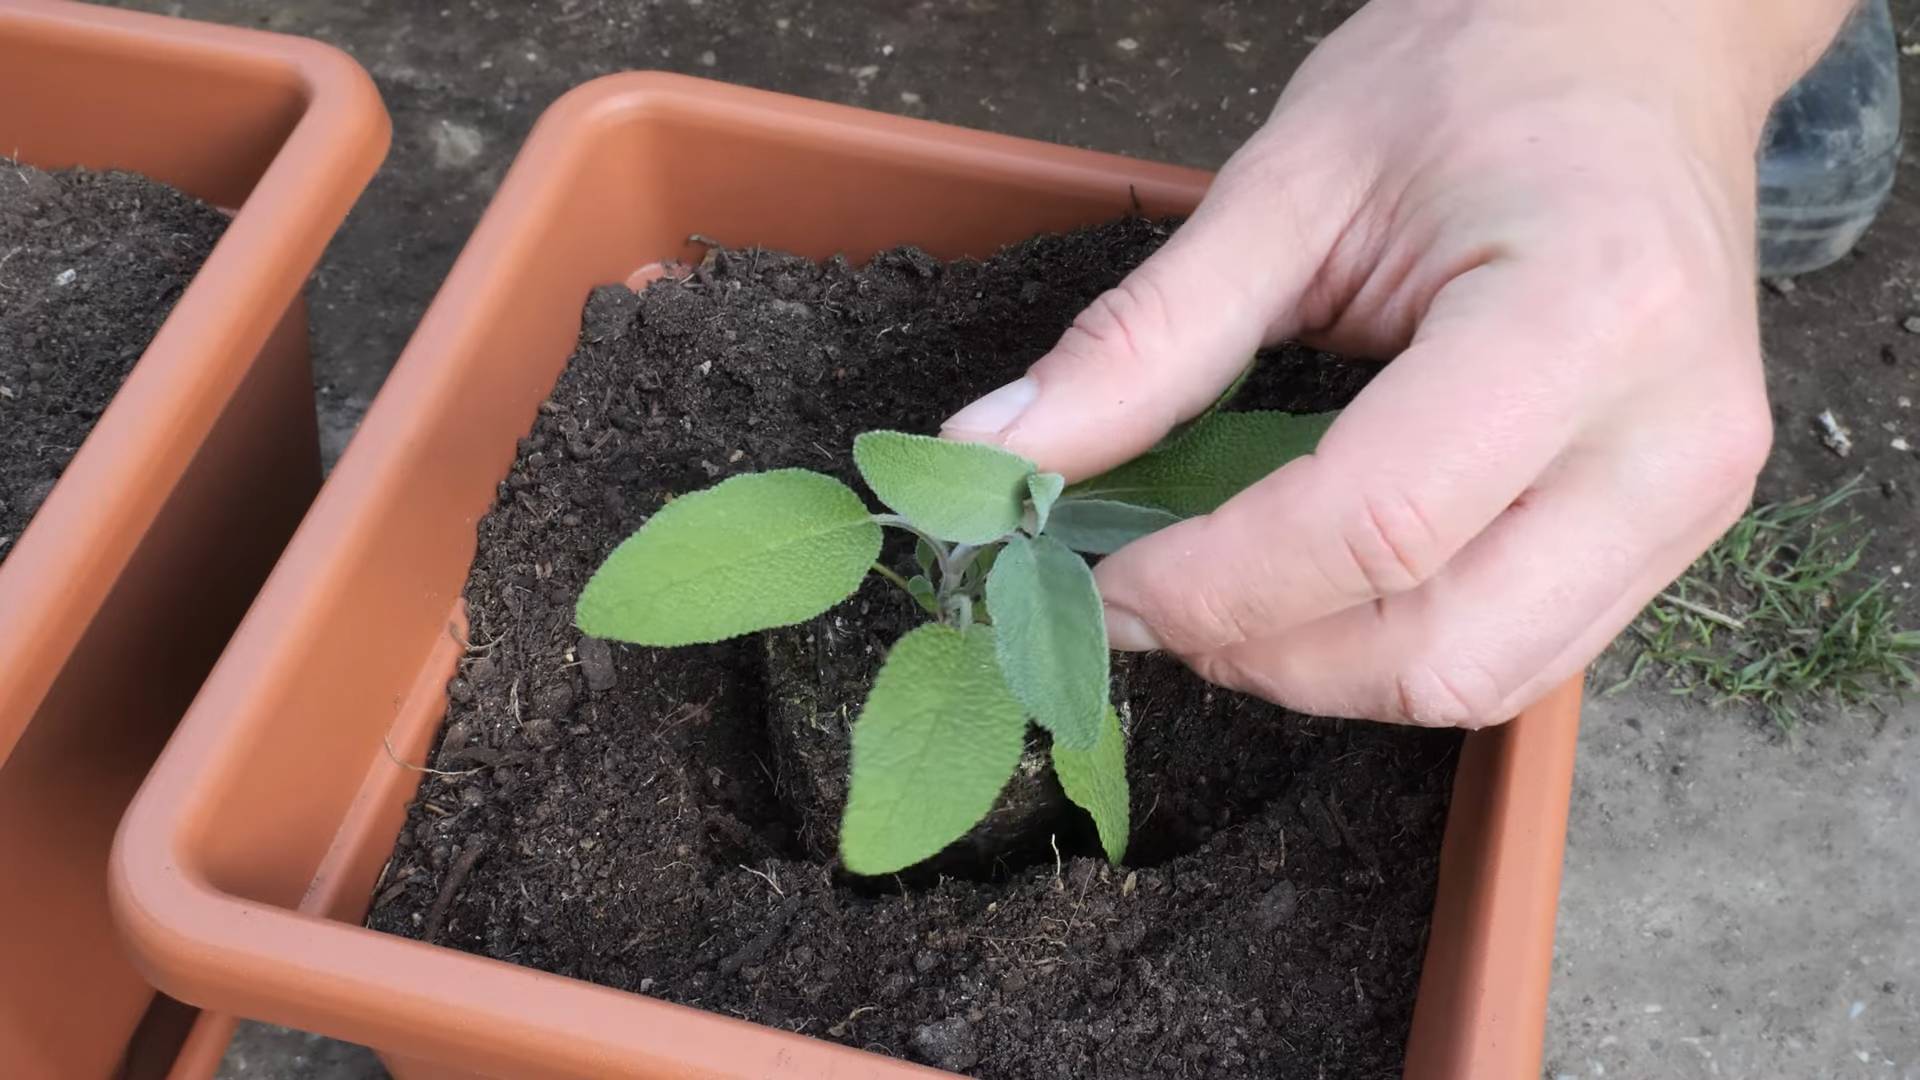
4. Planting a Young Sage Plant: Gently remove the sage plant from its nursery container. Loosen the roots slightly with your fingers to encourage them to spread out.
5. Position the Plant: Place the sage plant in the center of the pot, making sure the top of the root ball is level with the soil surface.
6. Fill with Soil: Fill in the remaining space around the plant with soil, gently patting it down to secure the plant.
7. Water Thoroughly: Water the sage plant thoroughly until water drains out of the bottom of the pot. This helps settle the soil and ensures the roots are well-hydrated.
Caring for Your Potted Sage
Once your sage is planted, it’s time to provide the care it needs to flourish. Here’s what you need to know about sunlight, watering, fertilizing, and pruning.
* Sunlight: Sage loves sunshine! Aim for at least 6-8 hours of direct sunlight per day. If you don’t have a sunny spot outdoors, you can supplement with a grow light.
* Watering: Water sage deeply but infrequently. Allow the soil to dry out slightly between waterings. Overwatering is a common mistake that can lead to root rot. Check the soil moisture by sticking your finger about an inch into the soil. If it feels dry, it’s time to water.
* Fertilizing: Sage doesn’t need a lot of fertilizer. In fact, too much fertilizer can actually reduce its flavor. I recommend fertilizing once in the spring with a balanced, slow-release fertilizer. You can also use compost tea or fish emulsion for a more natural approach.
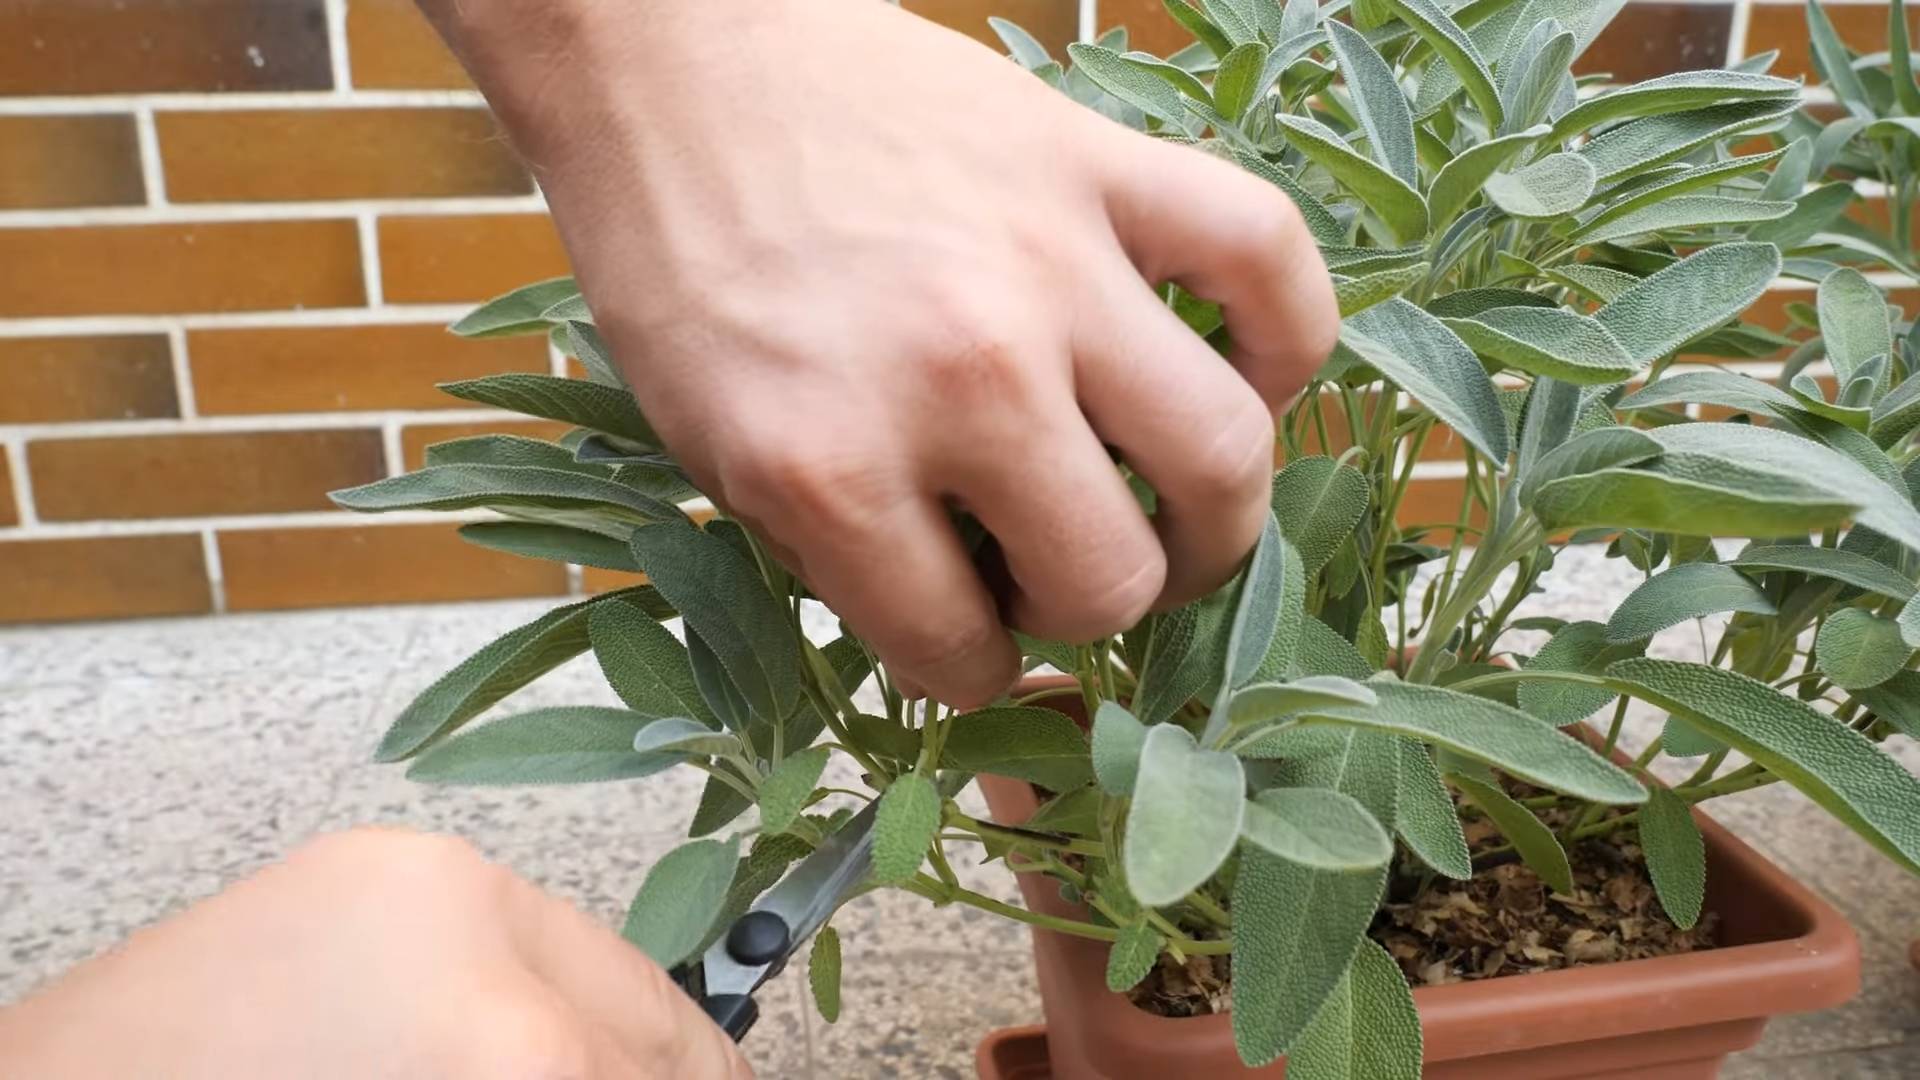
* Pruning: Pruning is essential for keeping your sage plant healthy and productive. Prune regularly to remove dead or damaged leaves and to encourage bushier growth. You can also prune to shape the plant and prevent it from becoming too leggy. I usually prune my sage plant in the spring and again in the late summer.
* Overwintering: Sage is a perennial in many climates, meaning it will come back year after year. However, in colder regions, you may need to protect your potted sage from frost. You can move the pot indoors to a sunny location or wrap it in burlap to insulate it.
Harvesting Your Sage
The best part of growing your own sage is being able to harvest fresh leaves whenever you need them!
1. When to Harvest: You can start harvesting sage leaves once the plant is established, usually after a few months. The leaves are most flavorful before the plant flowers.
2. How to Harvest: Use sharp scissors or pruning shears to cut the leaves from the plant. Avoid removing more than one-third of the plant at a time, as this can stress it.
3. Drying Sage: If you want to preserve your sage for later use, you can dry the leaves. Tie the stems together in a bundle and hang them upside down in a cool, dry place. You can also dry the leaves in a dehydrator or oven on low heat. Once the leaves are completely dry, store them in an airtight container.
Troubleshooting Common Problems
Even with the best care, you might encounter some problems with your potted sage. Here are a few common issues and how to address them.
* Yellowing Leaves: This can be a sign of overwatering, underwatering, or nutrient deficiency. Check the soil moisture and adjust your watering accordingly. If the soil is dry, water thoroughly. If the soil is soggy, allow it to dry out before watering again. You can also try fertilizing with a balanced fertilizer.
* Root Rot: This is caused by overwatering and poor drainage. If you suspect root rot, remove the plant from the pot and inspect the roots. If the roots are brown and mushy, trim them off. Repot the plant in fresh, well-draining soil.
* Pests: Sage can be susceptible to pests like aphids, spider mites, and whiteflies. Inspect your plant regularly for signs of infestation. You can treat pests with insecticidal soap or neem oil.
* Powdery Mildew: This is a fungal disease that can affect sage plants, especially in humid conditions. It appears as a white, powdery coating on the leaves. Improve air circulation around the plant and treat with a fungicide if necessary.
Sage Varieties to Consider
While common sage (Salvia officinalis) is the most popular variety, there are many other types of sage to explore. Here are a few of my favorites:
* Purple Sage (Salvia officinalis ‘Purpurascens’): This variety has beautiful purple leaves and a slightly milder flavor than common sage.
* Golden Sage (Salvia officinalis ‘Aurea’): This variety has golden-yellow leaves and a slightly sweeter flavor.
* Tricolor Sage (Salvia officinalis ‘Tricolor’): This variety has variegated leaves with green, white, and pink hues.
* Pineapple Sage (Salvia elegans): This variety has a distinct pineapple aroma and flavor. It’s a great addition to teas and desserts.
Using Your Homegrown Sage
Now that you’ve successfully grown your own sage, it’s time to put it to good use! Here are a few ideas:
* Cooking: Sage is a versatile herb that can be used in a variety of dishes, including soups, stews, roasts, and stuffings. It pairs well with poultry, pork, and vegetables.
* Tea: Sage tea is a soothing and flavorful beverage that’s said to have medicinal properties. Simply steep fresh or dried sage leaves in hot water for a few minutes.
* Smudging: Sage is often used for smudging, a spiritual practice that involves burning sage to cleanse a space or object.
* Crafts: Dried sage leaves can be used in potpourri, sachets, and other crafts.
Extra Tips for Success
Here are a few extra tips to help you grow the best possible sage in pots:
* Choose a high-quality potting mix: Don’t skimp on the soil! A good potting mix will provide the nutrients and drainage that your sage needs to thrive.
* Rotate your pot regularly: This will ensure that all sides of the plant receive equal sunlight.
* Deadhead spent flowers: This will encourage the plant to produce more leaves.
* Be patient: It takes time for sage to establish itself and start producing a lot of leaves. Don’t get discouraged if you don’t see results right away.
Growing sage in pots is a rewarding experience that anyone can enjoy. With a little bit of care and attention, you can have a thriving sage plant that provides you with fresh, flavorful leaves for years to come. Happy gardening!
Conclusion
So, there you have it! Cultivating your own sage in pots is not only achievable, but it’s also incredibly rewarding. We’ve walked through the simple steps, from selecting the right pot and soil to ensuring proper sunlight and watering. But why is this DIY sage gardening trick a must-try?
Firstly, think about the convenience. No more last-minute dashes to the grocery store for that crucial sprig of sage needed for your Thanksgiving stuffing or that comforting autumn soup. Fresh, fragrant sage will be right outside your door, ready to elevate your culinary creations. Secondly, consider the cost savings. Over time, purchasing fresh herbs regularly can add up. Growing your own sage is a one-time investment that yields a continuous supply. Thirdly, and perhaps most importantly, there’s the sheer joy of nurturing a living thing. Watching your sage plant thrive, knowing you provided the care it needed, is a deeply satisfying experience.
But the benefits don’t stop there. Growing sage in pots allows for flexibility. You can easily move your plant indoors during colder months, extending its growing season and ensuring a year-round supply of fresh herbs. This is particularly beneficial for those living in regions with harsh winters.
Variations and Suggestions:
* Sage Varieties: Don’t limit yourself to common garden sage! Explore different varieties like purple sage, golden sage, or tricolor sage. Each offers a unique flavor profile and visual appeal. Experiment and find your favorite!
* Companion Planting: Sage is a great companion plant for rosemary, thyme, and oregano. Consider planting these herbs together in a larger container for a mini herb garden.
* Sage Tea: Beyond culinary uses, sage makes a wonderful tea. Simply steep a few fresh leaves in hot water for a soothing and aromatic beverage.
* Drying Sage: When your sage plant is thriving, consider drying some of the leaves for later use. Simply hang bunches of sage upside down in a cool, dry place until the leaves are brittle. Store the dried sage in an airtight container.
* Creative Containers: While terracotta pots are a classic choice, don’t be afraid to get creative with your containers. Upcycle old buckets, metal tubs, or even wooden crates. Just ensure they have adequate drainage.
We believe that anyone, regardless of their gardening experience, can successfully grow sage in pots. It’s a simple, affordable, and incredibly rewarding project. So, grab a pot, some soil, and a sage plant, and get started today!
We are confident that you will find this DIY sage gardening trick to be a game-changer in your kitchen and garden. It’s a simple way to add fresh flavor to your meals, save money, and connect with nature.
Now, we want to hear from you! Have you tried growing sage in pots before? What tips and tricks have you learned along the way? Share your experiences in the comments below. We’re eager to learn from your successes and challenges. And if you’re new to this, don’t hesitate to ask questions. We’re here to help you every step of the way. Let’s cultivate a community of thriving sage gardeners!
FAQ
Frequently Asked Questions About Growing Sage in Pots
Q: What is the best type of pot for growing sage?
A: The best type of pot for growing sage is one that is at least 12 inches in diameter and has good drainage holes. Terracotta pots are a popular choice because they allow the soil to breathe, preventing overwatering. However, plastic or glazed ceramic pots can also be used, as long as they have adequate drainage. Avoid using pots that are too small, as this can restrict the plant’s root growth and lead to stunted growth.
Q: What kind of soil should I use for my sage plant?
A: Sage prefers well-draining soil that is slightly alkaline. A good potting mix for sage would be a blend of equal parts potting soil, perlite, and compost. The potting soil provides nutrients, the perlite improves drainage, and the compost adds organic matter. Avoid using heavy clay soil, as this can retain too much moisture and lead to root rot. You can also add a small amount of lime to the soil to increase its alkalinity.
Q: How much sunlight does sage need?
A: Sage needs at least 6-8 hours of sunlight per day to thrive. Place your potted sage plant in a sunny location, such as a south-facing window or a sunny patio. If you live in a hot climate, you may need to provide some afternoon shade to prevent the leaves from scorching. If you don’t have enough natural sunlight, you can supplement with grow lights.
Q: How often should I water my sage plant?
A: Water your sage plant when the top inch of soil feels dry to the touch. Avoid overwatering, as this can lead to root rot. When you water, water deeply, until water drains out of the drainage holes. During the summer months, you may need to water more frequently than during the winter months.
Q: How do I fertilize my sage plant?
A: Sage doesn’t require a lot of fertilizer. Fertilize your sage plant once a month during the growing season (spring and summer) with a balanced liquid fertilizer diluted to half strength. Avoid over-fertilizing, as this can lead to leggy growth and reduced flavor. You can also add compost to the soil to provide slow-release nutrients.
Q: How do I prune my sage plant?
A: Prune your sage plant regularly to encourage bushier growth and prevent it from becoming leggy. Prune in the spring, after the last frost, and again in the late summer. Remove any dead or damaged leaves and stems. You can also pinch back the tips of the stems to encourage branching.
Q: How do I overwinter my sage plant?
A: If you live in a cold climate, you will need to overwinter your sage plant indoors. Before the first frost, bring your potted sage plant indoors and place it in a sunny location. Water sparingly during the winter months. You can also prune the plant back to about 6 inches tall to encourage new growth in the spring.
Q: Can I propagate sage from cuttings?
A: Yes, you can easily propagate sage from cuttings. Take 4-6 inch cuttings from new growth in the spring or summer. Remove the lower leaves and dip the cut end in rooting hormone. Plant the cuttings in a pot filled with moist potting mix. Cover the pot with a plastic bag to create a humid environment. Keep the soil moist and the cuttings should root in 2-3 weeks.
Q: What are some common problems with sage plants?
A: Some common problems with sage plants include root rot, powdery mildew, and spider mites. Root rot is caused by overwatering. Powdery mildew is a fungal disease that can be prevented by providing good air circulation. Spider mites are tiny pests that can be controlled with insecticidal soap.
Q: Is sage safe for pets?
A: Sage is generally considered safe for pets in small amounts. However, large quantities of sage can be toxic to pets. If you have pets, it’s best to keep your sage plant out of their reach. If you suspect that your pet has ingested a large amount of sage, contact your veterinarian immediately.

Leave a Comment