

Easy Grout Cleaning Clorox: Sounds like a dream, right? I know, I know, grout cleaning is probably right up there with cleaning the oven on the list of everyone’s least favorite chores. But what if I told you that sparkling clean grout was within your reach, and easier than you ever imagined? We’re diving deep into the world of DIY grout cleaning, and trust me, you’ll be amazed at how simple it can be.
Grout, that porous material between your tiles, has been around for centuries, dating back to ancient civilizations who used it to hold their magnificent structures together. While they might not have been battling stubborn stains and discoloration like we are today, the need for effective grout maintenance is timeless. Over time, grout can become a breeding ground for mold, mildew, and grime, making your beautiful tiles look dull and uninviting.
That’s where this easy grout cleaning Clorox trick comes in! In this article, I’m going to share a simple, yet incredibly effective DIY method using Clorox that will have your grout looking brand new in no time. No more back-breaking scrubbing or expensive professional cleaners needed. I’ll walk you through each step, providing tips and tricks to ensure a sparkling clean finish. Get ready to say goodbye to dingy grout and hello to a brighter, fresher home!
DIY Grout Cleaning with Clorox: A Sparkling Transformation!
Okay, let’s talk grout. That dingy, stained grout between your tiles can make even the cleanest bathroom or kitchen look… well, less than sparkling. And trust me, I’ve been there! I’ve tried countless commercial cleaners, scrubbed until my arms ached, and still ended up with grout that looked like it had seen better days. But then I discovered the magic of Clorox bleach, and let me tell you, it’s a game-changer. This method is effective, but remember to always prioritize safety and ventilation.
Safety First!
Before we dive in, let’s cover the essentials. Bleach is powerful stuff, so we need to be careful.
* Ventilation is Key: Open windows and doors! Seriously, don’t skip this step. You want plenty of fresh air circulating.
* Protective Gear: Wear rubber gloves to protect your skin. Bleach can be irritating. Eye protection is also a good idea, especially if you’re working on a ceiling or vertical surface. An old pair of glasses will do the trick.
* Avoid Mixing: Never, ever mix bleach with ammonia or other cleaning products. This can create dangerous fumes.
* Test Patch: Before applying bleach to a large area, test it on a small, inconspicuous spot to make sure it doesn’t discolor your grout or tiles.
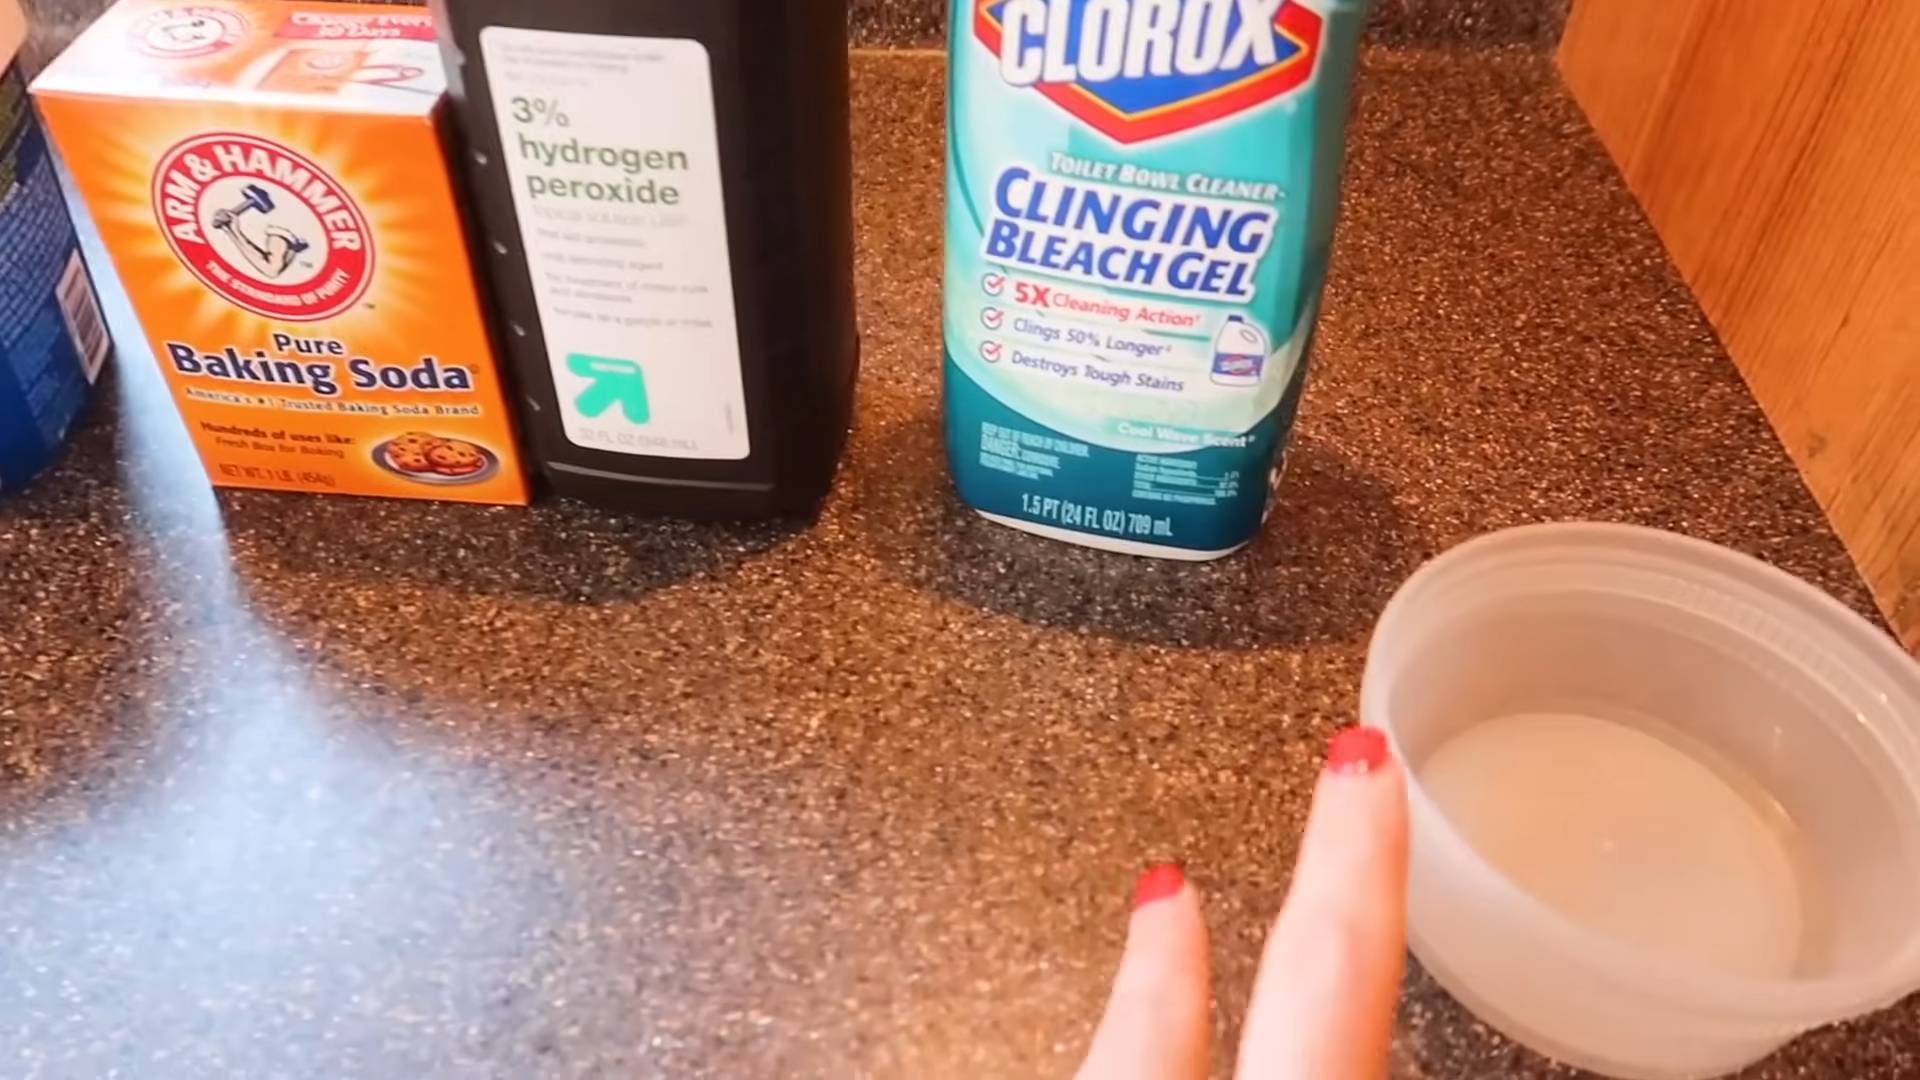
Materials You’ll Need
Here’s what you’ll need to gather before we get started:
* Clorox Bleach: Regular household bleach is what we’re after.
* Spray Bottle: A clean, empty spray bottle is essential for applying the bleach.
* Old Toothbrush or Grout Brush: For scrubbing those stubborn stains. An electric toothbrush with a small brush head can also work wonders!
* Clean Rags or Sponges: For wiping up excess bleach and rinsing.
* Water: For rinsing and diluting the bleach (optional, but recommended for colored grout).
* Optional: Baking Soda: For extra stubborn stains, baking soda can be a great addition.
* Optional: Small Bowl: If you’re using baking soda, you’ll need a small bowl to mix it with water.
Step-by-Step Grout Cleaning Guide
Alright, let’s get down to business! Here’s how I tackle grout cleaning with Clorox:
1. Prepare the Area: Clear the area you’re cleaning. Remove any rugs, bath mats, or other items that might get in the way or be damaged by bleach. Sweep or vacuum the floor to remove any loose dirt or debris. This will help the bleach work more effectively.
2. Dilute the Bleach (Optional): For white grout, you can use bleach undiluted. However, for colored grout, I highly recommend diluting it with water to prevent discoloration. A 1:1 ratio (equal parts bleach and water) is a good starting point. If you’re concerned about discoloration, test a small area with a more diluted solution first.
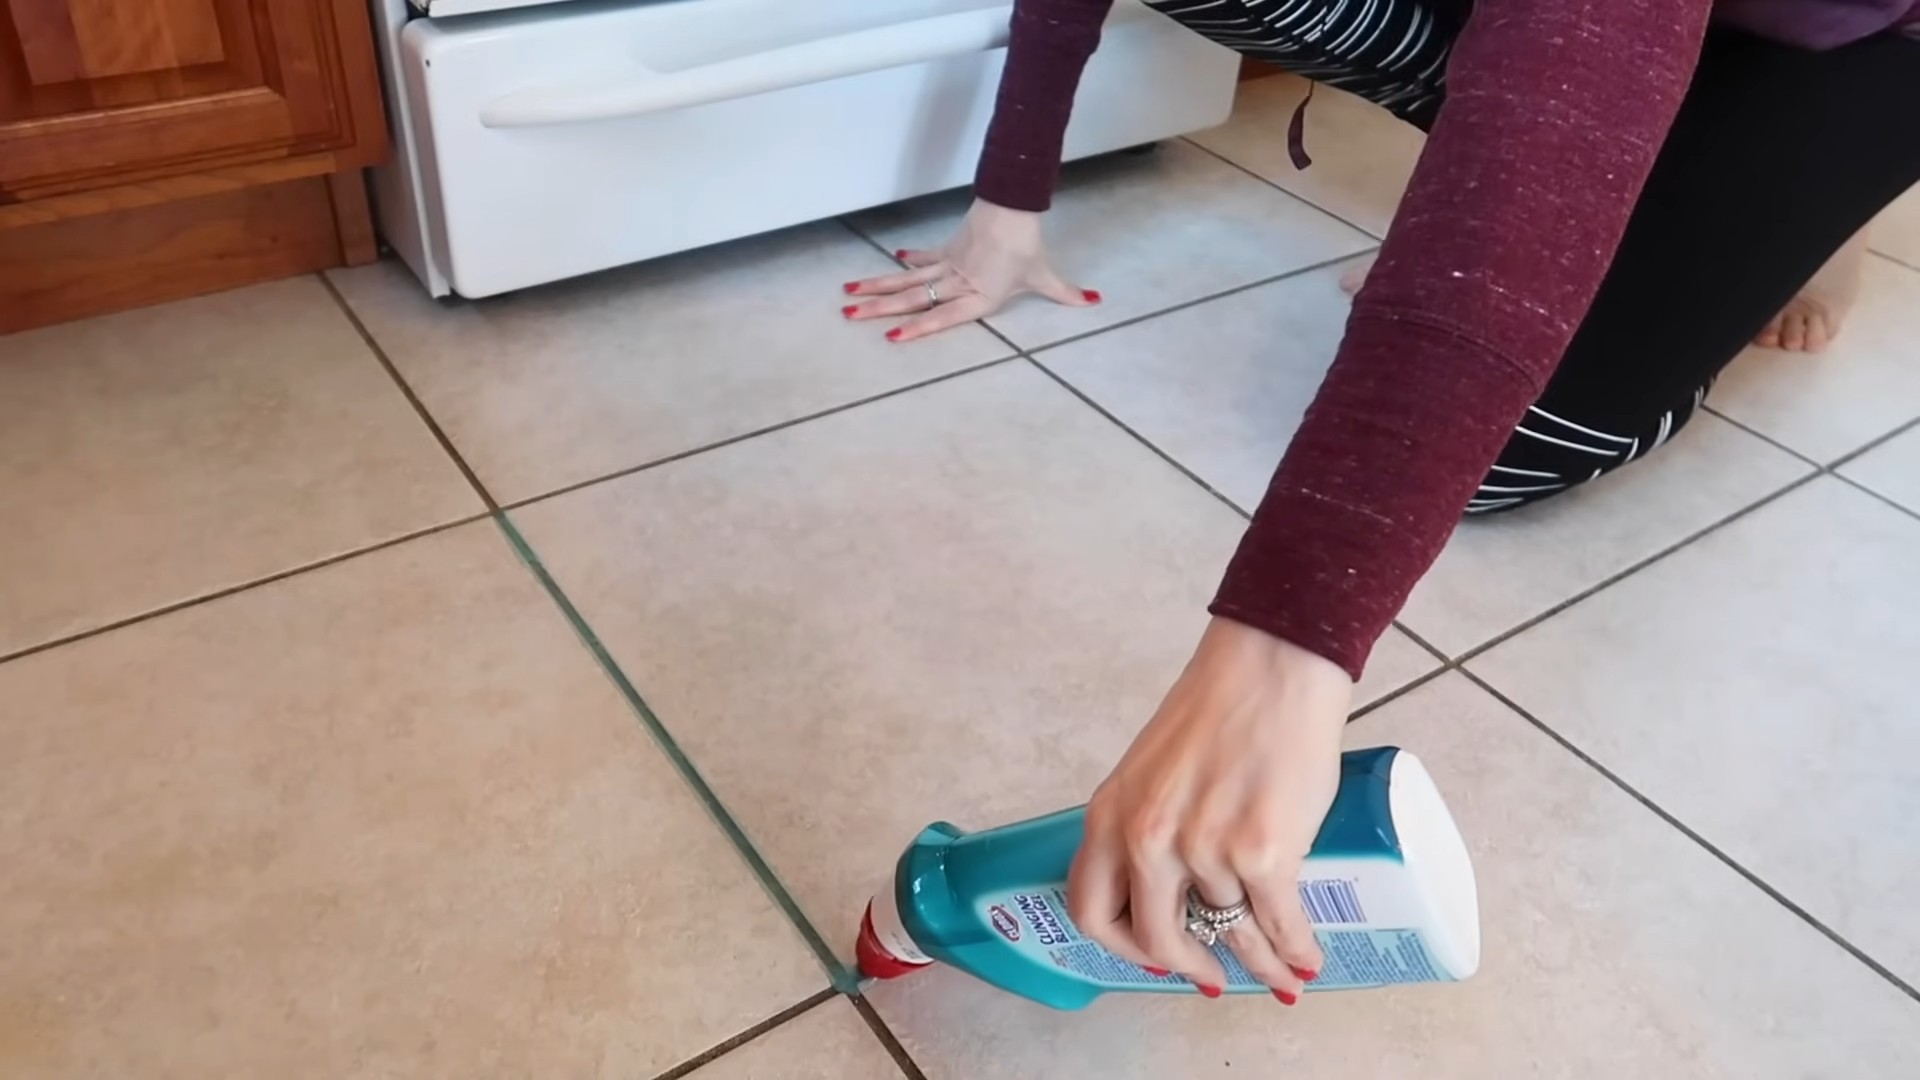
3. Apply the Bleach: Pour the bleach (or diluted bleach solution) into your spray bottle. Spray the grout lines thoroughly, making sure to saturate them. Don’t be afraid to be generous! You want the bleach to really soak into the grout.
4. Let it Sit: This is where the magic happens! Let the bleach sit on the grout for about 10-15 minutes. This gives it time to break down the stains and mildew. Don’t let it sit for too long, though, as it could potentially damage the grout or tiles.
5. Scrub, Scrub, Scrub! Grab your old toothbrush or grout brush and start scrubbing! Focus on the areas with the most stubborn stains. You’ll likely see the dirt and grime start to lift away. If you’re using an electric toothbrush, let the brush do the work for you. Just guide it along the grout lines.
6. Tackle Stubborn Stains with Baking Soda (Optional): If you have some particularly stubborn stains that aren’t budging, try making a paste of baking soda and water. Apply the paste to the stained areas and let it sit for a few minutes before scrubbing again. The baking soda acts as a gentle abrasive, helping to lift the stains.
7. Rinse Thoroughly: Once you’ve scrubbed all the grout lines, it’s time to rinse. Use clean water and a sponge or rag to wipe away all the bleach residue. Make sure to rinse thoroughly, as any remaining bleach can continue to lighten the grout or damage the tiles. I usually rinse several times to be sure.
8. Dry the Area: After rinsing, dry the area with a clean towel or rag. This will help prevent water spots and mildew growth. You can also use a fan to speed up the drying process.
Dealing with Different Types of Grout
Not all grout is created equal! Here’s how to adjust your cleaning approach based on the type of grout you have:
* Cement Grout: This is the most common type of grout and is generally safe to clean with bleach. However, it’s porous, so it can absorb stains easily. Be sure to rinse thoroughly to remove all bleach residue.
* Epoxy Grout: Epoxy grout is more resistant to stains and mildew than cement grout. It’s also less porous, so it’s less likely to be damaged by bleach. However, it’s still a good idea to test a small area first.
* Colored Grout: As I mentioned earlier, it’s crucial to dilute the bleach when cleaning colored grout to prevent discoloration. Start with a highly diluted solution and test a small area before applying it to the entire surface.
Maintaining Your Sparkling Grout
Once you’ve achieved that sparkling clean grout, you’ll want to keep it that way! Here are a few tips for maintaining your grout:
* Regular Cleaning: Wipe up spills and messes as soon as they happen. This will prevent stains from setting in.
* Ventilation: Make sure your bathroom is well-ventilated to prevent mildew growth. Run the exhaust fan during and after showers.
* Grout Sealer: Consider applying a grout sealer to protect your grout from stains and moisture. This will make it easier to clean in the future. You can find grout sealers at most home improvement stores.
* Avoid Harsh Chemicals: While bleach is effective for deep cleaning, avoid using harsh chemicals on your grout on a regular basis. These can damage the grout over time.
Troubleshooting
Sometimes, even with the best efforts, you might encounter a few challenges. Here are some common issues and how to address them:
* Discoloration: If you notice any discoloration after cleaning with bleach, try rinsing the area again with clean water. If the discoloration persists, you may need to use a grout colorant to restore the original color.
* Stubborn Stains: For extremely stubborn stains, you can try using a stronger bleach solution or letting the bleach sit on the grout for a longer period of time (but don’t exceed 30 minutes). You can also try using a steam cleaner to loosen the stains before scrubbing.
* Damaged Grout: If your grout is cracked or crumbling, cleaning it with bleach may exacerbate the problem. In this case, you may need to repair or replace the grout.
Conclusion
Cleaning grout with Clorox bleach is a simple and effective way to transform your bathroom or kitchen. Just remember to prioritize safety, follow the steps carefully, and maintain your grout regularly to keep it looking its best. With a little elbow grease and the power of bleach, you can say goodbye to dingy grout and hello to a sparkling clean space! Happy cleaning!
Conclusion
So, there you have it! This simple, yet incredibly effective, DIY grout cleaning method using Clorox is a game-changer for anyone battling dingy, stained grout. We’ve all been there, scrubbing endlessly with minimal results, only to be left with aching backs and grout that still looks less than sparkling. This method bypasses all that frustration. The power of Clorox, combined with a little elbow grease (though significantly less than traditional methods!), delivers truly remarkable results.
Why is this a must-try? Because it’s efficient, cost-effective, and uses a readily available household product. You’re not investing in expensive, specialized cleaners that may or may not work. You’re leveraging the proven cleaning power of Clorox in a targeted way. Think of the time and money you’ll save! Plus, the satisfaction of seeing your grout transform from dull and dirty to bright and clean is incredibly rewarding.
But the best part? It’s adaptable! Feel free to experiment with variations to suit your specific needs and preferences. For instance, if you have particularly stubborn stains, you can let the Clorox solution sit for a longer period, perhaps even up to an hour, before scrubbing. Just be sure to ventilate the area well. Alternatively, if you’re sensitive to the smell of Clorox, consider adding a few drops of your favorite essential oil, like lemon or eucalyptus, to the solution. This won’t affect the cleaning power but will make the process more pleasant. Another variation is to use a grout pen after cleaning to seal the grout and prevent future staining. This is especially helpful in high-traffic areas like bathrooms and kitchens.
Don’t be afraid to customize the process to achieve your desired results. The key is to start with a small, inconspicuous area to test the solution and ensure it doesn’t damage your tiles.
We are confident that this DIY grout cleaning Clorox trick will revolutionize your cleaning routine. It’s a simple, effective, and affordable way to achieve professional-looking results without the professional price tag.
Now, it’s your turn! We wholeheartedly encourage you to give this DIY grout cleaning method a try. We’re eager to hear about your experiences. Did it work wonders on your grout? Did you try any variations? What tips and tricks did you discover along the way? Share your before-and-after photos and your stories in the comments below. Let’s build a community of sparkling clean grout enthusiasts! Your feedback will not only help others but also inspire us to continue sharing helpful cleaning hacks. Let’s banish dingy grout together!
Frequently Asked Questions (FAQ)
Is it safe to use Clorox on all types of grout?
While Clorox is generally safe for most types of grout, it’s always best to test it in an inconspicuous area first. Some colored grout may be susceptible to fading, although this is less likely with the diluted solution we recommend. Pay close attention to the grout after applying the solution and before scrubbing to ensure no discoloration occurs. If you notice any fading, rinse immediately and consider using a gentler cleaning method. For epoxy grout, which is more resistant to staining, you may not need such a strong solution. A mild detergent and water might suffice. Always consult the manufacturer’s recommendations for your specific type of grout if you’re unsure.
How often should I clean my grout with Clorox?
The frequency of cleaning depends on the traffic and usage of the area. For high-traffic areas like bathrooms and kitchens, cleaning every 1-2 months may be necessary. For less frequently used areas, cleaning every 3-6 months may be sufficient. Regular cleaning prevents the buildup of dirt and grime, making it easier to maintain clean grout over time. Avoid over-cleaning, as excessive use of Clorox can potentially weaken the grout over time. Spot clean as needed for spills or stains.
What kind of brush should I use for scrubbing?
A stiff-bristled brush is ideal for scrubbing grout. A grout brush, specifically designed for cleaning grout lines, is the best option. These brushes have angled bristles that can effectively reach into the grout lines. If you don’t have a grout brush, a toothbrush or a small scrub brush can also work. Avoid using metal brushes, as they can scratch the tiles. The key is to use a brush with firm bristles that can effectively dislodge dirt and grime without damaging the surrounding tiles.
What safety precautions should I take when using Clorox?
Safety is paramount when using Clorox. Always wear gloves to protect your skin from irritation. Ensure adequate ventilation by opening windows and doors. Avoid mixing Clorox with other cleaning products, especially ammonia, as this can create dangerous fumes. If you experience any irritation or discomfort, stop using the product immediately and rinse the affected area with water. Keep Clorox out of reach of children and pets. Store it in a cool, dry place away from direct sunlight.
Can I use this method on vertical grout, like in a shower?
Yes, this method can be used on vertical grout. However, you may need to adjust the application technique. Instead of spraying the solution directly onto the grout, consider applying it with a sponge or a small brush. This will help prevent the solution from running down the wall too quickly. You can also create a thicker paste by adding a small amount of baking soda to the Clorox solution. This will help the solution adhere to the vertical grout lines better.
What if the stains are really stubborn and don’t come off easily?
For extremely stubborn stains, you can try a few different approaches. First, increase the concentration of Clorox in the solution, but be cautious and test in an inconspicuous area first. Second, allow the solution to sit on the grout for a longer period, up to an hour, before scrubbing. Third, try using a more abrasive scrubbing tool, such as a scrub pad designed for grout cleaning. Finally, for truly persistent stains, you may need to consider using a specialized grout stain remover. Always follow the manufacturer’s instructions carefully when using any cleaning product.
How do I prevent grout from getting dirty again so quickly?
Prevention is key to maintaining clean grout. Regularly sweep or vacuum the area to remove loose dirt and debris. Wipe up spills immediately to prevent them from soaking into the grout. Consider sealing the grout with a grout sealer to protect it from stains and moisture. Use mats or rugs in high-traffic areas to reduce the amount of dirt tracked onto the grout. Regularly ventilate the area to prevent moisture buildup, which can lead to mold and mildew growth. By taking these preventative measures, you can significantly reduce the frequency of grout cleaning.

Leave a Comment