

Red Radish Winter Gardening might sound like a frosty fairytale, but trust me, it’s a deliciously achievable reality! Imagine this: while the rest of your neighborhood is bundled up indoors, dreaming of spring, you’re harvesting crisp, peppery radishes straight from your own backyard. Sounds pretty amazing, right?
For centuries, resourceful gardeners have extended their growing seasons using clever techniques. The history of winter gardening is intertwined with survival and self-sufficiency, a testament to human ingenuity in the face of challenging climates. Think about it – access to fresh, homegrown food during the colder months was, and still is, a huge advantage.
But why should you bother with Red Radish Winter Gardening? Well, beyond the bragging rights (which are totally deserved!), growing radishes in winter offers a fantastic way to enjoy fresh produce year-round, reduce your reliance on store-bought vegetables (often shipped from far away), and connect with nature even when the weather outside is frightful. Plus, radishes are incredibly fast-growing, making them a super rewarding project for even the most impatient gardener (like me!).
This DIY guide is packed with simple, effective tricks and hacks to help you successfully cultivate these vibrant little root vegetables, even when Jack Frost is nipping at your nose. So, grab your gloves, and let’s get started on your winter radish adventure!
Growing Red Radishes All Winter Long: My DIY Guide
Okay, so you want fresh, peppery radishes even when the snow is falling? I get it! There’s nothing quite like the satisfaction of pulling a vibrant red radish from the earth in the dead of winter. It’s totally doable, and I’m going to walk you through exactly how I do it. This guide focuses on growing radishes indoors, extending your harvest well beyond the typical growing season.
Choosing the Right Radish Variety
First things first, not all radishes are created equal when it comes to indoor winter growing. Some varieties are just better suited for the lower light conditions and confined spaces. Here are a few of my favorites:
- Cherry Belle: This is a classic for a reason! They mature quickly (around 22 days) and are super reliable.
- French Breakfast: These elongated radishes have a milder flavor and are ready in about 25 days.
- Easter Egg: If you want a colorful mix, this variety produces radishes in shades of red, pink, purple, and white. They take about 28 days to mature.
- Sparkler: Another quick grower, ready in about 22 days, with a mild flavor and a white tip.
I usually opt for Cherry Belle because they’re readily available and consistently perform well for me. But feel free to experiment and see what works best for you!
Setting Up Your Indoor Radish Garden
Now, let’s get our hands dirty (well, not too dirty!). Here’s what you’ll need to create your indoor radish haven:
- Containers: You’ll need containers that are at least 6 inches deep. Radishes don’t need a ton of space, but they do need room for their roots to develop. I like to use plastic containers with drainage holes, but terracotta pots work too. Just make sure they have drainage!
- Potting Mix: Don’t use garden soil! It’s too heavy and compacts easily. Instead, use a good quality potting mix that’s light and well-draining. I often mix in some perlite or vermiculite to improve drainage even further.
- Grow Lights: This is crucial for winter growing. Radishes need at least 6 hours of direct sunlight per day, and in the winter, that’s just not going to happen naturally. Invest in a good set of grow lights. LED grow lights are energy-efficient and work great.
- Watering Can or Spray Bottle: For gentle watering.
- Radish Seeds: Of course!
- Optional: Seed starting tray (for pre-sprouting, which I’ll explain later), heat mat (to speed up germination).
Step-by-Step Planting Guide
Okay, let’s get planting!
- Prepare Your Containers: Fill your containers with potting mix, leaving about an inch of space at the top. Gently pat down the soil.
- Sow the Seeds: Radish seeds are small, so you don’t need to plant them too deep. Make small indentations in the soil about ½ inch deep and 1 inch apart. Place one or two seeds in each indentation. I usually plant two seeds per spot just to be safe, and then thin them out later if both germinate.
- Cover the Seeds: Gently cover the seeds with potting mix.
- Water Thoroughly: Water the soil gently until it’s evenly moist. You don’t want to flood the seeds, but you want to make sure the soil is well-hydrated.
- Position Under Grow Lights: Place your containers under your grow lights. Make sure the lights are about 6-12 inches above the soil surface.
- Maintain Moisture: Keep the soil consistently moist, but not soggy. Check the soil daily and water when the top inch feels dry.
Optional: Pre-Sprouting for Faster Germination
This is a trick I use to get my radishes sprouting even faster, especially in colder temperatures.
- Dampen a Paper Towel: Moisten a paper towel with water and squeeze out any excess.
- Place Seeds on Towel: Spread the radish seeds evenly on the damp paper towel.
- Fold and Seal: Fold the paper towel over the seeds and place it in a plastic bag or container. Seal the bag or container.
- Warm Location: Place the bag or container in a warm location (around 70-75°F). A heat mat can be helpful here.
- Check Daily: Check the seeds daily for germination. They should sprout within a few days.
- Plant Sprouts: Once the seeds have sprouted, carefully plant them in your prepared containers, following the same steps as above.
Caring for Your Radish Plants
Once your radishes have sprouted, it’s important to provide them with the right care to ensure a bountiful harvest.
- Thinning: Once the seedlings have their first true leaves (the second set of leaves), thin them out so that they are about 1-2 inches apart. This will give them enough room to grow. Snip off the weaker seedlings at the soil line with scissors. Don’t pull them out, as this can disturb the roots of the remaining plants.
- Watering: Continue to water regularly, keeping the soil consistently moist. Avoid overwatering, as this can lead to root rot.
- Lighting: Make sure your radishes are getting enough light. If they start to look leggy (tall and spindly), it means they’re not getting enough light. Lower the grow lights or provide additional light.
- Fertilizing: Radishes don’t need a lot of fertilizer, but a light feeding every couple of weeks can help them grow. Use a balanced liquid fertilizer diluted to half strength.
- Temperature: Radishes prefer cooler temperatures, around 60-70°F. Avoid placing them near heat sources.
Dealing with Pests and Diseases
Luckily, radishes are relatively pest-free, especially when grown indoors. However, here are a few things to watch out for:
- Fungus Gnats: These tiny flies can be a nuisance. They’re attracted to moist soil. To prevent them, avoid overwatering and allow the top inch of soil to dry out between waterings. You can also use sticky traps to catch the adults.
- Aphids: These small, sap-sucking insects can sometimes infest radishes. If you see aphids, you can spray them off with a strong stream of water or use insecticidal soap.
- Root Rot: This is caused by overwatering. Make sure your containers have good drainage and avoid letting the soil stay soggy.
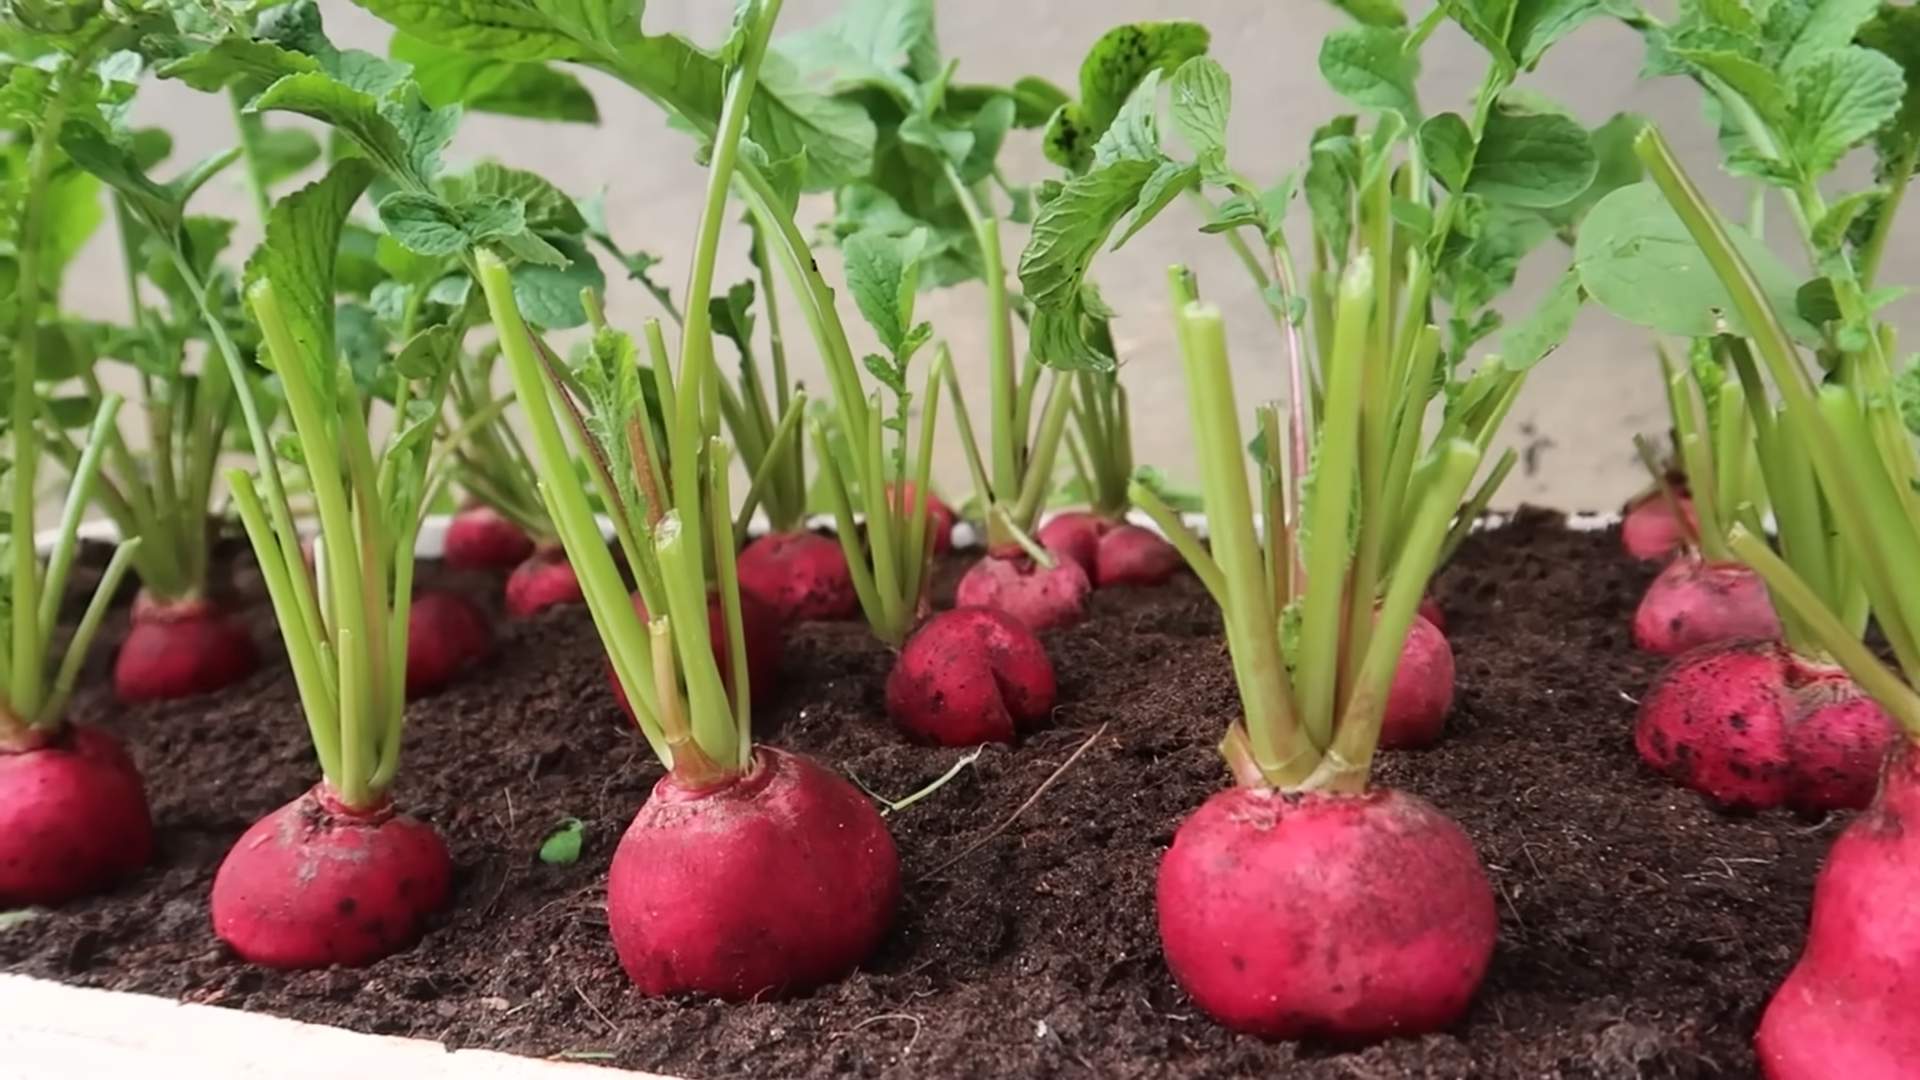
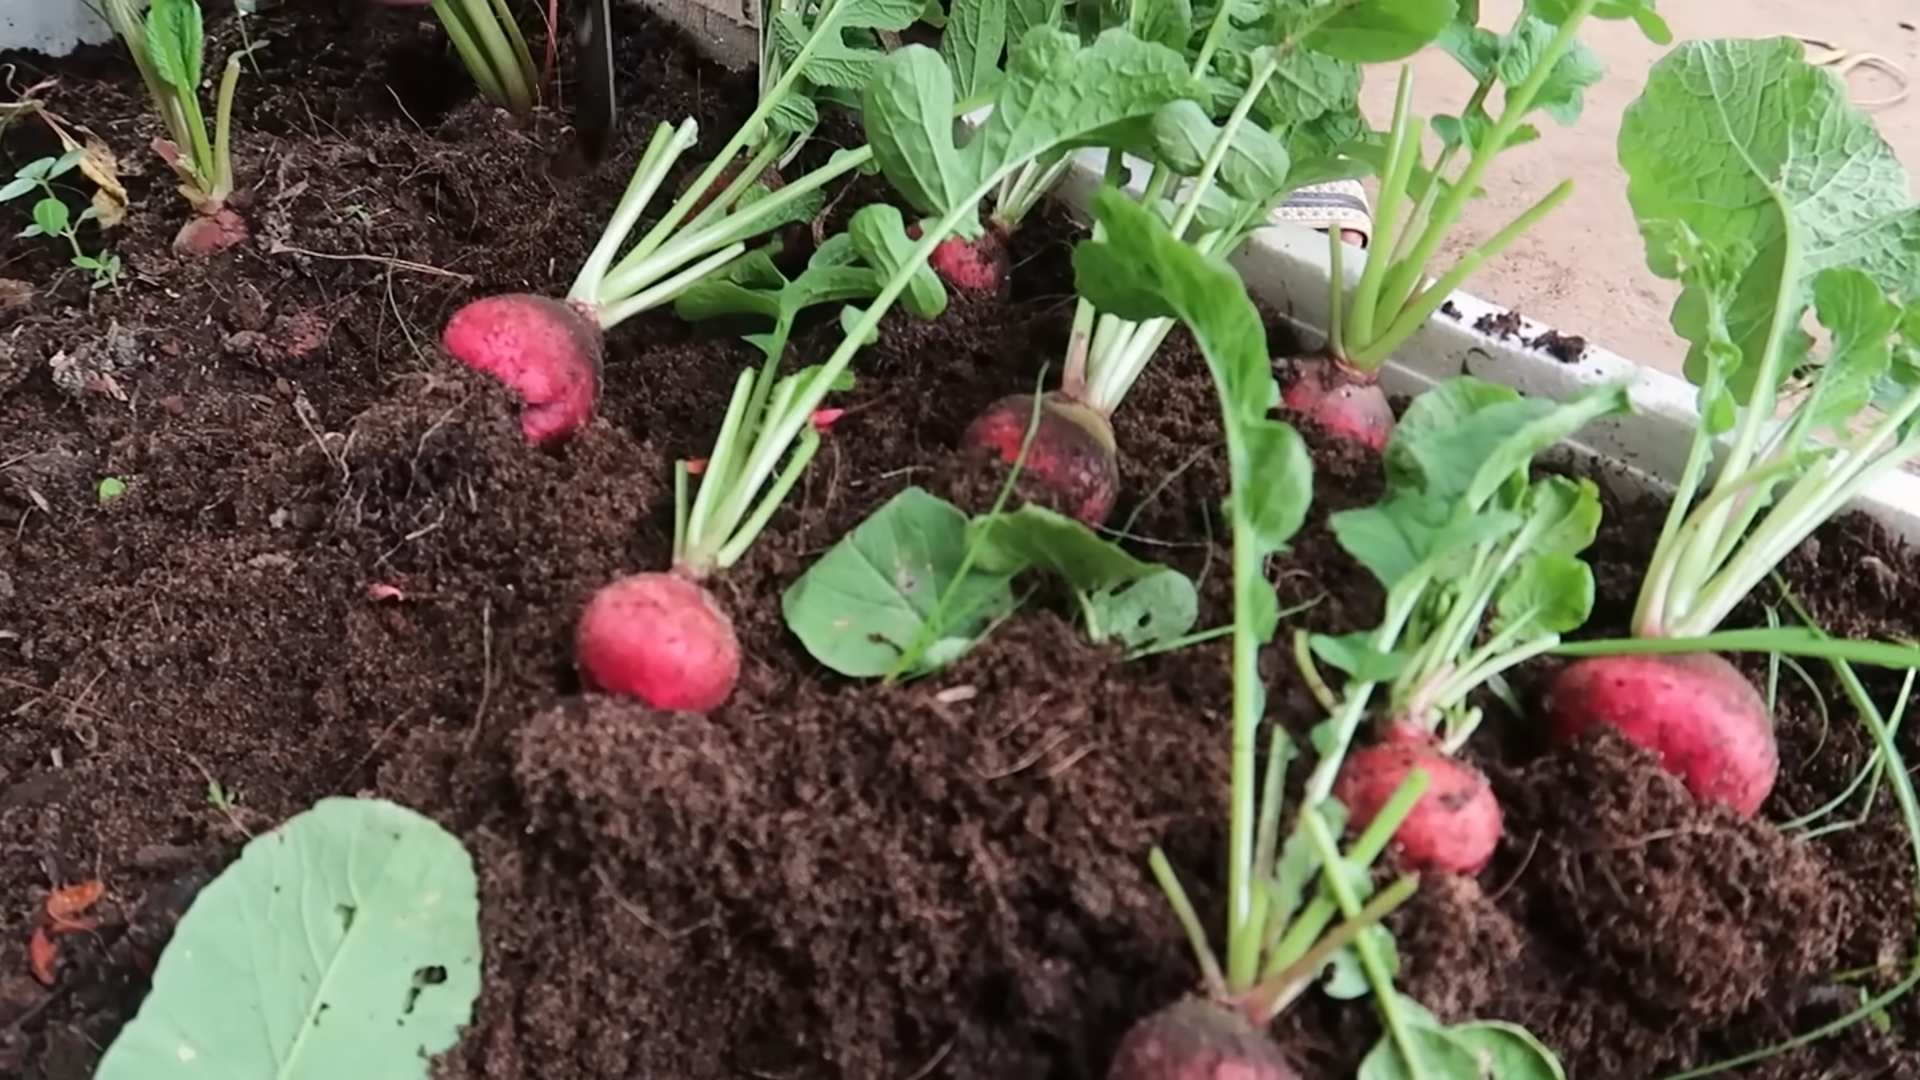
Harvesting Your Radishes
The best part! Radishes are ready to harvest when they reach the size specified for their variety. This is usually around 22-30 days after planting.
- Check for Size: Gently brush away the soil around the base of the radish to check its size.
- Pull Gently: Grasp the radish leaves near the base and gently pull the radish out of the soil. If it’s difficult to pull, loosen the soil around the radish with a small trowel.
- Wash and Enjoy: Wash the radishes thoroughly and enjoy them fresh!
Extending Your Harvest
To keep a steady supply of radishes throughout the winter, I recommend succession planting. This means planting a new batch of seeds every week or two. This way, you’ll always have radishes ready to harvest.
Troubleshooting Tips
Here are a few common problems you might encounter and how to fix them:
- Radishes are not forming bulbs: This is usually caused by overcrowding, lack of light, or poor soil. Make sure you thin your seedlings properly, provide adequate light, and use a good quality potting mix.
- Radishes are too spicy: This can be caused by hot weather or dry soil. Keep the soil consistently moist and try to keep the temperature cool.
- Radishes are cracking: This is usually caused by inconsistent watering. Make sure you water regularly and avoid letting the soil dry out completely.
- Radishes are leggy: This means they’re not getting enough light. Lower the grow lights or provide additional light.
Enjoying Your Homegrown Radishes
Now that you’ve successfully grown your own radishes, it’s time to enjoy them! Here are a few of my favorite ways to eat them:
- Raw: Sliced thinly and added to salads, sandwiches, or tacos.
- Roasted:
Conclusion
So, there you have it! Cultivating your own red radishes during the winter months isn’t just a whimsical dream; it’s an achievable reality with a little planning and the right approach. We’ve explored the ins and outs of winter radish gardening, from selecting the perfect varieties to providing the optimal growing environment. But why should you embark on this chilly adventure?
Firstly, the taste. Commercially grown radishes, while readily available, often lack the vibrant, peppery punch of homegrown varieties. Imagine biting into a crisp, juicy red radish, bursting with flavor, knowing you nurtured it from seed to table. The difference is truly remarkable.
Secondly, the satisfaction. There’s an undeniable sense of accomplishment that comes from growing your own food, especially when the weather outside is frightful. Nurturing life during the dormant season is a rewarding experience that connects you to the natural world in a profound way.
Thirdly, freshness and nutrition. Homegrown radishes are harvested at their peak ripeness, ensuring maximum flavor and nutritional value. You control the growing process, eliminating the need for harmful pesticides or herbicides. You’re providing yourself and your family with a healthy, delicious addition to your winter diet.
And finally, the sheer fun of it! Winter gardening can be a welcome distraction from the winter blues. It’s a chance to get your hands dirty, learn new skills, and witness the miracle of growth, even in the coldest months.
Don’t be afraid to experiment with different radish varieties. ‘French Breakfast’ radishes offer a milder flavor, while ‘Black Spanish’ radishes provide a more intense, earthy taste. Consider succession planting to ensure a continuous harvest throughout the winter. Plant a new batch of seeds every few weeks to keep the radishes coming.
You can also get creative with your growing methods. Try growing radishes in containers on a sunny windowsill, or build a simple cold frame to extend your growing season. Explore companion planting to deter pests and improve soil health. Carrots and lettuce are excellent companions for radishes.
Winter radish gardening is more than just a way to grow vegetables; it’s a way to connect with nature, nourish your body, and brighten your spirits during the darkest months of the year. So, grab your seeds, prepare your soil, and get ready to experience the joy of homegrown radishes this winter.
We encourage you to try this DIY trick and share your experiences with us! Let us know what varieties you’ve grown, what challenges you’ve faced, and what successes you’ve celebrated. Share your photos, tips, and tricks in the comments below. We can’t wait to hear from you! Let’s cultivate a community of winter radish enthusiasts!
Frequently Asked Questions (FAQs)
What are the best radish varieties to grow in winter?
Several radish varieties thrive in cooler temperatures and are well-suited for winter gardening. Some excellent choices include:
* **’Cherry Belle’:** A classic, fast-maturing variety with bright red, round roots and a mild flavor.
* **’French Breakfast’:** An elongated radish with a mild, slightly sweet flavor. It’s known for its quick growth and crisp texture.
* **’Sparkler’:** A round radish with a vibrant red top and a white tip. It has a slightly peppery flavor and matures quickly.
* **’Black Spanish’:** A winter radish with a black skin and white flesh. It has a strong, pungent flavor and stores well.
* **’Daikon’:** A long, white radish with a mild, slightly sweet flavor. It’s often used in Asian cuisine and can be grown throughout the winter in milder climates.
* **’Easter Egg’:** A mix of radishes in various colors, including red, pink, purple, and white. They offer a fun and colorful addition to your winter garden.The best variety for you will depend on your personal preferences and growing conditions. Consider trying a few different varieties to see which ones perform best in your garden.
How much sunlight do radishes need in winter?
Radishes need at least 6 hours of direct sunlight per day to thrive. In winter, sunlight can be limited, so it’s important to choose a sunny location for your radish garden. If you don’t have a sunny spot, you can supplement with grow lights. Position the grow lights a few inches above the plants and keep them on for 12-14 hours per day.
What kind of soil is best for growing radishes in winter?
Radishes prefer well-drained, loose soil that is rich in organic matter. Amend your soil with compost or well-rotted manure before planting to improve drainage and fertility. The ideal soil pH for radishes is between 6.0 and 7.0. Avoid heavy clay soils, as they can inhibit root development.
How often should I water my radishes in winter?
Water radishes regularly, especially during dry spells. Keep the soil consistently moist, but avoid overwatering, which can lead to root rot. Water deeply when the top inch of soil feels dry to the touch. In winter, you may need to water less frequently than in summer, as the soil will retain moisture for longer.
How do I protect my radishes from frost in winter?
Frost can damage or kill radishes, so it’s important to protect them during cold snaps. Cover your radish plants with a frost blanket or row cover when temperatures are expected to drop below freezing. You can also grow radishes in a cold frame or greenhouse to provide extra protection from the elements.
When are radishes ready to harvest?
Radishes are typically ready to harvest in 3-4 weeks, depending on the variety and growing conditions. Check the seed packet for specific maturity dates. Harvest radishes when they reach the desired size, as they can become woody and bitter if left in the ground too long. Gently pull the radishes from the soil, or use a garden fork to loosen the soil around the roots.
Can I grow radishes in containers in winter?
Yes, radishes are well-suited for container gardening. Choose a container that is at least 6 inches deep and has drainage holes. Fill the container with a well-draining potting mix and plant the radish seeds according to the instructions on the seed packet. Place the container in a sunny location or under grow lights.
What are some common pests and diseases that affect radishes?
Radishes are generally pest-resistant, but they can be susceptible to certain pests and diseases, including:
* **Flea beetles:** Small, jumping beetles that chew holes in the leaves.
* **Root maggots:** Fly larvae that feed on the roots of radishes.
* **Clubroot:** A fungal disease that causes swollen, distorted roots.To prevent pests and diseases, practice good garden hygiene, such as removing plant debris and rotating crops. You can also use organic pest control methods, such as insecticidal soap or neem oil.
Can I eat radish greens?
Yes, radish greens are edible and nutritious. They have a peppery flavor similar to the roots. Use them in salads, soups, or stir-fries. Harvest the greens when they are young and tender.
How do I store radishes after harvesting?
Remove the greens from the radishes and store them separately in the refrigerator. Place the radishes in a plastic bag or container with a damp paper towel to keep them crisp. Radishes can be stored in the refrigerator for up to 2 weeks.

Leave a Comment