

Water spinach low maintenance? Absolutely! And I’m here to tell you that growing your own delicious, leafy greens doesn’t have to be a chore. Forget spending hours toiling in the garden; with a few clever tricks and DIY hacks, you can enjoy a thriving water spinach patch with minimal effort.
Water spinach, also known as kangkong or ong choy, has been a staple in Southeast Asian cuisine for centuries. Its popularity stems not only from its delicious flavor but also from its incredible adaptability and rapid growth. Imagine harvesting fresh, crisp greens right from your backyard, knowing exactly where they came from and what went into growing them. That’s the beauty of home gardening!
In today’s busy world, who has time for complicated gardening routines? That’s where these DIY tricks come in. I’m going to share some simple, yet effective methods to ensure your water spinach low maintenance garden flourishes. From clever container ideas to natural pest control solutions, these hacks will save you time, money, and effort, all while providing you with a bountiful harvest. Ready to get your hands dirty (just a little bit!) and discover the joy of effortless gardening? Let’s dive in!
Growing Water Spinach (Kangkong) at Home: A Beginner’s Guide
Hey there, fellow gardening enthusiasts! I’m super excited to share my experience with growing water spinach, also known as kangkong or ong choy, right in my backyard. It’s surprisingly easy, incredibly rewarding, and you’ll have a constant supply of fresh, delicious greens. Plus, it’s a low-maintenance dream! Let’s dive in!
What You’ll Need
Before we get started, let’s gather all the necessary supplies. Trust me, having everything ready beforehand will make the whole process smoother.
* Water Spinach Seeds or Cuttings: You can find these online, at Asian grocery stores, or even from a friend who already grows it. Cuttings are a faster way to get started.
* A Large Container or Tub: Think big! Water spinach loves space. A container at least 12 inches deep and wide is ideal.
* Potting Mix: A good quality potting mix is crucial. I prefer a mix that retains moisture well but also drains adequately.
* Water: Obviously! You’ll need a consistent supply of water, as the name suggests, water spinach loves water.
* Fertilizer (Optional): A balanced liquid fertilizer can boost growth, but it’s not strictly necessary.
* Sunlight: Water spinach needs at least 6 hours of sunlight per day.
* Gardening Gloves: To keep your hands clean and protected.
* Watering Can or Hose: For easy watering.
* Scissors or Pruning Shears: For harvesting.
Choosing Your Growing Method: Seeds vs. Cuttings
You have two main options for starting your water spinach journey: seeds or cuttings. Both are effective, but cuttings offer a quicker route to harvest.
* Seeds: Starting from seeds takes a bit longer, but it’s a fun and rewarding process. You’ll need to germinate the seeds before planting them.
* Cuttings: Using cuttings is faster and easier. Simply take cuttings from an existing water spinach plant and root them in water.
Germinating Water Spinach Seeds (If Using Seeds)
If you’re starting from seeds, here’s how to germinate them:
1. Soak the Seeds: Place the water spinach seeds in a bowl of warm water and let them soak for 24 hours. This helps soften the seed coat and encourages germination.
2. Prepare a Seed Tray or Small Pots: Fill a seed tray or small pots with moist potting mix.
3. Sow the Seeds: Sow the seeds about 1/2 inch deep in the potting mix.
4. Water Gently: Water the soil gently to avoid disturbing the seeds.
5. Cover with Plastic Wrap: Cover the seed tray or pots with plastic wrap to create a humid environment.
6. Place in a Warm Location: Place the seed tray or pots in a warm location with indirect sunlight.
7. Keep the Soil Moist: Check the soil daily and water as needed to keep it moist but not waterlogged.
8. Wait for Germination: The seeds should germinate in about 7-14 days. Once the seedlings emerge, remove the plastic wrap.
Rooting Water Spinach Cuttings (If Using Cuttings)
If you’re using cuttings, here’s how to root them:
1. Take Cuttings: Take cuttings from a healthy water spinach plant. The cuttings should be about 6-8 inches long and have at least 2-3 nodes (the points where leaves grow).
2. Remove Lower Leaves: Remove the leaves from the bottom 2 inches of the cuttings.
3. Place in Water: Place the cuttings in a glass or jar of water, making sure the nodes are submerged.
4. Change the Water Regularly: Change the water every 1-2 days to prevent bacterial growth.
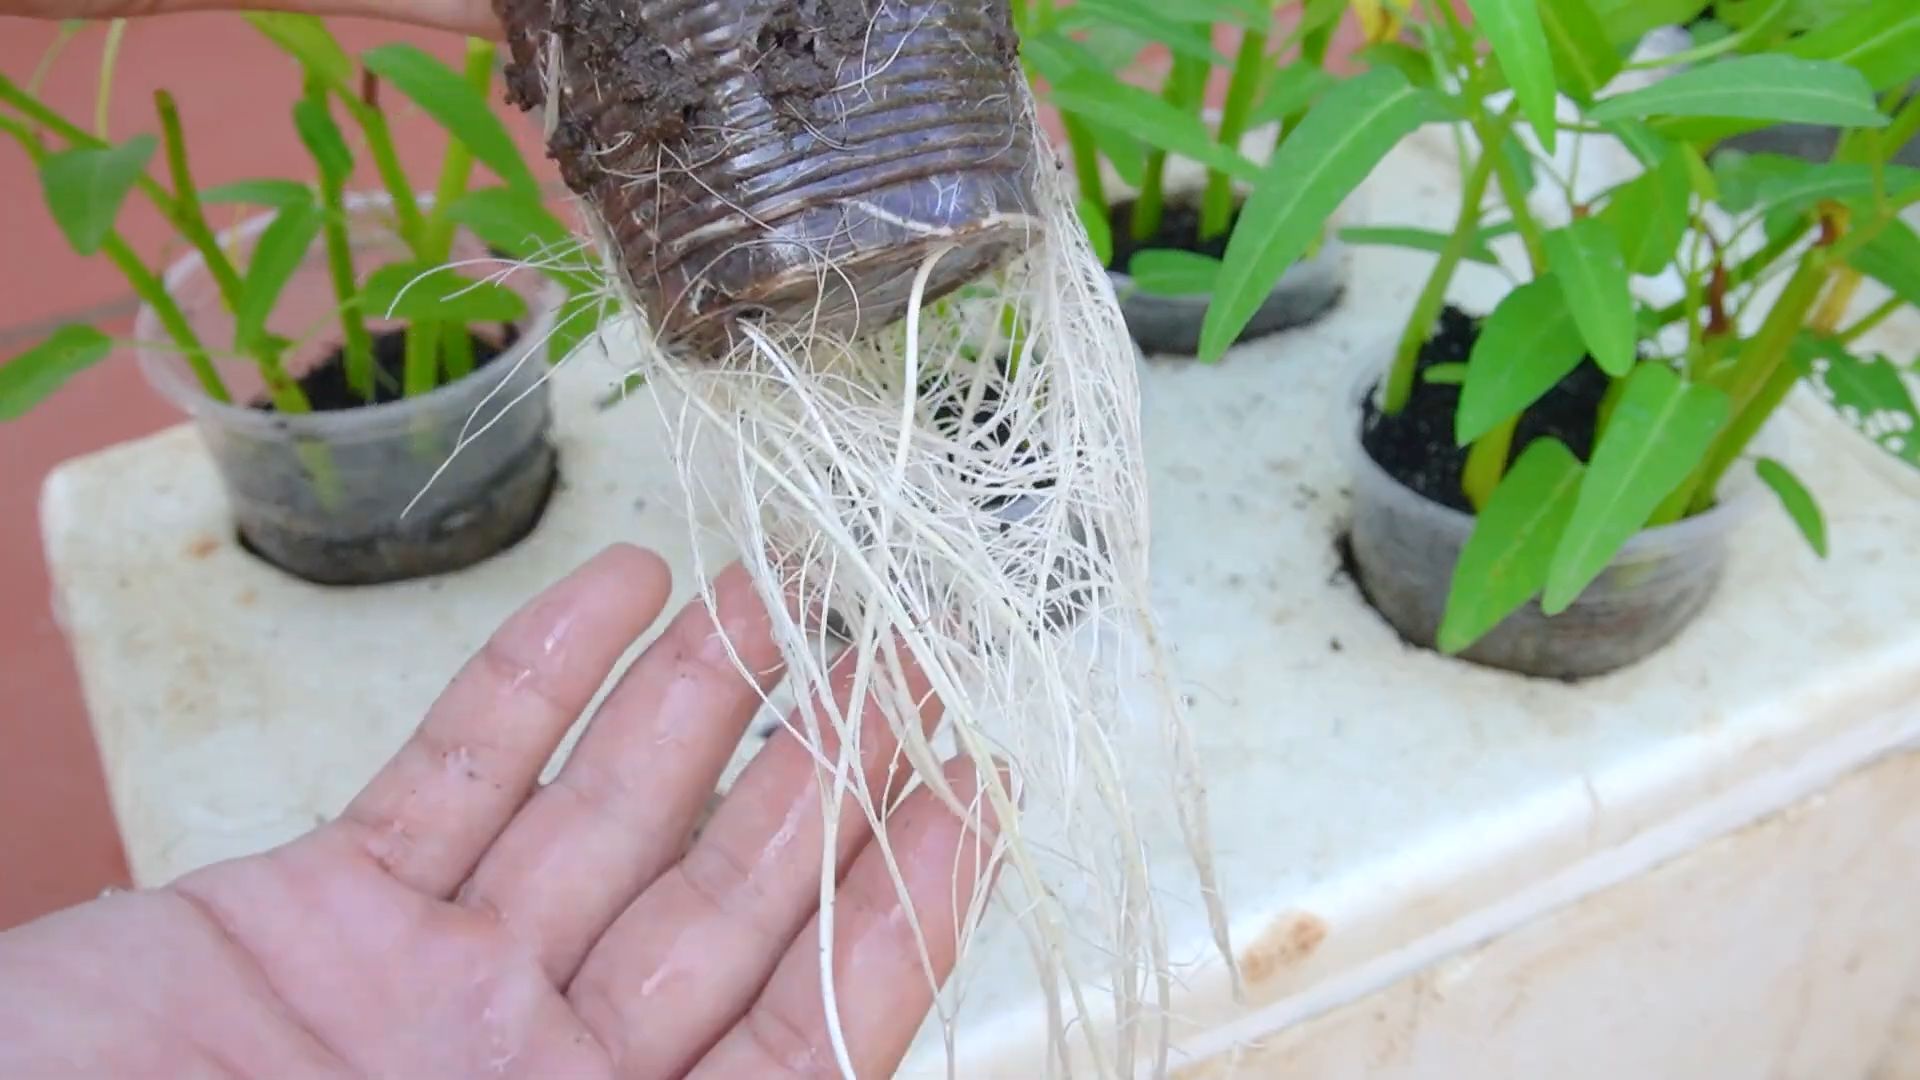
5. Wait for Roots to Develop: Roots should start to develop in about 5-7 days.
6. Plant the Cuttings: Once the roots are about 1-2 inches long, you can plant the cuttings in your container.
Planting Your Water Spinach
Now comes the fun part – planting! Whether you’re using seedlings or rooted cuttings, the process is similar.
1. Prepare Your Container: Fill your large container with potting mix, leaving about 2 inches of space at the top.
2. Create Planting Holes: Dig small holes in the potting mix, spaced about 6-8 inches apart.
3. Plant the Seedlings or Cuttings: Gently remove the seedlings from the seed tray or the rooted cuttings from the water and place them in the planting holes.
4. Cover the Roots: Cover the roots with potting mix and gently firm the soil around the plants.
5. Water Thoroughly: Water the plants thoroughly after planting.
Caring for Your Water Spinach
Water spinach is relatively low-maintenance, but here are a few tips to keep it thriving:
* Watering: Water spinach loves water, so keep the soil consistently moist. You can even partially submerge the container in water, creating a bog-like environment. I usually water mine every day, especially during hot weather.
* Sunlight: Ensure your water spinach gets at least 6 hours of sunlight per day. If you don’t have enough sunlight, you can supplement with grow lights.
* Fertilizing (Optional): If you want to boost growth, you can fertilize your water spinach every 2-3 weeks with a balanced liquid fertilizer. Follow the instructions on the fertilizer label. I personally use a diluted seaweed emulsion.
* Pruning: Pruning encourages bushier growth. Pinch off the tips of the stems regularly to promote branching.
* Pest Control: Water spinach is generally pest-resistant, but keep an eye out for aphids or other common garden pests. If you spot any pests, you can spray them with insecticidal soap or neem oil.
* Weeding: Remove any weeds that may grow in the container.
Harvesting Your Water Spinach
Harvesting is the most rewarding part! You can start harvesting your water spinach about 4-6 weeks after planting.
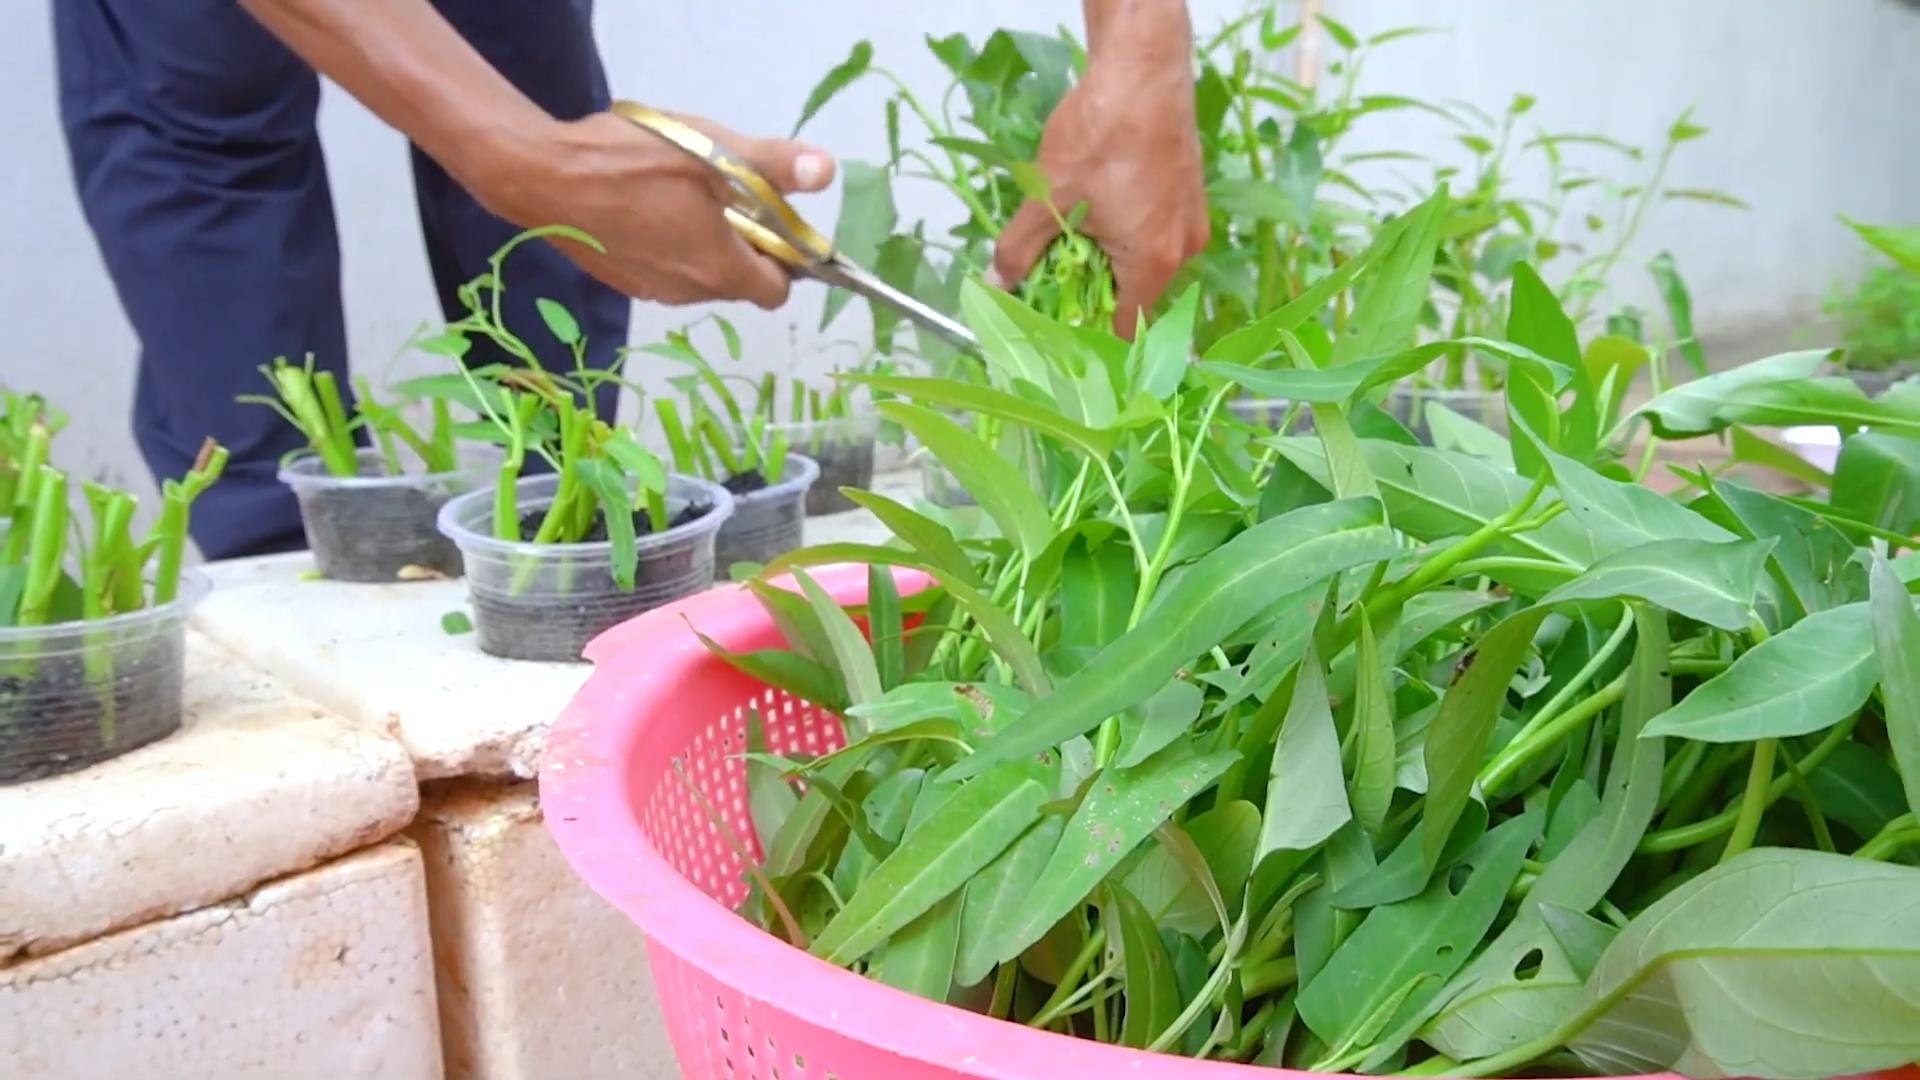
1. Harvesting Stems: Use scissors or pruning shears to cut the stems about 6-8 inches from the top.
2. Harvesting Regularly: Harvest regularly to encourage continued growth. The more you harvest, the more it will grow!
3. Enjoy Your Harvest: Water spinach is delicious stir-fried, steamed, or added to soups and salads.
Troubleshooting
Even with the best care, you might encounter a few challenges. Here are some common issues and how to address them:
* Yellowing Leaves: Yellowing leaves can indicate overwatering, underwatering, or nutrient deficiency. Adjust your watering schedule and consider fertilizing.
* Slow Growth: Slow growth can be caused by insufficient sunlight, poor soil, or lack of nutrients. Ensure your water spinach gets enough sunlight, use a good quality potting mix, and fertilize regularly.
* Pests: If you notice pests, treat them with insecticidal soap or neem oil.
Tips for Success
Here are a few extra tips to help you succeed with growing water spinach:
* Choose the Right Container: Make sure your container is large enough to accommodate the plant’s growth.
* Use Good Quality Potting Mix: A good quality potting mix will provide the necessary nutrients and drainage.
* Water Regularly: Water spinach needs consistent moisture, so water regularly, especially during hot weather.
* Provide Plenty of Sunlight: Water spinach needs at least 6 hours of sunlight per day.
* Harvest Regularly: Harvesting regularly encourages continued growth.
* Don’t Be Afraid to Experiment: Gardening is all about experimentation. Don’t be afraid to try different things and see what works best for you.
Enjoying Your Homegrown Water Spinach
Growing your own water spinach is a fantastic way to enjoy fresh, healthy greens right from your backyard. It’s a low-maintenance plant that’s easy to grow, even for beginners. So, give it a try and enjoy the delicious rewards! I hope this guide has been helpful. Happy gardening!
Conclusion
So, there you have it! Cultivating your own thriving patch of water spinach, also known as ong choy, doesn’t require a green thumb or a sprawling garden. This simple, effective DIY trick unlocks a world of fresh, delicious, and nutritious greens right at your fingertips. Forget expensive grocery store prices and questionable freshness; with minimal effort, you can enjoy a constant supply of this versatile vegetable.
Why is this a must-try? Because it’s incredibly easy, cost-effective, and rewarding. You’re not just growing food; you’re connecting with nature, reducing your carbon footprint, and ensuring you have access to healthy ingredients. The satisfaction of harvesting your own water spinach and using it in your favorite stir-fries, soups, or salads is truly unparalleled. Plus, it’s a fantastic conversation starter! Imagine telling your friends and family that you grew that delicious dish yourself.
But the beauty of this DIY approach lies in its adaptability. Feel free to experiment with different containers. While a simple bucket works wonders, you could also use a repurposed plastic tub, a large ceramic pot, or even a section of your garden dedicated to water spinach cultivation. Consider adding a small, slow-release fertilizer to the water to boost growth, but be mindful not to over-fertilize. Organic options are always best!
Another variation to consider is the growing location. While water spinach thrives in sunny spots, it can also tolerate partial shade, especially in hotter climates. Observe your plants and adjust their location accordingly to ensure they receive the optimal amount of sunlight. You can also try growing different varieties of water spinach. Some varieties have broader leaves, while others have thinner stems. Experiment to find your favorite!
Don’t be afraid to get creative with your water spinach cultivation. You can even try propagating new plants from cuttings of your existing ones, effectively multiplying your harvest. This is a great way to share your bounty with friends and neighbors or simply expand your own water spinach empire.
Ultimately, this DIY trick is about empowering you to take control of your food source and enjoy the benefits of fresh, homegrown produce. It’s about simplifying the process and making it accessible to everyone, regardless of their gardening experience.
We wholeheartedly encourage you to give this DIY water spinach cultivation method a try. It’s a fun, educational, and incredibly rewarding experience. And most importantly, don’t forget to share your journey with us! We’d love to hear about your successes, challenges, and any variations you’ve discovered along the way. Post pictures of your thriving water spinach plants, share your favorite recipes, and let’s create a community of water spinach enthusiasts! Your experiences can inspire others to embark on their own gardening adventures and discover the joy of growing their own food. So, grab a bucket, some water, and a handful of water spinach cuttings, and get ready to experience the magic of homegrown goodness. You won’t regret it! Remember, mastering the art of growing your own **water spinach** is easier than you think!
Frequently Asked Questions (FAQ)
What exactly is water spinach, and what does it taste like?
Water spinach (Ipomoea aquatica), also known as ong choy, morning glory, or swamp cabbage, is a semi-aquatic leafy green vegetable popular in Asian cuisine. It has long, hollow stems and arrow-shaped leaves. The taste is mild and slightly sweet, with a subtle nutty flavor. It’s often compared to spinach but with a more delicate texture and a slightly more pronounced flavor. It’s incredibly versatile and can be used in stir-fries, soups, salads, and even as a side dish.
How long does it take for water spinach to grow using this DIY method?
One of the great things about water spinach is its rapid growth rate. Under optimal conditions (warm temperatures and plenty of sunlight), you can expect to start harvesting leaves within 3-4 weeks of planting cuttings. The plant will continue to produce new growth as long as it’s properly maintained. Regular harvesting actually encourages further growth, so don’t be shy about snipping off those delicious leaves!
What kind of water should I use for growing water spinach?
Tap water is generally fine for growing water spinach, but it’s best to let it sit out for 24 hours to allow any chlorine to dissipate. You can also use rainwater or well water. Avoid using water that is heavily contaminated with chemicals or pollutants. Regularly changing the water (every 1-2 weeks) is also important to prevent the buildup of algae and maintain a healthy growing environment.
How much sunlight does water spinach need?
Water spinach thrives in full sun, requiring at least 6-8 hours of direct sunlight per day. However, it can also tolerate partial shade, especially in hotter climates. If you live in a region with intense summer heat, providing some afternoon shade can help prevent the leaves from scorching. Observe your plants and adjust their location accordingly to ensure they receive the optimal amount of sunlight.
Do I need to add fertilizer to the water?
While water spinach can grow without fertilizer, adding a small amount of fertilizer can significantly boost growth and yield. Use a balanced, water-soluble fertilizer, following the instructions on the package. Organic options, such as compost tea or diluted fish emulsion, are also excellent choices. Be careful not to over-fertilize, as this can lead to excessive growth and a less flavorful product. A little goes a long way!
How often should I change the water in the container?
It’s recommended to change the water in your water spinach container every 1-2 weeks. This helps to prevent the buildup of algae and maintain a healthy growing environment. When changing the water, be sure to gently rinse the roots of the plants to remove any debris.
How do I harvest water spinach?
Harvesting water spinach is easy! Simply use scissors or a sharp knife to cut the stems about 4-6 inches from the top. The plant will continue to produce new growth from the cut stems. Regular harvesting encourages further growth and ensures a continuous supply of fresh leaves.
Can I grow water spinach indoors?
Yes, you can grow water spinach indoors, but you’ll need to provide adequate lighting. A sunny windowsill or a grow light can provide the necessary light for healthy growth. Be sure to rotate the plants regularly to ensure even exposure to light.
Is water spinach safe to eat?
Water spinach is generally safe to eat, but it’s important to source it from a reputable source or grow it yourself to ensure it’s free from contaminants. Avoid harvesting water spinach from polluted waterways or areas where pesticides have been used. Thoroughly wash the leaves before eating.
Can I propagate water spinach from cuttings?
Absolutely! Propagating water spinach from cuttings is a simple and effective way to multiply your plants. Simply take a cutting from a mature stem, about 6-8 inches long, and remove the lower leaves. Place the cutting in a glass of water, and roots will typically develop within a few days. Once the roots are about an inch long, you can transplant the cutting into your water spinach container.
What are some common pests and diseases that affect water spinach?
Water spinach is generally resistant to pests and diseases, but it can occasionally be affected by aphids, spider mites, or fungal diseases. Regularly inspect your plants for any signs of infestation or disease. If you notice any problems, treat them promptly with an appropriate organic pesticide or fungicide. Good air circulation and proper watering can also help prevent these issues.
How do I store harvested water spinach?
Harvested water spinach is best used fresh, but it can be stored in the refrigerator for a few days. Wrap the leaves in a damp paper towel and place them in a plastic bag. This will help to keep them fresh and prevent them from wilting.
Can I grow water spinach in colder climates?
Water spinach is a tropical plant and thrives in warm temperatures. It can be grown in colder climates during the summer months, but it will likely need to be brought indoors during the winter. You can also grow it in a greenhouse or other protected environment to extend the growing season.
What are some delicious ways to cook water spinach?
Water spinach is incredibly versatile and can be used in a variety of dishes. It’s commonly stir-fried with garlic, chili peppers, and soy sauce. It can also be added to soups, stews, and salads. Some popular dishes include stir-fried water spinach with shrimp paste (belacan), water spinach soup with tofu, and water spinach salad with peanut dressing. The possibilities are endless!

Leave a Comment