

DIY chili pepper garden: Ready to turn up the heat in your backyard? I’m so excited to share some simple, yet effective, DIY tricks that will have you harvesting a fiery bounty of chili peppers in no time! Forget those bland, store-bought peppers – imagine the satisfaction of plucking vibrant, flavorful chilies straight from your own garden.
Chili peppers have a rich and fascinating history, dating back thousands of years to South America. They weren’t just a food source; they held cultural significance, used in rituals and even as medicine. Today, they’re a global culinary staple, adding zest and depth to dishes around the world. But why settle for just buying them when you can grow your own, tailored to your exact spice preference?
Let’s face it, gardening can sometimes feel intimidating, especially when you’re aiming for something specific like a thriving DIY chili pepper garden. That’s where these DIY hacks come in! I’ll walk you through easy-to-implement strategies for everything from choosing the right chili varieties for your climate to creating the perfect soil mix and warding off pesky pests. These aren’t just gardening tips; they’re shortcuts to success, designed to help you cultivate a pepper paradise, regardless of your experience level. So, grab your gardening gloves, and let’s get started on this spicy adventure!

DIY Chili Pepper Garden: From Seed to Sizzle!
Hey there, fellow spice enthusiasts! Ever dreamt of having a fiery arsenal of chili peppers right at your fingertips? Well, you’ve come to the right place! I’m going to walk you through creating your very own chili pepper garden, from the very beginning – starting with seeds! Get ready to add some serious heat to your cooking!
Choosing Your Chili Pepper Varieties
Before we dive into the nitty-gritty, let’s talk peppers! The world of chili peppers is vast and exciting. Think about what kind of heat you’re after and how you plan to use your peppers.
Here are a few popular choices to get you started:
* **Jalapeño:** A classic, mild heat, perfect for stuffing, pickling, or adding a kick to your nachos.
* **Serrano:** A step up in heat from jalapeños, great for salsas and sauces.
* **Cayenne:** These thin, red peppers pack a punch and are often dried and ground into powder.
* **Habanero:** Proceed with caution! These little guys are seriously hot and fruity, ideal for those who love intense flavor.
* **Ghost Pepper (Bhut Jolokia):** For the truly adventurous! One of the hottest peppers in the world, use sparingly!
* **Bell Pepper:** Okay, okay, not technically a chili, but a great addition for color and sweetness!
Once you’ve chosen your varieties, you can purchase seeds online, at your local garden center, or even save seeds from peppers you’ve bought at the store (though the results might be a little unpredictable).
Starting Your Seeds Indoors
Starting your chili pepper seeds indoors gives them a head start, especially if you live in a region with a shorter growing season. I usually start mine about 6-8 weeks before the last expected frost.
Here’s what you’ll need:
* Chili pepper seeds
* Seed starting trays or small pots
* Seed starting mix (a light, sterile soil mix)
* Spray bottle
* Heat mat (optional, but highly recommended)
* Grow light (optional, but helpful)
* Clear plastic dome or plastic wrap
Now, let’s get planting!
1. **Prepare Your Seed Starting Trays:** Fill your seed starting trays or pots with seed starting mix. Gently tap the trays to settle the soil.
2. **Sow Your Seeds:** Make a small indentation (about ¼ inch deep) in the center of each cell or pot. Place 2-3 seeds in each indentation. This increases your chances of germination.
3. **Cover the Seeds:** Gently cover the seeds with seed starting mix.
4. **Water Carefully:** Use a spray bottle to lightly mist the soil. You want to moisten the soil without overwatering it.
5. **Provide Warmth:** Place your seed starting trays on a heat mat. Chili pepper seeds germinate best in warm temperatures (around 80-85°F).
6. **Maintain Humidity:** Cover the trays with a clear plastic dome or plastic wrap to create a humid environment. This helps the seeds germinate.
7. **Provide Light:** If you’re using a grow light, position it a few inches above the trays. If not, place the trays in a warm, sunny location.
8. **Monitor and Water:** Check the trays daily and mist the soil as needed to keep it moist. Don’t let the soil dry out completely.
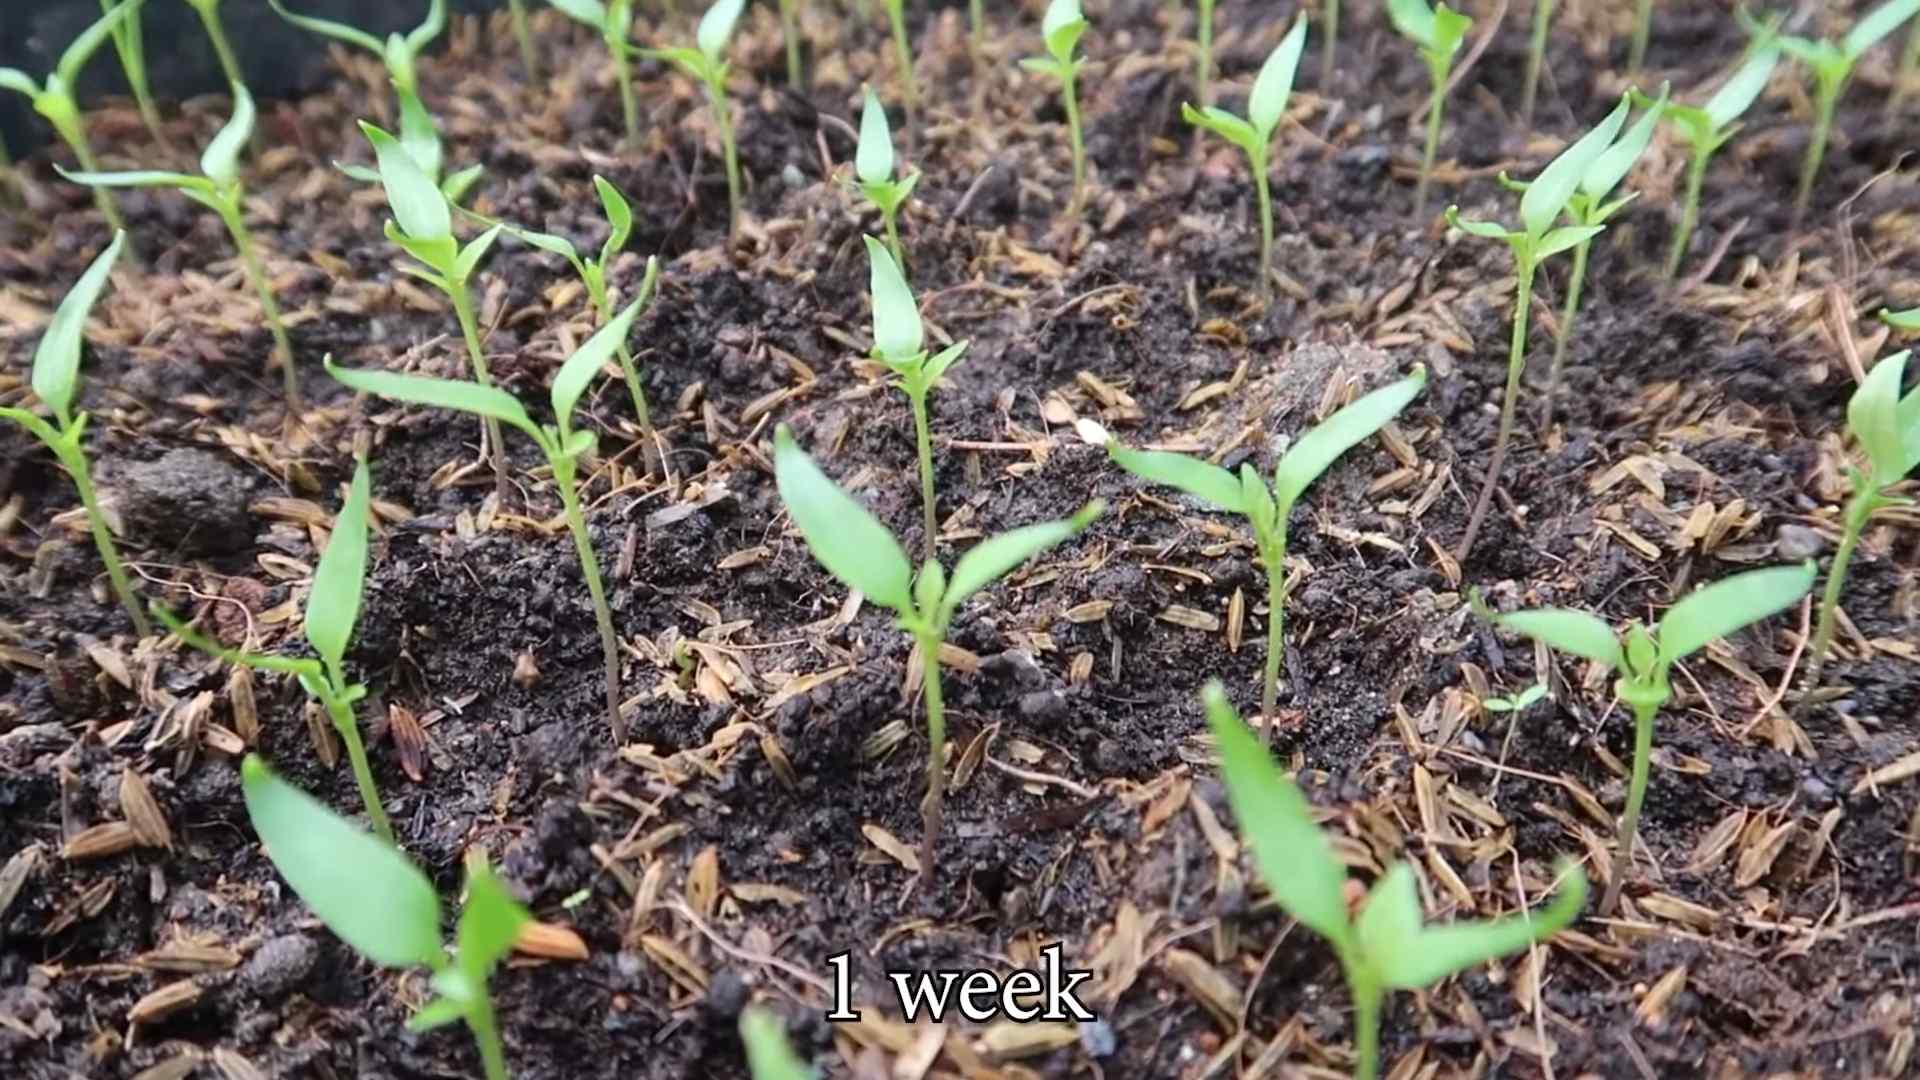
9. **Remove the Dome:** Once the seeds germinate (usually within 7-14 days), remove the plastic dome or plastic wrap.
10. **Thin Seedlings:** Once the seedlings have their first true leaves (the second set of leaves that appear after the initial seed leaves), thin them out by snipping off the weaker seedlings at the soil line. Leave only one strong seedling per cell or pot.
Transplanting Your Seedlings
Once your seedlings have grown a few inches tall and the weather outside has warmed up (after the last frost), it’s time to transplant them into larger pots or directly into your garden.
Here’s what you’ll need:
* Larger pots (if you’re not planting directly in the garden)
* Potting mix (for pots) or garden soil (for the garden)
* Trowel
* Watering can
* Fertilizer (optional)
Let’s get transplanting!
1. **Harden Off Your Seedlings:** Before transplanting, you need to “harden off” your seedlings. This means gradually exposing them to outdoor conditions to help them acclimate. Start by placing them outside in a sheltered location for an hour or two each day, gradually increasing the amount of time they spend outdoors over the course of a week.
2. **Prepare Your Pots or Garden Bed:** If you’re planting in pots, fill them with potting mix. If you’re planting in the garden, choose a sunny location with well-drained soil. Amend the soil with compost or other organic matter to improve its fertility.
3. **Carefully Remove the Seedlings:** Gently remove the seedlings from their seed starting trays or pots. Be careful not to damage the roots.
4. **Plant the Seedlings:** Dig a hole in the potting mix or garden soil that is large enough to accommodate the root ball. Place the seedling in the hole and gently backfill with soil.
5. **Water Thoroughly:** Water the seedlings thoroughly after planting.
6. **Fertilize (Optional):** If you want to give your seedlings a boost, you can fertilize them with a balanced fertilizer. Follow the instructions on the fertilizer package.
Caring for Your Chili Pepper Plants
Now that your chili pepper plants are in their new homes, it’s time to provide them with the care they need to thrive.
Here are some tips for caring for your chili pepper plants:
* **Sunlight:** Chili pepper plants need at least 6-8 hours of sunlight per day.
* **Watering:** Water your plants regularly, especially during hot, dry weather. Allow the soil to dry out slightly between waterings. Avoid overwatering, as this can lead to root rot.
* **Fertilizing:** Fertilize your plants every few weeks with a balanced fertilizer. You can also use a fertilizer specifically formulated for peppers.
* **Pruning:** Pruning your chili pepper plants can help them produce more fruit. Pinch off the tips of the branches to encourage branching.
* **Pest Control:** Keep an eye out for pests such as aphids, spider mites, and whiteflies. Treat infestations promptly with insecticidal soap or other organic pest control methods.
* **Support:** Some chili pepper varieties, especially those with heavy fruit, may need support. Use stakes or cages to prevent the branches from breaking.
Harvesting Your Chili Peppers
The moment you’ve been waiting for! Harvesting your chili peppers is the most rewarding part of the process.
Here are some tips for harvesting your chili peppers:
* **Timing:** The timing of your harvest will depend on the variety of chili pepper you’re growing and your personal preference. Generally, chili peppers are ready to harvest when they have reached their mature color and size.
* **Tools:** Use pruning shears or scissors to cut the peppers from the plant.
* **Handling:** Be careful when handling hot chili peppers. Wear gloves to protect your skin from the oils that can cause burning.
* **Storage:** You can store your chili peppers in the refrigerator for several weeks. You can also dry them, freeze them, or pickle them.
Troubleshooting Common Problems
Even with the best care, you might encounter some problems while growing your chili peppers. Here are a few common issues and how to address them:
* **Blossom End Rot:** This is a condition where the bottom of the pepper turns black and leathery. It’s usually caused by a calcium deficiency. To prevent blossom end rot, make sure your soil is rich in calcium and water your plants consistently.
* **Aphids:** These tiny insects can suck the sap from your plants, causing them to weaken and become distorted. Treat infestations with insecticidal soap or neem oil.
* **Spider Mites:** These tiny pests can cause yellowing and stippling on the leaves. Treat infestations with insecticidal soap or neem oil.
* **Lack of Fruit Set:** If your chili pepper plants are flowering but not producing fruit, it could be due to a lack of pollination. You can hand-pollinate the flowers by gently brushing them with a small paintbrush. Temperature extremes can also affect fruit set.
Enjoying Your Homegrown Chili Peppers
Congratulations! You’ve successfully grown your own chili peppers! Now it’s time to enjoy the fruits (or should I say, peppers!) of your labor.
Here are just a few ways to use your homegrown chili peppers:
* **Salsas:** Add them to your favorite salsa recipe for a spicy kick.
* **Sauces:** Make your own hot sauce or chili oil.
* **Stews and Soups:** Add them to stews and soups for extra flavor and heat.
* **Pickling:** Pickle them for a tangy and spicy
Conclusion
So, there you have it! Creating your own DIY chili pepper garden isn’t just a fun project; it’s a gateway to a world of fresh, flavorful possibilities. Imagine stepping outside your door and harvesting the perfect chili for your next culinary masterpiece. No more bland supermarket peppers lacking that fiery kick! This is about taking control of your spice rack and enjoying the satisfaction of growing your own ingredients.
Why is this a must-try? Because it’s economical, sustainable, and incredibly rewarding. Store-bought chili peppers can be expensive, especially if you’re looking for specific varieties. With a DIY chili pepper garden, you can cultivate a diverse range of peppers, from mild Anaheims to scorching Scotch Bonnets, all for a fraction of the cost. Plus, you’re reducing your carbon footprint by eliminating the need for transportation and packaging.
But the real magic lies in the freshness. Homegrown chili peppers boast an unparalleled vibrancy and flavor that you simply can’t find in commercially grown produce. The moment you pluck a ripe chili from your plant, you’re capturing its peak flavor, ready to infuse your dishes with an authentic, fiery zest.
Looking for variations? Absolutely! Consider these ideas to personalize your DIY chili pepper garden:
* **Container Gardening:** If you’re short on space, container gardening is your best friend. Choose pots that are at least 12 inches in diameter to give your chili plants ample room to grow.
* **Vertical Gardening:** Maximize your space with a vertical garden. Use hanging baskets, stacked planters, or even repurposed pallets to create a stunning display of chili peppers.
* **Companion Planting:** Enhance your chili pepper garden by planting companion plants like basil, tomatoes, and carrots. These plants can help deter pests, improve soil health, and even enhance the flavor of your chili peppers.
* **Hydroponics:** For a more advanced approach, explore hydroponic gardening. This method involves growing chili peppers in nutrient-rich water without soil. It’s a great option for indoor gardening and can result in faster growth and higher yields.
* Experiment with different varieties! Don’t limit yourself to just one type of chili pepper. Try growing a mix of mild, medium, and hot peppers to cater to your taste preferences.
We’re confident that you’ll love the experience of growing your own chili peppers. It’s a fantastic way to connect with nature, learn new skills, and elevate your cooking. So, grab your seeds, soil, and gardening gloves, and get ready to embark on a spicy adventure!
We encourage you to try this DIY chili pepper garden project and share your experiences with us. Post photos of your chili plants, share your favorite recipes using your homegrown peppers, and let us know what challenges you encountered and how you overcame them. Your feedback will help us improve this guide and inspire others to create their own thriving chili pepper gardens. Let’s build a community of chili pepper enthusiasts!
Frequently Asked Questions (FAQ)
What are the best chili pepper varieties to grow for beginners?
For beginners, it’s best to start with easier-to-grow varieties that are relatively mild and forgiving. Some excellent choices include:
* **Anaheim:** These peppers are mild and versatile, perfect for stuffing, roasting, or adding to salsas.
* **Poblano:** Another mild option with a rich, smoky flavor. They’re commonly used in chili rellenos.
* **Jalapeño:** A classic choice with a moderate level of heat. They’re great for pickling, adding to nachos, or making poppers.
* **Serrano:** Slightly hotter than jalapeños, serranos are a good option for those who want a bit more kick.
* **Hungarian Wax:** These peppers offer a mild to medium heat and are often used in pickled form or added to salads.
These varieties are generally more resistant to pests and diseases and don’t require as much specialized care as some of the hotter, more exotic chili peppers. As you gain experience, you can gradually experiment with more challenging varieties.
How much sunlight do chili pepper plants need?
Chili pepper plants thrive in full sun, requiring at least 6-8 hours of direct sunlight per day. Insufficient sunlight can lead to leggy growth, reduced flowering, and smaller, less flavorful peppers. If you’re growing your chili peppers indoors, supplement with grow lights to ensure they receive adequate light. Position the grow lights about 6-12 inches above the plants and keep them on for 14-16 hours per day.
What type of soil is best for growing chili peppers?
Chili peppers prefer well-draining soil that is rich in organic matter. A slightly acidic to neutral pH (around 6.0-7.0) is ideal. You can improve the soil by adding compost, aged manure, or other organic amendments. Avoid heavy clay soils, as they can retain too much water and lead to root rot. If you’re growing in containers, use a high-quality potting mix specifically formulated for vegetables.
How often should I water my chili pepper plants?
Water your chili pepper plants regularly, especially during hot, dry weather. The soil should be kept consistently moist but not waterlogged. Water deeply whenever the top inch of soil feels dry to the touch. Avoid overhead watering, as this can promote fungal diseases. Instead, water at the base of the plant. During cooler weather, you can reduce the frequency of watering.
What are some common pests and diseases that affect chili pepper plants, and how can I prevent them?
Common pests that affect chili pepper plants include aphids, spider mites, whiteflies, and pepper weevils. Diseases include fungal diseases like powdery mildew, blossom end rot, and verticillium wilt.
To prevent pests and diseases:
* **Inspect your plants regularly:** Check for signs of infestation or disease, such as yellowing leaves, spots, or webbing.
* **Use organic pest control methods:** Introduce beneficial insects like ladybugs or use insecticidal soap or neem oil to control pests.
* **Provide good air circulation:** Space your plants adequately to allow for good air circulation, which can help prevent fungal diseases.
* **Water properly:** Avoid overwatering and water at the base of the plant to prevent fungal diseases.
* **Practice crop rotation:** Rotate your crops each year to prevent soilborne diseases from building up.
* **Choose disease-resistant varieties:** Select chili pepper varieties that are known to be resistant to common diseases.
When is the best time to harvest chili peppers?
The best time to harvest chili peppers depends on the variety and your personal preference. Generally, chili peppers are ready to harvest when they have reached their mature color and size. The color will vary depending on the variety, ranging from green to red, yellow, orange, or even purple. The peppers should also feel firm and slightly waxy to the touch. You can use scissors or pruning shears to cut the peppers from the plant, leaving a small stem attached.
How can I store harvested chili peppers?
There are several ways to store harvested chili peppers:
* **Fresh:** Store fresh chili peppers in the refrigerator for up to a week.
* **Dried:** Dry chili peppers by stringing them together and hanging them in a well-ventilated area, or by using a dehydrator. Dried chili peppers can be stored in an airtight container for several months.
* **Frozen:** Freeze chili peppers whole or chopped. They can be stored in the freezer for up to a year.
* **Pickled:** Pickle chili peppers in vinegar or brine for a longer shelf life.
* **Infused Oil:** Infuse oil with chili peppers for a flavorful condiment.
Can I grow chili peppers indoors?
Yes, you can grow chili peppers indoors, but you’ll need to provide them with adequate light and warmth. Use grow lights to supplement natural sunlight and maintain a consistent temperature of around 70-80°F (21-27°C). Choose smaller chili pepper varieties that are well-suited for container gardening.
How do I increase the heat level of my chili peppers?
Several factors can influence the heat level of chili peppers:
* **Variety:** Different varieties of chili peppers have different levels of heat.
* **Growing conditions:** Stressful growing conditions, such as drought or nutrient deficiencies, can increase the heat level of chili peppers.
* **Harvest time:** Chili peppers tend to become hotter as they ripen.
* **Capsaicin content:** The capsaicin content of chili peppers is what determines their heat level.
To increase the heat level of your chili peppers, try growing hotter varieties, providing them with slightly stressful growing conditions, and harvesting them when they are fully ripe. Remember to handle hot chili peppers with care and wear gloves when handling them.
Leave a Comment